Virtual Keyboard: A S D F Keys
The original exercise builds four virtual keys—A S D F—and displays the pointer's clientX/clientY coordinates while appending the selected letter. It also explains screen.availWidth. Those learning goals and the original four-key facility are retained.
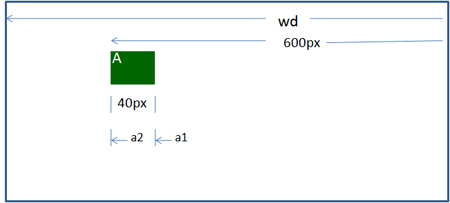
Modern Button-Based Virtual Keyboard Top ↑
Instead of guessing which key was clicked from screen-coordinate ranges, each key can be a real button. The click event still provides clientX and clientY, while the button's data-key gives the selected letter directly. This is more responsive and keyboard accessible.
<p id="coordinates" aria-live="polite"></p>
<p id="typed-keys" aria-label="Typed keys"></p>
<div class="virtual-keyboard" aria-label="Virtual keyboard">
  <button type="button" class="virtual-key" data-key="A">A</button>
  <button type="button" class="virtual-key" data-key="S">S</button>
  <button type="button" class="virtual-key" data-key="D">D</button>
  <button type="button" class="virtual-key" data-key="F">F</button>
</div>
.virtual-keyboard { display: flex; gap: 10px; flex-wrap: wrap; }
.virtual-key { width: 48px; height: 48px; background: #006040; color: white; border: 0; border-radius: 4px; }
.virtual-key:focus { outline: 3px solid #66afe9; outline-offset: 2px; }
const coordinateOutput = document.getElementById("coordinates");
const textOutput = document.getElementById("typed-keys");

for (const key of document.querySelectorAll(".virtual-key")) {
  key.addEventListener("click", (event) => {
    const letter = event.currentTarget.dataset.key;
    coordinateOutput.textContent = `X: ${event.clientX}  Y: ${event.clientY}`;
    textOutput.textContent += letter;
  });
}
Why the Original Screen-Range Technique Is Fragile Top ↑
// Historical idea: calculate four screen-coordinate ranges and infer A/S/D/F
// from event.clientX. This is fragile because screen.availWidth describes
// the screen, not the page layout, and the element positions change on
// responsive pages. Prefer attaching the event directly to each key button.
Complete Working Page Top ↑
<!doctype html><html lang="en"><head><meta charset="utf-8"><meta name="viewport" content="width=device-width, initial-scale=1"><title>ASDF virtual keyboard</title><style>.virtual-keyboard { display: flex; gap: 10px; flex-wrap: wrap; }
.virtual-key { width: 48px; height: 48px; background: #006040; color: white; border: 0; border-radius: 4px; }
.virtual-key:focus { outline: 3px solid #66afe9; outline-offset: 2px; }</style></head><body>
<p id="coordinates" aria-live="polite"></p>
<p id="typed-keys" aria-label="Typed keys"></p>
<div class="virtual-keyboard" aria-label="Virtual keyboard">
  <button type="button" class="virtual-key" data-key="A">A</button>
  <button type="button" class="virtual-key" data-key="S">S</button>
  <button type="button" class="virtual-key" data-key="D">D</button>
  <button type="button" class="virtual-key" data-key="F">F</button>
</div>
<script>const coordinateOutput = document.getElementById("coordinates");
const textOutput = document.getElementById("typed-keys");

for (const key of document.querySelectorAll(".virtual-key")) {
  key.addEventListener("click", (event) => {
    const letter = event.currentTarget.dataset.key;
    coordinateOutput.textContent = `X: ${event.clientX}  Y: ${event.clientY}`;
    textOutput.textContent += letter;
  });
}</script>
</body></html>
Event Handling onMouseOver and onMouseOut

Subhendu Mohapatra
Author & Instructor at plus2net
I write and maintain practical tutorials on Python, PHP, SQL, JavaScript, HTML, jQuery, and web development at plus2net. The tutorials focus on clear explanations, working examples, and code that readers can test and adapt while learning.


Subscribe to our YouTube Channel here
