Django: Inserting Form data to MySQL table
Displaying Form to take user input
We will create one web form to take input from users. This page we will keep inside our template directory as smo_temp/signup_student.html. To setup the template directory you can change the settings.py file.TEMPLATES = [
{
'BACKEND': 'django.template.backends.django.DjangoTemplates',
'DIRS': [os.path.join(BASE_DIR,'smo_temp')],
'APP_DIRS': True,
'OPTIONS': {
'context_processors': [
'django.template.context_processors.debug',
'django.template.context_processors.request',
'django.contrib.auth.context_processors.auth',
'django.contrib.messages.context_processors.messages',
],
},
},
]{% extends 'temp_basic.html' %}
{% block content %}
{{msg}}
<form action='signup_student_output' method=POST>
{% csrf_token %}
name :<input type=text name=name><br>
class :<input type=text name=class><br>
Mark :<input type=text name=mark><br>
Gender :<input type=text name=gender><br>
<input type=submit value=Submit>
</form>
{% endblock %}<html>
<head>
<title>This is basic template file </title>
</head>
<body>
{% block content %}
{% endblock %}
<br><br>
<center>Displayed by using template file temp_basic.html</center>
</body>
</html>Adding URL
Inside our apps directory we will use the urls.py file to add the path to our form.urls.py
from django.urls import path
from  . import views

# Create your views here.
urlpatterns=[
    path('',views.index,name='index'),
    path('student/signup_student',views.signup_student,name='signup_student'),
    path('student/signup_student_output',views.signup_student_output,name='signup_student_output2')
]
Creating table
In the Django framework we need not create our table by using SQL queries so we will write our model.model.py
from django.db import models
# Create your models here.
class student(models.Model):
    name =models.CharField(max_length=100)
    cl=models.CharField(max_length=10,db_column='class')
    mark =models.IntegerField()
    gender  =models.CharField(max_length=6)
    class Meta:
db_table='student'Watch the class Meta, here we are saying that the table name is student. If we don't use Meta then the name of the table will be <app_name>_student.
class Meta:
        db_table='student'
Database details ( MySQL )
Inside our settings.py keep login details like this.DATABASES = {
'default': {
'ENGINE': 'django.db.backends.mysql',
'NAME': 'database_name',
'USER' : 'userid_here',
'PASSWORD' :'password_here',
'HOST' : 'localhost'
}
}Migrations
We have to create migrations based on inputs we have in our Model. This is required for the first time to create the table and when we do any changes at Database side, Django keeps the history of changes. Wath the file created inside your migrations folder.At command prompt enter this.
python manage.py makemigrationspython manage.py migrate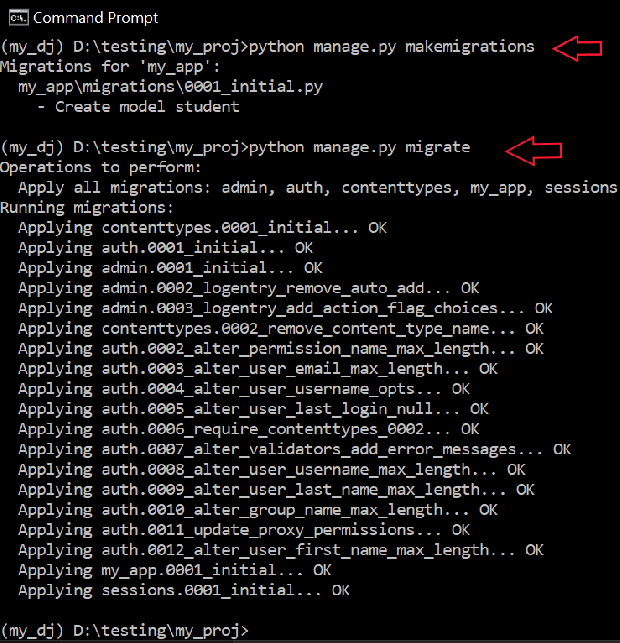
Once the migration is applied, Django will create some tables inside our MySQL database including our required table student.
Creating views
When user enters the url http://127.0.0.1:8000/my_app/student/signup_student in browser ( server is running ) , our urls.py page will send the request to our signup_student.html page by using the view signup_student(). This happens due to the entry ( check above ) inside urls.py page.path('student/signup_student',views.signup_student,name='signup_student')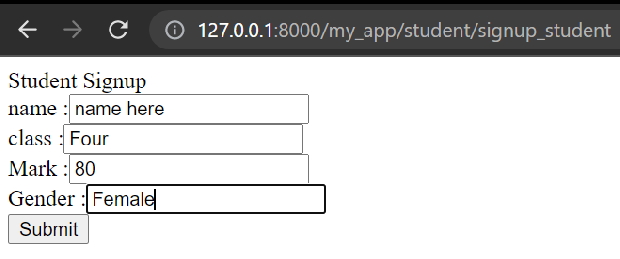
Once the user enters the data and submits the form, the action attribute of the form request for signup_student_output
<form action='signup_student_output' method=POST>path('student/signup_student_output',views.signup_student_output,name='signup_student_output2')We used the student model ( check models.py above ) to insert the data we collect from the form to our table.
The variables of the form is collected like this ( highlighted below ) and assigned to columns of the student table. Here name,cl,mark,gender are connecting to respective columns of our table.
views.py
from django.shortcuts import render
from django.http import HttpResponse
from .models import student
# Create your views here.
def index(request):
    return render(request,'form.html')

def signup_student(request):
    return render(request,'signup_student.html',{'msg':'Student Signup'})
def signup_student_output(request):
    en=student(name=request.POST.get('name'),cl=request.POST.get('class'),
     mark=request.POST.get('mark'),gender=request.POST.get('gender'))
    en.save()
    str1="Data inserted to student table"
    return render(request,'signup_student.html',{'msg':str1})
Getting the unique id of inserted row
While creating the table Django has added one AUTO_INCREMENT column id. One unique id is added to the row by mysql when we insert any record to the table. This id we can collect after saving the record in our table. Here is the code changes we have done to collect the unique id. Here we used str() to convert the id value to string while adding to the string variable str1.def signup_student_output(request):
en=student(name=request.POST.get('name'),cl=request.POST.get('class'),
mark=request.POST.get('mark'),gender=request.POST.get('gender'))
en.save()
str1="Data inserted to student table with id:" + str(en.id)
return render(request,'signup_student.html',{'msg':str1})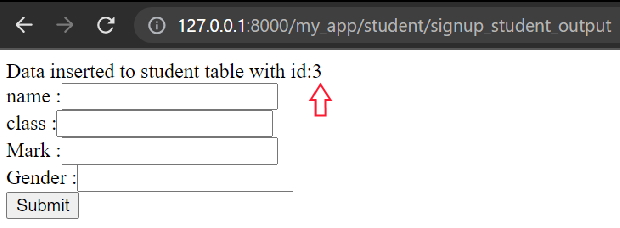
Data display Adding multiple records to MySQL table

Subhendu Mohapatra
Author
🎥 Join me live on YouTubePassionate about coding and teaching, I publish practical tutorials on PHP, Python, JavaScript, SQL, and web development. My goal is to make learning simple, engaging, and project‑oriented with real examples and source code.
Subscribe to our YouTube Channel here
This article is written by plus2net.com team.
https://www.plus2net.com

22-01-2023 | |
| Hi, I've wll executed all what you taught in your tutorial, I am having some errors that tell me my db_table = 'user' name is not defined. What to do ? | |
 Python Video Tutorials