Python Imaging Library PIL
pip install Pillow
Python Imaging Library: Pillow basics to create or read images to resize, rotate, generate thumbnail
Creating a new Image
img = Image.new(mode, size, color)size: Tuple (width,height) of the image.
color : yellow , green or other supported colours OR Hex value
from PIL import Image
path = "F:\\testing\\images\\test3.png"  # new image to create
img = Image.new("RGB", (400, 200), color="#F1F1CC")
img.save(path)
Saving Image
In above code we used the file name and path to save the image.Image.save(path, format=None, **params)Opening Image
Image.open(path, mode='r', formats=None)mode : 'r' for read mode
formats : A list of tuple of formats.
from PIL import Image
path = "F:\\testing\\images\\cat.png"  # existing image to open
img = Image.open(path, mode="r")
img.show()
Getting image details
path = "F:\\testing\\images\\cat.png"  # existing image to open
img = Image.open(path)
print(img.format)  # Image format
print(img.mode)  # pixel mode RGBA
print(img.size)  # ( 620,500)
print(img.height)  # 500
print(img.width)  # 620
print(img.info)  # all details about the image.
Rotate Image
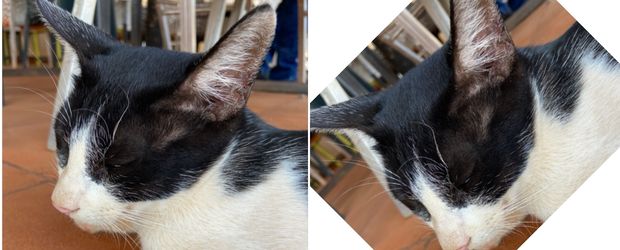
from PIL import Image
path = "F:\\testing\\images\\cat.png"  # existing image to open
path2 = "F:\\testing\\images\\cat2.png"  # Path to save
img = Image.open(path)
img2 = img.rotate(45)  # rotate by 45 degree
img2.show()
img2.save(path2) # save rotated image img2 = img.rotate(45, expand=True) # rotate by 45 degree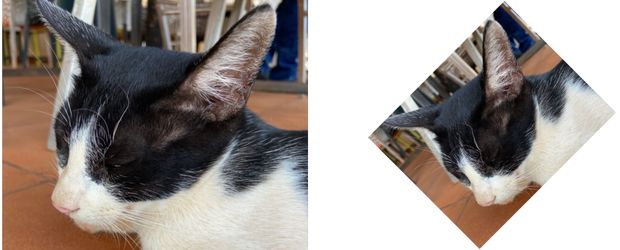
Resizing Images
Image.resize(size, resample=None, box=None, reducing_gap=None)[source]
resample : optional resampling filter
box : optional, for the region to be scaled. (0,0,width,height)
reducing_gap : Apply optimization by resizing the image in two steps.
from PIL import Image

path = "F:\\testing\\images\\jump.jpeg"  # Path to Image
path2 = "F:\\testing\\images\\jump_resize.jpeg"  # resized
img = Image.open(path, mode="r")  # create image object
img.show()  # display
img_new = img.resize((200, 200))  # resize the image
print(img.size)  # original image size ( width , height)
print(img_new.size)  # resized image size ( width, height)
img_new.show()  # display resized image
img_new.save(path2)  # save resized image
Thumbnail
To maintain aspect ratios we have to use thumbnail(). We can also give maximum width and maximum height (as tuple) of the thumbnail image.from PIL import Image
path = "F:\\testing\\images\\jump.jpeg" # Path to Image
path2 = "F:\\testing\\images\\jump_thumbnail.jpeg" # resized
img = Image.open(path, mode="r") # create image object
img.show() # display
print(img.size) # main image size ( width, height)
img.thumbnail((200, 200)) # max width, max height
img.save(path2) # save thumbnail image
print(img.size) # thumbnail size ( width, height)
img.show() # display resized image(1024, 768)
(200, 150)Image Crop
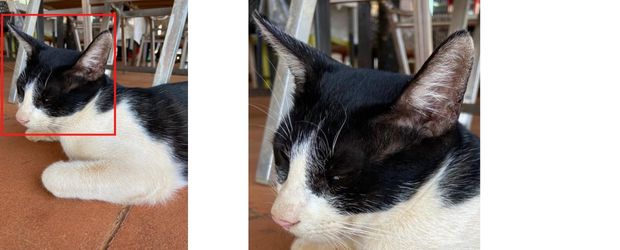
To crop an image we have to use crop()
Image.crop(box=None)from PIL import Image
path = "F:\\testing\\images\\cat-crop.jpeg" # Path to Image
path2 = "F:\\testing\\images\\cat-crop2.jpeg" # new image
img = Image.open(path, mode="r") # create image object
img.show() # display
print(img.size) # main image size ( width, height)
box = (20, 65, 470, 550) # rectangle for crop
img_crop = img.crop(box) # Cropped image object
img_crop.save(path2) # save cropped image
print(img_crop.size) # cropped image size ( width, height)
img_crop.show() # display cropped image(768, 1024)
(450, 485)Removing Background
This script effectively removes the background from an image and saves the edited image to a specified location on your system. It's a simple yet powerful way to process images for various applications, such as graphic design, web development, or product photography.Install the library
pip install rembg from rembg import remove
from PIL import Image
input_path = 'D:\\testing\\images\\yanam-raj.png'
output_path = 'D:\\testing\\images\\out1.png'
input = Image.open(input_path)
output = remove(input)
output.save(output_path)Displaying Resized image in Tkinter GUI using PIL Thumbnails using Pillow and Tkinter GUI Watermark on Image using text and Image

Subhendu Mohapatra
Author
🎥 Join me live on YouTubePassionate about coding and teaching, I publish practical tutorials on PHP, Python, JavaScript, SQL, and web development. My goal is to make learning simple, engaging, and project‑oriented with real examples and source code.
Subscribe to our YouTube Channel here
This article is written by plus2net.com team.
https://www.plus2net.com

 Python Video Tutorials