User inputs from Tkinter to create ID Card
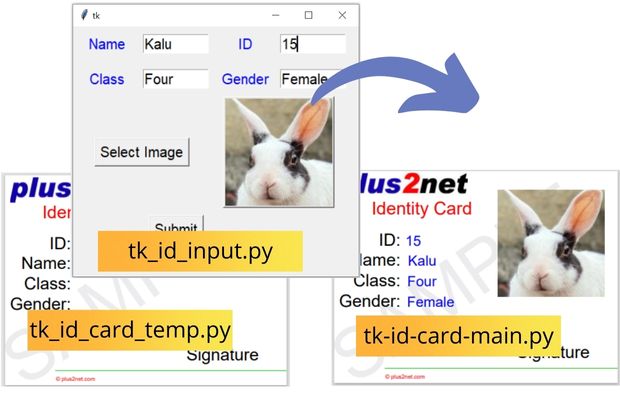
Generating PDF ID card by using user input data & image through Tkinter window using ReportLab
Tkinter window to take user inputs
We need five input data from user to create the ID Card.s_name : Student names_id : Student ID s_class : Student Classs_gender : Student Genders_filename : Student picture as Path to the file. We used StringVar() to collect data and pass the same to main file.
Button b2 is used to add click event to close the window
command=lambda:my_w.destroy(). Here is the full code. tk_id_input.py
import tkinter as tk
from tkinter import filedialog
from tkinter.filedialog import askopenfile
from PIL import Image, ImageTk
my_w = tk.Tk()
my_w.geometry("400x350")
s_name=tk.StringVar(value='Kalu')
s_id=tk.StringVar(value='16')
s_class=tk.StringVar(value='Four')
s_gender=tk.StringVar(value='Female')
s_filename=''
#def my_input():
l1=tk.Label(my_w,text='Name',font=22,width=8,fg='blue')
l1.grid(row=0,column=0,padx=1,pady=10)
e1=tk.Entry(my_w,font=22,width=8,textvariable=s_name)
e1.grid(row=0,column=1,padx=1,pady=10)

l2=tk.Label(my_w,text='ID',font=22,width=8,fg='blue')
l2.grid(row=0,column=2,padx=1,pady=10,sticky='w')
e2=tk.Entry(my_w,font=22,textvariable=s_id,width=8)
e2.grid(row=0,column=3,padx=1,pady=10,sticky='w')

l3=tk.Label(my_w,text='Class',font=22,width=8,fg='blue')
l3.grid(row=1,column=0,padx=1,pady=10)
e3=tk.Entry(my_w,font=22,textvariable=s_class,width=8)
e3.grid(row=1,column=1,padx=1,pady=10)

l4=tk.Label(my_w,text='Gender',font=22,width=8,fg='blue')
l4.grid(row=1,column=2,padx=1,pady=10,sticky='w')
e4=tk.Entry(my_w,font=22,textvariable=s_gender,width=8)
e4.grid(row=1,column=3,padx=1,pady=10,sticky='w')

b1 = tk.Button(my_w, text='Select Image',font=22,
    command = lambda:upload_file())
b1.grid(row=2,column=0,columnspan=2)

def upload_file():
    global img,s_filename
    f_types = [('Jpg Files', '*.jpg')]
    s_filename = filedialog.askopenfilename(filetypes=f_types)
    img = ImageTk.PhotoImage(file=s_filename)
    b4 =tk.Button(my_w,image=img) # using Button
    b4.grid(row=2,column=2,columnspan=2)
    #print(s_filename)


b2=tk.Button(my_w,text='Submit',font=22,command=lambda:my_w.destroy())
b2.grid(row=3,column=1,padx=10,pady=10)

my_w.mainloop()
Creating the ID card using data
We Import the blank template and use the same for creating the ID card.from tk_id_card_temp import my_temp # import the templatefrom tk_id_input import s_name,s_id,s_class,s_gender,s_filenametk_id_card_main.py
from reportlab.pdfgen import canvas
import tkinter as tk

my_path='G:\\My drive\\testing\\pypdf2\\my_pdf.pdf' # update the path
from reportlab.lib.units import inch

from tk_id_card_temp import my_temp # import the template
from tk_id_input import s_name,s_id,s_class,s_gender,s_filename #tkinter

## comment below values if you are using above Tkinter window
#s_filename='D:\\images\\rabbit_face2.jpg'

c = canvas.Canvas(my_path,pagesize=(400,300))
c=my_temp(c) # run the template
c.drawImage(s_filename,2.2*inch,0.7*inch) #Add image

###### Adding Collected data ####
c.setFillColorRGB(0,0,1)
c.setFont("Helvetica", 20)
c.drawString(0.5*inch,1.7*inch,str(s_id.get()))
c.drawString(0.5*inch,1.3*inch,s_name.get())
c.drawString(0.5*inch,0.9*inch,s_class.get())
c.drawString(0.5*inch,0.5*inch,s_gender.get())
######
c.showPage()
c.save()tk_id_card_temp.py
from reportlab.lib.units import inch
def my_temp(c):
    c.translate(inch,inch)
    c.setFont("Helvetica",14)

    c.setStrokeColorRGB(0.1,0.8,0.1)
    c.setFillColorRGB(0,0,1)
    c.drawImage('D:\\top2.jpg',-0.9*inch,2.6*inch)
    #####
    c.rotate(35)
    c.setFillColorCMYK(0,0,0,0.08) # font colour
    c.setFont("Helvetica", 100)
    c.drawString(-1.1*inch, -0.5*inch, "SAMPLE") # watermarking
    c.rotate(-35)
    #####
    c.setFillColorRGB(1,0,0)
    c.setFont("Helvetica", 25)
    c.drawRightString(1.7*inch,2.3*inch,'Identity Card')
    ######
    c.setFillColorRGB(0,0,0)
    c.setFont("Helvetica", 24)
    c.drawRightString(0.3*inch,1.7*inch,'ID:')
    c.drawRightString(0.3*inch,1.3*inch,'Name:')
    c.drawRightString(0.3*inch,0.9*inch,'Class:')
    c.drawRightString(0.3*inch,0.5*inch,'Gender:')
    c.drawRightString(4.0*inch,-0.5*inch,'Signature')
    #####
    c.line(-1.1,-0.7*inch,5*inch,-0.7*inch)
    c.setFont("Helvetica",8)
    c.setFillColorRGB(1,0,0) # font colour
    c.drawString(0, -0.9*inch, u"\u00A9"+" plus2net.com")
    ####
return cPDF Mark sheet by using data from SQLite database Generate PDF Invoice using Sales data Table from different data sources to PDF file Table from Pandas DataFrame to PDF file PDF Circles & Shapes
Create Report in PDF using Charts, images, tables and Paragraphs
Bar charts in PDF Line charts in PDF Pie Charts Paragraph
Python

Subhendu Mohapatra
Author
🎥 Join me live on YouTubePassionate about coding and teaching, I publish practical tutorials on PHP, Python, JavaScript, SQL, and web development. My goal is to make learning simple, engaging, and project‑oriented with real examples and source code.
Subscribe to our YouTube Channel here
This article is written by plus2net.com team.
https://www.plus2net.com

 Python Video Tutorials