ImageDraw of PIL
Add line, rectangle, arc, circles to images using Pillow ImageDraw
Creating object
PIL.ImageDraw.Draw(im, mode=None)mode : Optional , mode to use colour values.
Adding Lines to an image
ImageDraw.line(xy, fill=None, width=0, joint=None)fill: Colour of the line
width : Line width ( Integer )
We can draw a line between two coordiantes. (0,0) is the top left corner of the image.
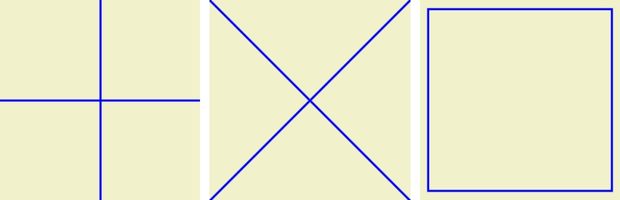
Horizontal and vertical cross lines at center.
from PIL import Image, ImageDraw

path = "F:\\testing\\images\\test3.png"  # new image to create
width, height = 200, 200
img = Image.new("RGB", (width, height), color="#F1F1CC")
img1 = ImageDraw.Draw(img) # Object to draw over main image

img1.line([(0,100),(200,100)] , fill='blue',width=2,joint='curve') # Horizontal
img1.line([(100,0),(100,200)] , fill='blue',width=2,joint='curve') # Vertical
# img.save(path)
img.show()img1.line([(0,0),(200,200)] , fill='blue',width=2,joint='curve') # cross
img1.line([(0,200),(200,0)] , fill='blue',width=2,joint='curve') # crossimg1.line([(10,10),(190,10)] , fill='blue',width=2,joint='curve') # Horizontl top
img1.line([(190,10),(190,190)] , fill='blue',width=2,joint='curve') # vertical right
img1.line([(190,190),(10,190)] , fill='blue',width=2,joint='curve') # Horizontl botton
img1.line([(10,190),(10,10)] , fill='blue',width=2,joint='curve') # vertical rightLines using For loop
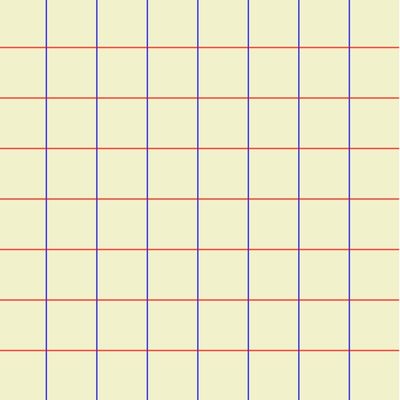
from PIL import Image, ImageDraw

path = "E:\\testing\\images\\test3.png"  # new image to create
width, height = 400, 400
img = Image.new("RGB", (width, height), color="#F1F1CC")
img1 = ImageDraw.Draw(img) # Object to draw over main image
for i in range(0, width, 50):
    img1.line([i, 0, i, height], fill="blue", width=1) # vertical
for j in range(0, height, 50):
    img1.line([0, j, width, j], fill="red", width=1) # Horizontal
img.save(path)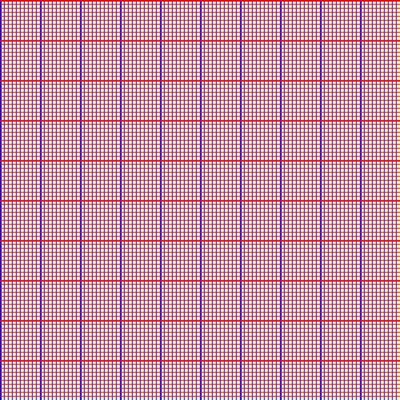
from PIL import Image, ImageDraw
path = "E:\\testing\\images\\test3.png"  # new image to create
width, height = 500, 500
img = Image.new("RGB", (width, height), color="#F1F1CC")
img1 = ImageDraw.Draw(img) # Object to draw over main image
for i in range(0, width, 5):
    if i % 50 ==0 :
        img1.line([i, 0, i, height], fill="blue", width=2)
    else:
        img1.line([i, 0, i, height], fill="blue", width=1)

for j in range(0, height, 5):
    if j% 50 ==0:
        img1.line([0, j, width, j], fill="red", width=2)
    else:
        img1.line([0, j, width, j], fill="red", width=1)
#img.show()
img.save(path)
Adding rectangle to image
ImageDraw.rectangle(xy, fill=None, outline=None, width=1)fill: Colour for filling
outline : Colour of the outline
width : Line width
Draw a border around an image with a gap of 10 from edges.
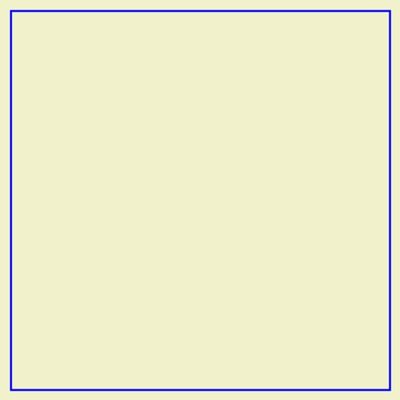
from PIL import Image, ImageDraw
path = "F:\\testing\\images\\rect1.png"  # new image to create
width, height = 400, 400
img = Image.new("RGB", (width, height), color="#F1F1CC")
img1 = ImageDraw.Draw(img)
size=[(10,10),(width-10,height-10)] # box with coordinates
img1.rectangle(size, fill=None, outline='blue', width=2)
img.show()
Concentric rectangles
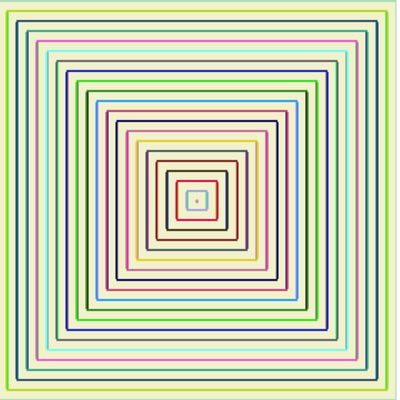
Here on each step of the for loop the coordinates decreases by 10,
We have used numpy random integers to create a tuple with Random RGB numbers. Here in each step one random colour is generated.
from PIL import Image, ImageDraw
import numpy as np
path = "E:\\testing\\images\\rect1.png"  # new image to create
width, height = 400, 400
img = Image.new("RGB", (width, height), color="#F1F1CC")
img1 = ImageDraw.Draw(img) # create object to Draw
for i in range(0,int(width/2),10):
    size=[(i,i),(width-i,height-i)] # coordinates of the rectangle
    color = tuple(np.random.choice(range(255), size=3)) # random RGB colour
    img1.rectangle(size, fill=None, outline=color, width=2)
img.show()
img.save(path)
Adding Arc to an image
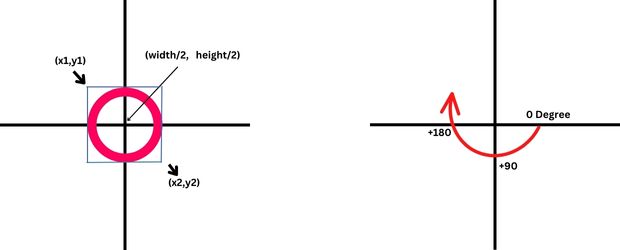
ImageDraw.arc(xy, start, end, fill=None, width=0)start: Starting angle of the arc. Starts from 3 o’clock, increase clockwise
end: Ending angle in degree
fill: Colour for filling
width : Line width
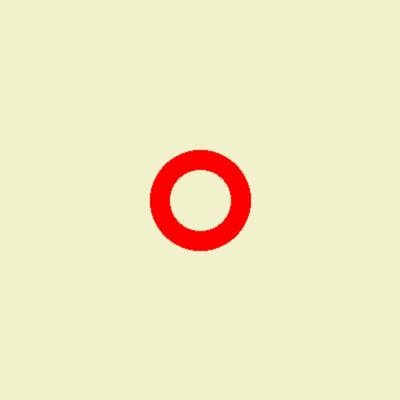
Circle at Center
from PIL import Image, ImageDraw
path = "E:\\testing\\images\\arc1.png"  # new image to create
width, height = 400, 400
img = Image.new("RGB", (width, height), color="#F1F1CC")
img1 = ImageDraw.Draw(img) # create object to Draw
size=[(width/2)-50,(height/2)-50,(width/2)+50,(height/2)+50]
img1.arc(size,0,360, fill='red', width=20)
img.show()
img.save(path)
Concentric Circles
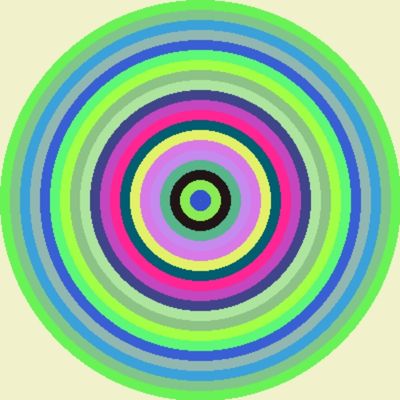
Here the same concept of concentric rectangles ( above explained ) is used.
from PIL import Image, ImageDraw
import numpy as np
path = "C:\\testing\\images\\arc1.png"  # new image to create
width, height = 400, 400
img = Image.new("RGB", (width, height), color="#F1F1CC")
img1 = ImageDraw.Draw(img) # create object to Draw
for i in range(0,int(width/2),10):
    size=[(i,i),(width-i,height-i)] # box around arc
    color = tuple(np.random.choice(range(255), size=3)) # ranom RGB value
    img1.arc(size,0,360, fill=color, width=11)
img.show()
img.save(path)
Half Arc
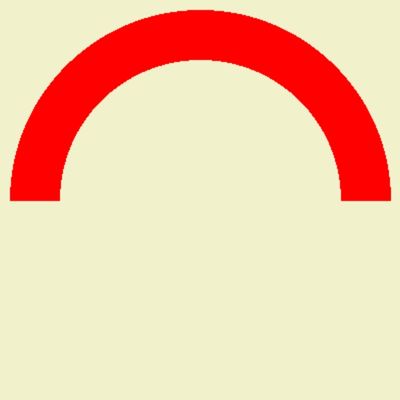
Here start angle is 180 degree and ending angle is 360 degree.
from PIL import Image, ImageDraw
path = "E:\\testing\\images\\arc1.png"  # new image to create
width, height = 400, 400
img = Image.new("RGB", (width, height), color="#F1F1CC")
img1 = ImageDraw.Draw(img) # create object to Draw
size=[(width/2)-190,(height/2)-190,(width/2)+190,(height/2)+190]
img1.arc(size,180,360, fill='red', width=50)
img.show()
img.save(path)
Subhendu Mohapatra
Author
🎥 Join me live on YouTubePassionate about coding and teaching, I publish practical tutorials on PHP, Python, JavaScript, SQL, and web development. My goal is to make learning simple, engaging, and project‑oriented with real examples and source code.
Subscribe to our YouTube Channel here
This article is written by plus2net.com team.
https://www.plus2net.com

 Python Video Tutorials