Database table data to Excel using openpyxl
MySQL
Here is the connection string , after successful connection we will use the variablemy_conn in our examples below.
from sqlalchemy import create_engine
my_conn = create_engine("mysql+mysqldb://userid:pw@localhost/my_db")
usrid : Your MySql login user id pw : Your MySql login passwordlocalhost : Address of MySQL server, IP address or localhostmy_db : Database name of MySQL where our table is available.
Full code to copy and add all rows to student table is here
SQLite
from sqlalchemy import create_engine
my_conn = create_engine("sqlite:///D:\\testing\\my_db\\my_db.db")Query to get data
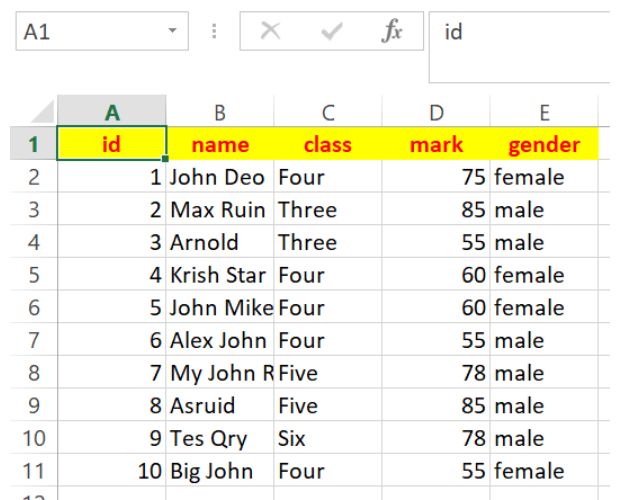
Here is the query to get 5 rows of data and all the columns from student table. Change the Query as per your requirement.query="SELECT * FROM student LIMIT 0,5" # query Full code to create Excel file with student table data is here
from openpyxl import Workbook
from openpyxl.styles import PatternFill,Font

from sqlalchemy import create_engine
my_conn = create_engine("mysql+mysqldb://userid:pw@localhost/my_db")
query="SELECT * FROM student LIMIT 0,5" # query
my_data=my_conn.execute(query)

wb=Workbook()
ws1=wb.active # work with default worksheet
l1=[r for r in my_data.keys()] # List of column headers
ws1.append(l1) # adding column headers at first row

my_font=Font(size=14,bold=True) # font styles
my_fill=PatternFill(fill_type='solid',start_color='FFFF00') #Background color
for cell in ws1["1:1"]: # First row
    cell.font = my_font
    cell.fill= my_fill

r,c=2,0 # row=2 and column=0
for row_data in my_data:
    d=[r for r in row_data]
    ws1.append(d)
my_path='G:\\My drive\\testing\\openpyxl\\demo2.xlsx'#Path
wb.save(my_path)
Here is a code which uses
cell(row, column, data) to position the records at any location specified by row and column. Note the value set in this script as r,c=2,2. Change this value to give a different position to start. All column headers and data is automatically taken from the collected data set and placed inside the Excel file based on the set row and column values ( r,c=2,2 )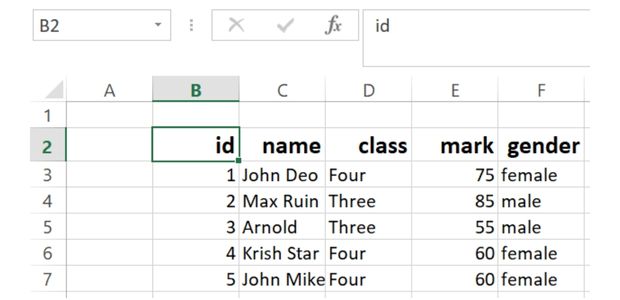
from openpyxl import Workbook
from openpyxl.styles import Font,Alignment

from sqlalchemy import create_engine
my_conn = create_engine("mysql+mysqldb://root:test@localhost/my_tutorial")
query="SELECT * FROM student LIMIT 0,5" # query
my_data=my_conn.execute(query)

wb=Workbook()
ws1=wb.active # work with default worksheet
l1=[r for r in my_data.keys()] # List of column headers

r,c=2,2 # row=2 and column=2, starting point of showing data

c1=c # for the first row or headers
for k in my_data.keys(): # adding column headers
    ws1.cell(r,c1,k)
    c1=c1+1    # increase the column value to move right

my_font=Font(size=14,bold=True) # font styles for column headers
my_align=Alignment(horizontal='right')
for cell in ws1[r:r]: # header row formatting
    cell.font = my_font # add bold style to header column
    cell.alignment=my_align # right align

# Iterating through data and adding each row to Excel page
for row, text in enumerate(my_data, start=r+1): # adding data
    for d in range(len(text)): # each row of data
        ws1.cell(column=c+d, row=row, value=text[d])

my_path='G:\\My drive\\testing\\openpyxl\\demo2.xlsx'#Path
wb.save(my_path)
Using Pandas DataFrame
import pandas as pd
from sqlalchemy import create_engine
my_conn = create_engine("mysql+mysqldb://userid:pw@localhost/my_db")
sql="SELECT * FROM student "
df = pd.read_sql(sql,my_conn)
df.to_excel('D:\\my_data\\student.xlsx') # Change the pathTkinter GUI to add user inputs to Excel file by openpyxl
SQlite to Excel using Pandas DataFrame Pandas DataFrame to Excel by to_excel()
Python Xlxwriter library

Subhendu Mohapatra
Author
🎥 Join me live on YouTubePassionate about coding and teaching, I publish practical tutorials on PHP, Python, JavaScript, SQL, and web development. My goal is to make learning simple, engaging, and project‑oriented with real examples and source code.
Subscribe to our YouTube Channel here
This article is written by plus2net.com team.
https://www.plus2net.com

 Python Video Tutorials