ImageDraw to add Text
PIL.ImageDraw.Draw(im, mode=None)mode : Optional , mode to use colour values.
Creating bulk certificates using data from MySQL by Pillow in Python
Adding text to an image

Opening an image
from PIL import Image, ImageDraw, ImageFont

path = "E:\\testing\\images\\cat.png" # existing image to open
img = Image.open(path)fnt = ImageFont.truetype("times.ttf", 140) # family with size
#fnt = ImageFont.truetype("arial.ttf", 140)from PIL import Image, ImageDraw, ImageFont
path = "E:\\testing\\images\\cat.png" # existing image to open
path2 = "E:\\testing\\images\\cat2.png" # save the new image path
img = Image.open(path)
fnt = ImageFont.truetype("times.ttf", 140)
d1 = ImageDraw.Draw(img)
d1.text((80, 160), "plus2net", fill=(194, 61, 43),font=fnt)
img.show()
img.save(path2) # Save the image in new location or path
We can specify the anchor option for the alignment of the text with xy coordinates. The default value is la (left-ascender) or top – left corner of the image. More precise alignment can be achieved by using anchor option with different values.
Create certificate with details of the student

from PIL import Image, ImageDraw, ImageFont

path = "F:\\testing\\images\\certificate.png"  # blank certificate
path2 = "F:\\testing\\images\\certificate_01.png"  # final certificate
img = Image.open(path, mode="r")
# img.show()
img1 = ImageDraw.Draw(img)  # create object to Draw
fnt1 = ImageFont.truetype("arial.ttf", 70) # font for Label text
fnt2 = ImageFont.truetype("arial.ttf", 50) # font for data text
fill1 = (39, 77, 113) # colour of the Label text
fill2 = (19, 119, 169) # colour of the data text
img1.text((280, 700), "Name :", fill=fill1, font=fnt1)
img1.text((550, 720), "plus2net", fill=fill2, font=fnt2)

img1.text((280, 800), "Grade :", fill=fill1, font=fnt1)
img1.text((550, 820), "B+", fill=fill2, font=fnt2)

img1.text((280, 900), "Class :", fill=fill1, font=fnt1)
img1.text((550, 920), "Five", fill=fill2, font=fnt2)
img.show()
img.save(path2)  # Save the image in new location or path
List data over an Image

There are four elements in one List. We will use the data from the list to add to an Image.
from PIL import Image, ImageDraw, ImageFont

path = "E:\\testing\\images\\certificate_b.png"  # blank certificate
path2 = "E:\\testing\\images\\certificate_12.png"  # final certificate
img = Image.open(path, mode="r")
# img.show()
img1 = ImageDraw.Draw(img)  # create object to Draw

fnt1 = ImageFont.truetype("arial.ttf", 70) # Font
fnt2 = ImageFont.truetype("arial.ttf", 50)
fill2 = (19, 119, 169) # colour used for data

l1=[12,'plus2net','Five',80] # List data to use for certificate

img1.text((570, 615), str(l1[0]), fill=fill2, font=fnt2)
img1.text((570, 720), l1[1], fill=fill2, font=fnt1)
img1.text((570, 870), l1[2], fill=fill2, font=fnt1)
img1.text((570, 1000), str(l1[3]), fill=fill2, font=fnt1)
img.show()
img.save(path2)  # Save the image in new location or path
Bulk Data from student table

We can collect records from our student table. Using the records we will create certificate for all. The file name should have the student id.
certificate_4.png
certificate_5.png
certificate_5.png
....path2 = "E:\\testing\\images\\certificate_"+str(row[0])+".png"from sqlalchemy import create_engine
my_conn = create_engine("mysql+mysqldb://root:pw@localhost/my_db")l1=my_conn.execute("SELECT * FROM student limit 0,5")from PIL import Image, ImageDraw, ImageFont
from sqlalchemy import create_engine
my_conn = create_engine("mysql+mysqldb://id:pw@localhost/my_db")
path = "E:\\testing\\images\\certificate_b.png" # blank certificate
fnt1 = ImageFont.truetype("arial.ttf", 70) # Font
fnt2 = ImageFont.truetype("arial.ttf", 50)
fill2 = (19, 119, 169) # colour used for data
l1=my_conn.execute("SELECT * FROM student limit 0,5")
for row in l1:
print(row )
img = Image.open(path, mode="r")
img1 = ImageDraw.Draw(img) # create object to Draw
path2 = "E:\\testing\\images\\certificate_"+str(row[0])+".png"
img1.text((570, 615), str(row[0]), fill=fill2, font=fnt2)
img1.text((570, 720), row[1], fill=fill2, font=fnt1)
img1.text((570, 870), row[2], fill=fill2, font=fnt1)
img1.text((570, 1000), str(row[3]), fill=fill2, font=fnt1)
img.show()
img.save(path2) # Save the image in new location or pathGenerating PDF files
While creating a new image we have to use mode as RGB ( not RGBA). We can't keep Alpha Channel which specifies the opacity for a color and then convert to PDF.While creating the image, use the option to create RGB mode only. If we don't have the choice or reading one existing image then we can convert the mode to RGB by using convert() method.
Here is the code to convert the image mode to RGB.
img = Image.new("RGBA", (width, height), color="#F1F1CC")
#img = Image.new("RGB", (width, height), color="#F1F1CC")
if img.mode == 'RGBA':
    img = img.convert('RGB')
from PIL import Image, ImageDraw, ImageFont
path = "E:\\testing\\images\\arc1.pdf" # new pdf file to create
width, height = 400, 200
img = Image.new("RGBA", (width, height), color="#F1F1CC")
#img = Image.new("RGB", (width, height), color="#F1F1CC") # in RGB mode
if img.mode == 'RGBA': # Not required if image mode is RGB
img = img.convert('RGB')
img1 = ImageDraw.Draw(img) # create object to Draw
fnt = ImageFont.truetype("arial.ttf", 40)
img1.text((width-215,height-115), "Plus2net", fill=(194, 61, 43), font=fnt,anchor='ls')
#print(img1.text['anchor'].getvalue())
img.show()
img.save(path) # Save the image in new location or path img = Image.open(path, mode="r")
if img.mode == 'RGBA':
img = img.convert('RGB')
img1 = ImageDraw.Draw(img) # create object to Draw
#path2 = "E:\\testing\\images\\certificate_"+str(row[0])+".png"
path2 = "E:\\testing\\images\\certificate_"+str(row[0])+".pdf"Tkinter for Save or Print Certificates in different formats
What is Tkinter ?Filedialog asksaveasfile
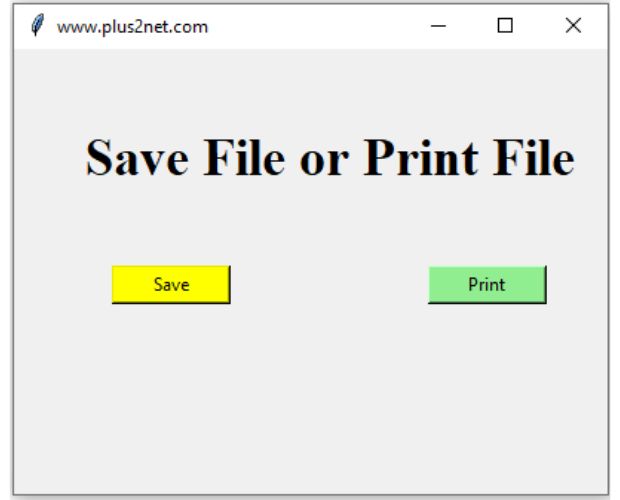
Pillow : Saving documents in PDF JPEG or PNG formats using Tkinter File dialog
from PIL import Image, ImageDraw, ImageFont

path = "F:\\testing\\images\\certificate_b.png"  # blank certificate
path2 = ""  # final certificate
img = Image.open(path, mode="r")
if img.mode == "RGBA":
    img = img.convert("RGB")
# img.show()
img1 = ImageDraw.Draw(img)  # create object to Draw

fnt1 = ImageFont.truetype("arial.ttf", 70)  # Font
fnt2 = ImageFont.truetype("arial.ttf", 50)
fill2 = (19, 119, 169)  # colour used for data

l1 = [12, "plus2net", "Five", 80]  # List data for certificate

img1.text((570, 615), str(l1[0]), fill=fill2, font=fnt2)
img1.text((570, 720), l1[1], fill=fill2, font=fnt1)
img1.text((570, 870), l1[2], fill=fill2, font=fnt1)
img1.text((570, 1000), str(l1[3]), fill=fill2, font=fnt1)
# img.show()
# img.save(path2)  # Save the image in new location or path
#####
import tkinter as tk
from tkinter import filedialog
import win32print
import win32api


my_w = tk.Tk()  # Parent winow
my_w.geometry("400x300")  # Size of the window, width x heiht
my_w.title("www.plus2net.com")  # title of the window
font1 = ("times", 26, "bold")  # font size style
l1 = tk.Label(
    my_w, text="Save File or Print File", width=20, font=font1, anchor="center"
)
l1.grid(row=1, column=1, columnspan=2, pady=50)

b1 = tk.Button(my_w, text="Save", bg="yellow", width=10, command=lambda: save_file())
b1.grid(row=2, column=1)

b2 = tk.Button(
    my_w, text="Print", bg="lightgreen", width=10, command=lambda: print_file()
)
b2.grid(row=2, column=2)


def save_file():
    file = filedialog.asksaveasfilename(
        filetypes=[("PDF file", ".pdf"), ("JPEG file", ".jpeg"), ("PNG file", ".png")],
        defaultextension=".jpeg",
    )
    path2 = file
    img.save(path2)


def print_file():
    choices = [printer[2] for printer in win32print.EnumPrinters(2)]
    print(*choices)
    for row in choices:
        print(row)
    win32print.SetDefaultPrinter(choices[2])
    # path2 = "F:\\testing\\images\\certificate_12.pdf"  # Path of  PDF file
    win32api.ShellExecute(0, "print", path2, None, ".", 0)


my_w.mainloop()
#####Python Imaging Library PIL ImageDraw to add Line, rectangle, circle to an Image. ImageFilter Thumbnails using Pillow and Tkinter GUI Watermark on Image using text and Image

Subhendu Mohapatra
Author
🎥 Join me live on YouTubePassionate about coding and teaching, I publish practical tutorials on PHP, Python, JavaScript, SQL, and web development. My goal is to make learning simple, engaging, and project‑oriented with real examples and source code.
Subscribe to our YouTube Channel here
This article is written by plus2net.com team.
https://www.plus2net.com

 Python Video Tutorials