Data export from SQLite to Excel and vice versa in Colab
- Installation of Database and connection
- Exporting data from SQLite table to Excel page
- Importing from Excel to SQLite database table
- Export or Import data from SQLite database to CSV file
- Export or Import data from SQLite database to other formats
- Without using Pandas and by using xlsxwriter
- Using openpyxl library
Exporting table from SQLite database to Excel and vice versa using Google colab
Installation of database and connecting 🔝
Download the full source code from Github or run the code in your Google colab platform
https://github.com/plus2net/Python-basics/blob/main/SQLite_remote_db_colab_sqlite3_excel.ipynb
https://github.com/plus2net/Python-basics/blob/main/SQLite_remote_db_colab_sqlite3_excel.ipynb
Download our sample SQLite database with student table which we will export to Excel page. Using the same Excel page we will create student table in our SQLite database.
# download my_db.db SQLite Database from plus2net.com
!wget https://www.plus2net.com/python/download/my_db.db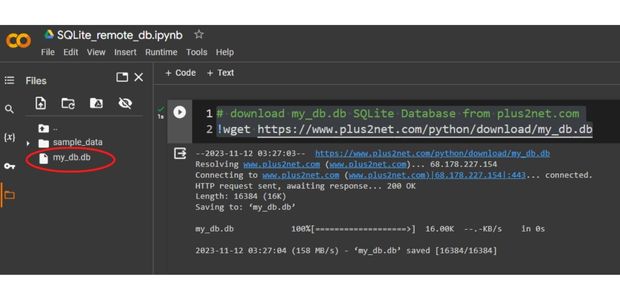
Here we are using sqlite3 library to connect to SQLite database, other type of connections using SQLAlchemy can also be used.
import sqlite3
my_conn = sqlite3.connect('my_db.db') # connect to dbquery="SELECT name FROM sqlite_master WHERE type='table' "
my_data=list(my_conn.execute(query)) # rows of data as list
print(my_data) # List of tablesquery="pragma table_info([student])"
my_data=list(my_conn.execute(query)) # rows of data as list
print(my_data) # structure of the tablequery="SELECT * FROM student LIMIT 0,5" # sql
my_data=list(my_conn.execute(query)) # rows of data as list
print(my_data) # display rowsFrom Sqlite table to Excel 🔝
We will use Pandas library and by using read_sql() we will create one DataFrame .import pandas as pd
query='SELECT * FROM student' # SQL to collect all records from table
df=pd.read_sql(query,my_conn,index_col='id') # create dataframe
print(df) # Print the dataframe with all rows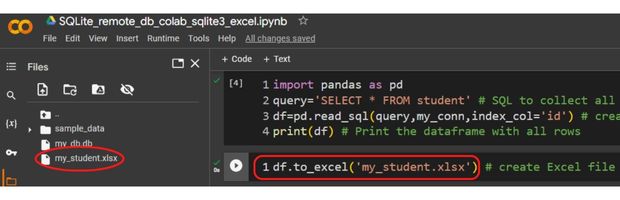
df.to_excel('my_student.xlsx') # create Excel fileFrom Excel to SQLite table 🔝
Using the above created my_student.xlsx file we will crete the student table in our SQLite database. First we will delete the student table already avilable in our database.#query="DELETE FROM student" # Query to delete records
query='DROP TABLE student' # Query to delete table
try:
r_set=my_conn.execute(query)
print("No of Records deleted : ",r_set.rowcount)
my_conn.commit()
except sqlite3.Error as my_error:
print("error: ",my_error)df = pd.read_excel('my_student.xlsx',index_col='id')df.to_sql(con=my_conn,name='student2',if_exists='append')query="SELECT * FROM student2 LIMIT 0,5" # sql
my_data=list(my_conn.execute(query)) # rows of data as list
print(my_data)Using csv (Comma separated value ) file 🔝
In above code in place of Excel file we can use csv file to export Sqlite database table to a csv file and vice versa.In place of read_excel() and to_excel() we will use read_csv() and to_csv() to read and write to csv file.
Download the full source code from Github or run the code in your Google colab platform on how to export import data from CSV file
https://github.com/plus2net/Python-basics/blob/main/SQLite_remote_db_colab_sqlite3_csv.ipynb
https://github.com/plus2net/Python-basics/blob/main/SQLite_remote_db_colab_sqlite3_csv.ipynb
Export import to other formats 🔝
By using same concepts , SQLite tables can be exported or imported to other formats like Json, string, html table etc.List of different sources can be used by using Pandas dataframe.
Without using Pandas and by using xlsxwriter 🔝
Note that we can't read Excel file and create the SQLite table by using xlsxwrite. We will only create the Excel file from SQLite database table.We have to install xlsxwrite in Colab platform first before using the same.
pip install xlsxwriterquery="pragma table_info([student])" # structure of the table
my_data=list(my_conn.execute(query)) # rows of data as list
l1=[r[1] for r in my_data] # List of column header
import xlsxwriter # Or install by using pip install xlsxwriter
wb = xlsxwriter.Workbook('my_student.xlsx') # create workbook
ws = wb.add_worksheet() # Add worksheet
query="SELECT * FROM student LIMIT 0,10" # query
my_data=my_conn.execute(query)
my_data=[r for r in my_data] # List of rows of data
my_format = wb.add_format({'bold': True, 'font_color': 'red',
'align':'center','bg_color':'#FFFF00'}) # Header row format
ws.write_row('A1',l1,my_format) # Add header row
r,c=1,0 # row=1 and column=0
for row_data in my_data:
ws.write_row(r,c,row_data) # add row to excel page
r=r+1 # increase row by 1 for next row
wb.close() # Save worksheet
Download the full source code from Github or run the code in your Google colab platform on how to export SQLite data to Excel using xlsxwrite
https://github.com/plus2net/Python-basics/blob/main/SQLite_remote_db_colab_sqlite3_xlsxwriter.ipynb
https://github.com/plus2net/Python-basics/blob/main/SQLite_remote_db_colab_sqlite3_xlsxwriter.ipynb
By using openpyxl 🔝
We will use openpyxl library to read from SQLite database to create Excel file and then using the Excel file we will create the SQLite database table. Install the library in your colab platform.pip install openpyxl # Install the libraryThis code will create the my_student.xlsx file using the above mentioned SQLite database file and database connection.
from openpyxl import Workbook
from openpyxl.styles import PatternFill,Font

query="pragma table_info([student])" # structure of the table
my_data=list(my_conn.execute(query)) # rows of data as list
l1=[r[1] for r in my_data] # List of column header

query="SELECT * FROM student LIMIT 0,10" # query
my_data=my_conn.execute(query)
my_data=[r for r in my_data] # List of rows of data

wb=Workbook()
ws1=wb.active # work with default worksheet
ws1.append(l1) # adding column headers at first row

my_font=Font(size=14,bold=True) # font styles
my_fill=PatternFill(fill_type='solid',start_color='FFFF00') #Background color
for cell in ws1["1:1"]: # First row
    cell.font = my_font
    cell.fill= my_fill

r,c=2,0 # row=2 and column=0
for row_data in my_data:
    d=[r for r in row_data]
    ws1.append(d)
my_path='my_student.xlsx'#Path
wb.save(my_path)query='DROP TABLE student'
try:
r_set=my_conn.execute(query)
print("No of Records deleted : ",r_set.rowcount)
my_conn.commit()
except sqlite3.Error as my_error:
print("error: ",my_error)# We have to create the table by directly writing the query
my_conn.execute('''
CREATE TABLE IF NOT EXISTS student(id integer primary key,
name text,
class text,
mark integer,
gender text
);''')
my_conn.commit()
print("Student Table created successfully");from openpyxl import load_workbook
wb = load_workbook(filename='my_student.xlsx', read_only=True) # change path
ws = wb['Sheet'] # connecting to sheet
my_data=[]
# remove the column headers and start from 2nd row with data
for data in ws.iter_rows(min_row=2,max_col=5,max_row=5,values_only=True):
print(data[0],data[1]) # Show column 1,2 - id, name
my_data.append(data)
wb.close()# Close the workbook after readingquery2='INSERT INTO `student` (`id`, `name`, `class`, `mark`, `gender`) VALUES '
my_str=",".join(map(str,my_data))
query2=query2+my_str+';'
print(query2) # for checking
r_set=my_conn.execute(query2) # insert data to table
my_conn.commit()
Download the full source code from Github or run the code in your Google colab platform on how to export SQLite data to Excel using openpyxl
https://github.com/plus2net/Python-basics/blob/main/Copy_of_SQLite_remote_db_colab_sqlite3_openpyxl.ipynb
https://github.com/plus2net/Python-basics/blob/main/Copy_of_SQLite_remote_db_colab_sqlite3_openpyxl.ipynb
Managing SQLite Database in Google Colab platform .
Displaying Image from SQLite database in Google colab

Subhendu Mohapatra
Author
🎥 Join me live on YouTubePassionate about coding and teaching, I publish practical tutorials on PHP, Python, JavaScript, SQL, and web development. My goal is to make learning simple, engaging, and project‑oriented with real examples and source code.
Subscribe to our YouTube Channel here
This article is written by plus2net.com team.
https://www.plus2net.com

 Python Video Tutorials