JQuery HTTP GET method of posting dataData : (optional ) We can send data to above URL Function : Function to run once the request is completed. 
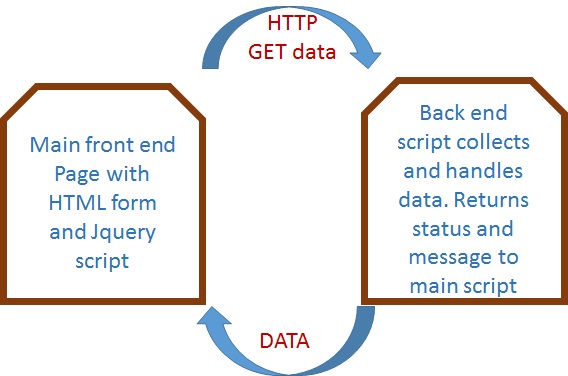
We will learn by using some examples. Let us try to display date and time by connecting to a click event of a button. The data we will get is a string containing data and current time at the server. This string of data we will keep inside a div tag called display. You can keep clicking the above button and see how time is changing. Every time you click the button it triggers the click event of b1 button and by using GET method we are getting the current time from getclockck.php. get-clockck.phpThis is a PHP file with one line of code displaying current data and time at server. Here is the code.Using GET method to post dataThe more practical uses of GET method is to post data. We will use set of name & value to our clock and get back the same data along with the string.Here we are sending site and plus2net as name value pair to get-clockck2.php file and getting back the same data. Here is the code Using a Form and posting data with GET methodThe best way to use GET method is to use in form. We will create a form and users will submit it. We will use serialize() function to create a string with form data. This sting can be displayed in the same page or can be directly posted to processing page.This is the line which creates the string by using serialize() function and stores in a variable data_list. Posting data and getting back.After submitting data to a backend script we will be interested in outcome of it. For example if we add a student to our table , we will displaying the unique student or auto-increment id of the record. So we will not try to bring back the data from the backend script and display the same. It is also required to get the status of record updating or data validation.Here we will try to postback the same data to our main script from the backend program. Here is the jquery part connected to click event of button ( id = b3) along with the form ( id = f1). Before that here is the demo The source code is here Writing form data to a text fileYou can download the zip file and run the entire sample codes explained here. Inside the file form-getck.php you can find the PHP code to store the form data in a plan text file. Similarly the data can be used to insert records in a database table.Posting data and getting return data as JSON stringSimple way to post two parametersIn our demo script we have three checkboxes with different id, on click ( check or uncheck ) of any checkbox the change event function will fire. We will read the id ,value and status of the clicked checkbox and store them in variables. Posting by GET and data return by JSON string 
This article is written by plus2net.com team.

|
| Most Popular JQuery Scripts | |
1 | Two dependant list boxes |
2 | Calendar with Date Selection |
3 | Data change by Slider |
4 | Show & Hide element |
 JQuery Video Tutorials