Message Box layer & jQuery
Users perform different actions and interact with the web page, during this process we have to communicate with users by showing them messages. For example, if you are trying to login with a wrong password then you should get a message saying about failed login attempt. Similarly on successful login we should show one welcome message.
By using jQuery we can manage logic, inside message and style associated with the message box.
Managing the display.
Message box are to be displayed when required , so by default the message box is hidden. We will use CSS to hide the message box while loading the page.
.msg{
display: none;
}
Positioning the message,
If user is submitting a form then it is better to show the message box above the form, or we can show the message box by the side of the input element ( tool tip )
 We can position the message box at a fixed location which does not change with vertical scrolling of the page. In our style sheet we set the properties like this .
.msg{
position: fixed;
top:0%;
right: 50%;
display: none;
FONT-SIZE: 12px;
font-family: Verdana;
width:150px;
}
Showing status of script execution ( Please wait …. , Done , Error )
Here is a demo were we are showing message box at top of the page. The position is fixed and does not change with scrolling of the page. In this example user has to click the button to display the message layer but the same can be triggered on different events occurring at different processes of script execution.
Style associated with the message box
We can show the message box with one background colour but it is better to change the colour based on the message we want to show. For error messages we can show background colour as red. Similarly green background we can show for successful completion of the process (like after signup or login) .
$("#msg").css("background-color","yellow")
$("#msg").css("color","black") // Change font colour
We can change font colour and background colour both by using single command.
$("#msg").css({"background-color": "green",'color': '#ffffff'})
Demo of showing message box at fixed location
Duration of display of the message box
We can manage the duration of the message box by using setTimeout function.
By using one common function we can manage duration of more than one message boxes.
setTimeout(function() { $("#d1,#d2,#msg").fadeOut('slow'); }, 4000);
Adding a close button
Instead of closing the message box after a fixed interval, we can add a close button so user can click and close the message box. For this we will keep one span tag with a X inside the message box. We will keep the hide event inside click function of this close X. Watch the message box displayed while clicking Error button in above demo.
$("#msg").append("X"); // adding a close button
Tool tips message box
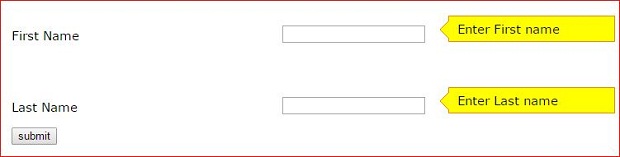
Tooltip is a special type of message box where we communicate pointing to the area of the missing or error to be taken care by user.
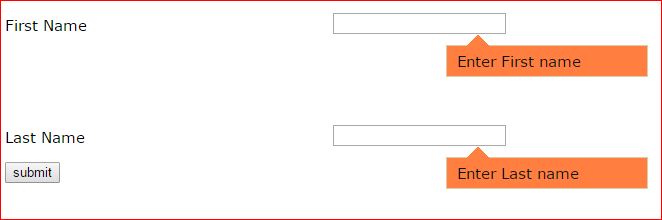 If the user forgot to enter email address or entered wrong email address then we will display a tooltip just by the side of the text box required for entering email address.
We will create one tooltip style by using CSS and one image. The image is pointer part of the box. We join the image with the box to create tool tip message box.
Demo scripts using Horizontal tooltips in a form
We created demo using two types of tooltips , one by using horizontal pointer and other by vertical pointer. The difference is in positing of the pointer image and the background colour.
Demo scripts using Horizontal pointer in a form
There is no difference in html or jQuery part of the two demo only main difference is the CSS and managing the position of the tooltip box.
We have two textboxes to enter first name and last name by user. If you click the button without entering names then tooltip message box will appear showing the error message.
If you enter only first name without second ( or last ) name then error message with tooltip will appear under last name only. After entering first name and last name we will get a welcome message box with both the names.
All messages are connected through a timer to display for 4 seconds only.
setTimeout(function() { $("#d1,#d2,#msg").fadeOut('slow'); }, 4000);
jQuery connecting to tooltip
The code is kept inside document ready function and starts with click event of button b1
$(document).ready(function() {
$("#b1").click(function(event){
First we will set a flag to monitor the status of the input validation. We will set the flag to 'T' at starting and then set it to 'F' if any of the input box is not entered.
var flag='T';
We will initialize the box ( tooltip ) with the pointer image each time the button is clicked. This is required as we are appending ( adding ) the text to the tool tip box so the text will be cumulatively added if b1 button is clicked more times.
$("#d1,#d2").html("<img class='pointer' src='pointer2.gif' />");
Checking for data entry in text box
If user has entered any data in textbox then the length will be more than 0 or 1. We used val() function to read the data entered by user and then used length property to calculate the number of chars entered by user. We check the length of data inside a if condition. If length of data is less than 1 then we will add the error message to our tooltip box and show it. We will also set the error flag to 'F'
if($("#fname").val().length < 1 ){
$("#d1").append('Enter First name');
$("#d1").show(); // display the tooltip
flag='F';
}else{
/// user has enterd its first name
$("#d1").hide();
}
Same way you can manage the entered data in second textbox.
After checking both the text boxes it is time to check the status of flag and display the welcome message. If any of the two text box are empty then the flag will be set to 'F'.
if(flag=='T'){
$("#msg").html('Welcome ' + $("#fname").val() + ' ' + $("#lname").val());
$("#msg").show();
}
After displaying the message boxes we can hide them after some time interval, here is the code using setTimeout() function.
setTimeout(function() { $("#d1,#d2,#msg").fadeOut('slow'); }, 4000);

This article is written by plus2net.com team.
plus2net.com
|

 JQuery Video Tutorials