Tkinter Date Picker: tkcalendar DateEntry (with Examples)
At Command prompt enter
pip install tkcalendar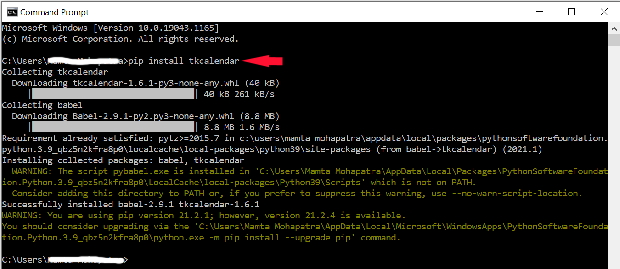
Tkinter Date picker Entry box using DateEntry for user to select read and set the date from calendar
import tkinter as tk from tkcalendar import DateEntrymy_w = tk.Tk()my_w.geometry("340x220") cal=DateEntry(my_w,selectmode='day')cal.grid(row=1,column=1,padx=15)my_w.mainloop()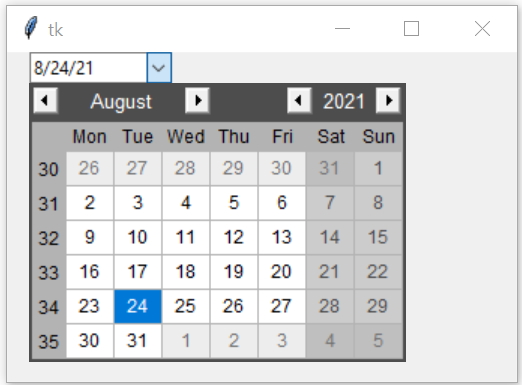
If we don't specify any year , month or day then it will show current year month and day as default selected.
cal=DateEntry(my_w,selectmode='day')cal=DateEntry(my_w,selectmode='day',year=2021,month=8,day=17)Collecting selected date 🔝
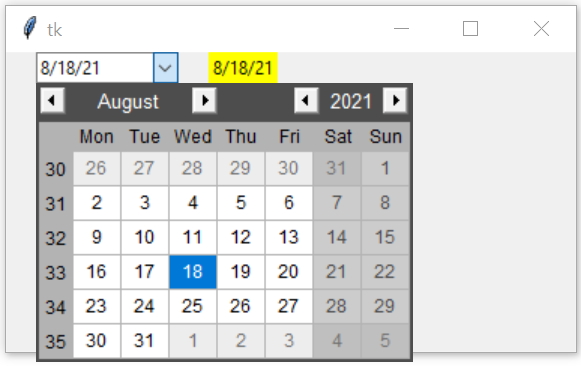
We will read and display the selected date from the calendar. Note that we are not using any Click event of the button here to read and display the selected date. To trigger the event we are using String Variable trace method to monitor the change in value.
import tkinter  as tk
from tkcalendar import DateEntry
my_w = tk.Tk()
my_w.geometry("380x200")  # width and height
sel=tk.StringVar() # declaring string variable

cal=DateEntry(my_w,selectmode='day',textvariable=sel)
cal.grid(row=1,column=1,padx=20)

def my_upd(*args): # triggered when value of string variable changes
    l1.config(text=sel.get()) # read and display date
l1=tk.Label(my_w,bg='yellow')  # Label to display date
l1.grid(row=1,column=2)

sel.trace_add('write',my_upd) # on change of string variable
my_w.mainloop()
Collecting selected date by using event 🔝
This is the event which can be used when one date is selected by the user.cal.bind('<<DateEntrySelected>>',my_upd)import tkinter as tk
from tkcalendar import DateEntry
my_w = tk.Tk() # Parent window
my_w.geometry("380x200") # width and height of window
cal = DateEntry(my_w, selectmode='day')
cal.grid(row=1, column=1, padx=20)
def my_upd(e): # triggered on select event
l1.config(text=cal.get_date()) # read and display
l1 = tk.Label(my_w, bg='yellow') # Label to display date
l1.grid(row=1, column=2)
cal.bind('<<DateEntrySelected>>', my_upd)
my_w.mainloop()Reading Selected date on Button Click 🔝
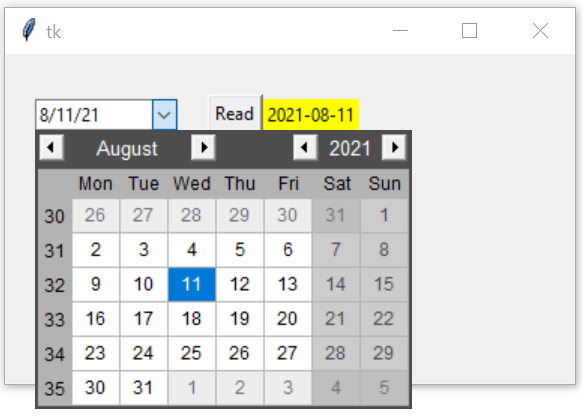
Once the button ( b1) is clicked the function my_upd() is executed and the Label text option is updated with new selection by config() method using get_date()
# on Button click reading and displaying date selection
import tkinter as tk
from tkcalendar import DateEntry

my_w = tk.Tk()
my_w.geometry("380x220")  # width and height of the window

cal = DateEntry(my_w, selectmode='day')
cal.grid(row=1, column=1, padx=20, pady=30)

def my_upd():  # triggered on Button Click
    l1.config(text=cal.get_date())  # read and display date

l1 = tk.Label(my_w, text='date', bg='yellow')  # Label to display date
l1.grid(row=1, column=3)

b1 = tk.Button(my_w, text='Read', command=lambda: my_upd())
b1.grid(row=1, column=2)

my_w.mainloop()def my_upd(): # triggered on Button Click
# l1.config(text=cal.get_date()) # read and display date
# l1.config(text=cal.get()) # using Entry widget get()
dt = cal.get_date()
str = dt.strftime("%d-%B-%Y") # changing the format
l1.config(text=str)setting the selected value using set_date() 🔝
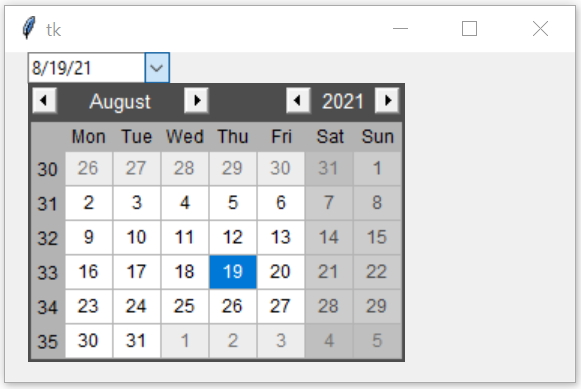
We can set the default or change the selection of date to any value by using set_date(). Input should be as datetime.date or as calendar local.
import tkinter as tk from tkcalendar import DateEntryfrom datetime import datemy_w = tk.Tk()my_w.geometry("380x220") cal=DateEntry(my_w,selectmode='day')cal.grid(row=1,column=1,padx=15)dt=date(2021,8,19) # specific date Year, month , daycal.set_date(dt) # Set the selected date #cal.set_date('8/16/2021') # Set the local calendar format my_w.mainloop()cal.set_date(date.today()) # todays date Deleting DateEntry 🔝
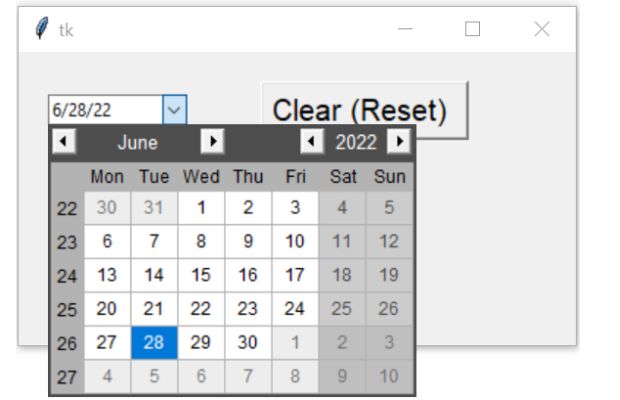
We can clear the date entered inside DateEntry field on click of a button.
import tkinter as tk
from tkcalendar import DateEntry

my_w = tk.Tk()
my_w.geometry("380x220")  # width and height of the window

cal = DateEntry(my_w, selectmode='day')
cal.grid(row=0, column=0, padx=15, pady=10)

b1 = tk.Button(my_w, text='Clear', font=20, command=lambda: cal.delete(0, 'end'))
b1.grid(row=0, column=1, padx=10)

my_w.mainloop()
Tkinter clearing dateEntry inputs on Click of a button using delete method of Entry
Changing the date format 🔝
To change the return date format we used get_date(), the get_date() method return the selected date as a datetime.date instance. So we can change the format by using strftime().In above code ( Button Click to display ) the changes inside the function my_upd() is here.
def my_upd(): # triggered on Button Click dt=cal.get_date() str_dt=dt.strftime("%d-%B-%Y") #format to change l1.config(text=str_dt) # read and display datedt = cal.get_date() # cal is my calendar
str_dt = dt.strftime("%d-%B-%Y") # date string 18-April-2021
str_dt2 = dt.strftime("%d-%m-%Y") # 18-04-2021
str_dt3 = dt.strftime("%m/%d/%Y") # 04/18/2021
str_dt4 = dt.strftime("%Y-%m-%d") # 2021-04-18 (For Database query)To change the display format on date selection we can use date_pattern option.
cal=DateEntry(my_w,selectmode='day',date_pattern='MM-dd-yyyy')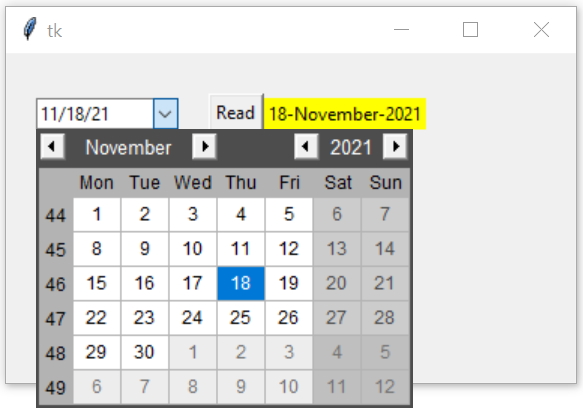
str=dt.strftime("%d-%B-%Y") # format changedMarking a range of dates by using tag_config() 🔝

This Python script utilizes Tkinter and tkcalendar to create a user-friendly interface for selecting and highlighting date ranges. Users can input start and end dates using DateEntry widgets, and the corresponding range is visually highlighted on a Calendar widget. The program ensures that the end date is always equal to or later than the start date, providing a seamless and intuitive experience for date range selection.
# Import necessary modules
import tkinter as tk
from tkcalendar import DateEntry, Calendar
from datetime import datetime, timedelta
from tkinter import font

# Function to update the calendar with the highlighted date range
def update_calendar():
    # Clear existing highlights
    cal.calevent_remove('all')
    # Get dates from DateEntry widgets
    start_date_str = start_entry.get()
    end_date_str = end_entry.get()
    # Convert strings to date objects
    try:
        start_date = datetime.strptime(start_date_str, '%m/%d/%y').date()
        end_date = datetime.strptime(end_date_str, '%m/%d/%y').date()
    except ValueError:
        return  # If date format is incorrect, do nothing
    # Ensure start_date is before end_date
    if start_date > end_date:
        return
    # Highlight the range
    current_date = start_date
    while current_date <= end_date:
        cal.calevent_create(current_date, '', 'highlight')
        current_date += timedelta(days=1)
    # Update the calendar display
    cal.tag_config('highlight', background='lightblue', foreground='black')

# Function to validate and adjust the start date
def validate_start_date(*args):
    start_date_str = start_entry.get()
    end_date_str = end_entry.get()
    try:
        start_date = datetime.strptime(start_date_str, '%m/%d/%y').date()
        end_date = datetime.strptime(end_date_str, '%m/%d/%y').date()
        if start_date > end_date:
            end_entry.set_date(start_date)
    except ValueError:
        return
    update_calendar()

# Function to validate and adjust the end date
def validate_end_date(*args):
    start_date_str = start_entry.get()
    end_date_str = end_entry.get()
    try:
        start_date = datetime.strptime(start_date_str, '%m/%d/%y').date()
        end_date = datetime.strptime(end_date_str, '%m/%d/%y').date()
        if end_date < start_date:
            start_entry.set_date(end_date)
    except ValueError:
        return
    update_calendar()

# Initialize the main window
root = tk.Tk()
root.title('Date Range Selector')
root.geometry('400x400')

# Define a larger font
large_font = font.Font(family='Helvetica', size=12)

# Create DateEntry widgets for start and end dates with larger font
start_entry = DateEntry(root, width=12, background='darkblue',
                        foreground='white', borderwidth=2, font=large_font)
start_entry.grid(row=0, column=1, padx=10, pady=10)
start_label = tk.Label(root, text='Start Date:', font=large_font)
start_label.grid(row=0, column=0, padx=10, pady=10)

end_entry = DateEntry(root, width=12, background='darkblue',
                      foreground='white', borderwidth=2, font=large_font)
end_entry.grid(row=1, column=1, padx=10, pady=10)
end_label = tk.Label(root, text='End Date:', font=large_font)
end_label.grid(row=1, column=0, padx=10, pady=10)

# Create a Calendar widget to display the highlighted range with larger font
cal = Calendar(root, selectmode='none', font=large_font)
cal.grid(row=2, column=0, columnspan=2, padx=10, pady=10)

# Trace changes in the DateEntry widgets
start_entry.bind("<<DateEntrySelected>>", validate_start_date)
end_entry.bind("<<DateEntrySelected>>", validate_end_date)

# Initial calendar update
update_calendar()

root.mainloop()
Difference in two calendar dates 🔝
Difference in days of two calendar dates using Tkinter tkcalendar DateEntry
User can select start date and end date from two different calendars. On click of the button the difference in days between two selected dates are displayed in a Label.
import tkinter as tk
from tkcalendar import DateEntry  # pip install tkcalendar

my_w = tk.Tk()
my_w.geometry("400x420")  # width and height of window
font1 = ['Times', 56, 'normal']  # font style to display output

l1 = tk.Label(my_w, text='data', bg='yellow', font=font1)  # display difference
l1.grid(row=0, column=0, padx=10, pady=20, columnspan=3, sticky='ew')

cal1 = DateEntry(my_w, selectmode='day')
cal1.grid(row=1, column=0, padx=20, pady=30)

cal2 = DateEntry(my_w, selectmode='day')
cal2.grid(row=1, column=1, padx=20, pady=30)

b1 = tk.Button(my_w, text='Diff in Days', bg='lightgreen', font=20, command=lambda: my_upd())
b1.grid(row=1, column=2)

def my_upd():  # triggered on Button Click
    diff_days = (cal2.get_date() - cal1.get_date()).days  # difference in days
    l1.config(text=str(diff_days) + ' days')  # read and display date

my_w.mainloop()
Age Calculation 🔝
Read more about relativedelta here.User will select the date of birth from the Calendar and output in terms of year , month and days i.e Age based on today's date will be displayed.
import tkinter as tk
from tkcalendar import DateEntry
from dateutil.relativedelta import relativedelta
from datetime import date, datetime

my_w = tk.Tk()
my_w.geometry("380x200")  # width and height of the window
sel = tk.StringVar()  # declaring string variable

cal = DateEntry(my_w, selectmode='day', textvariable=sel)
cal.grid(row=1, column=1, padx=20)

def my_upd(*args):  # triggered when value of string variable changes
    if len(sel.get()) > 4:
        l1.config(text=sel.get())  # read and display date
        dob = datetime.strptime(sel.get(), '%m/%d/%y')
        dt = date.today()
        dt3 = relativedelta(dt, dob)
        l2.config(text="Days:" +
			str(dt3.days) + "\n Months:" + str(dt3.months) +
			"\n Years:" + str(dt3.years))
        print("Days:", dt3.days, " Months:", dt3.months, " Years:", dt3.years)

l1 = tk.Label(my_w, bg='yellow')  # Label to display date
l1.grid(row=1, column=2)

l2 = tk.Label(my_w)  # Label to display age difference
l2.grid(row=1, column=3, padx=10)

sel.trace_add('write', my_upd)  # on change of string variable
my_w.mainloop()
Adding time to the Calendar 🔝
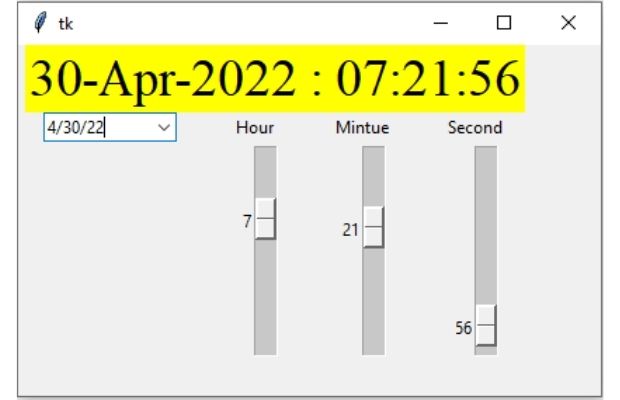
While selecting date from the Calendar, user can set the Hour , minute and second by using three Scales. One Date object is created by using strptime() from drop-down Calendar date ( Year-month-day ) and the values from the sliders for Hour, minute and seconds.
The display format is managed by using strftime()
Tkinter Calendar with time to set the Hour minute and second values along with date by using Scales
from datetime import datetime
import tkinter as tk
from tkcalendar import DateEntry

my_w = tk.Tk()
my_w.geometry("415x250")  # Set the width and height of the window

def my_upd(*args):  # triggered when value of string variable changes
    dt = sel.get()  # collect the selected date as string
    if len(dt) > 5:
        dt = dt + ":" + str(hr.get()) + "," + str(mn.get()) + "," + str(sc.get())
        str1 = datetime.strptime(dt, '%m/%d/%y:%H,%M,%S')
        str1 = str1.strftime("%d-%b-%Y : %H:%M:%S")  # display format
        l1.config(text=str1)

sel = tk.StringVar()

cal = DateEntry(my_w, selectmode='day', textvariable=sel)
cal.grid(row=1, column=0, padx=1, sticky='N')

l1 = tk.Label(my_w, bg='yellow', font=('Times', 28, 'normal'))  # show date
l1.grid(row=0, column=0, padx=5, columnspan=4)

l_hr = tk.Label(my_w, text='Hour')
l_hr.grid(row=1, column=1, sticky='N')

hr = tk.Scale(my_w, from_=0, to=23,
    orient='vertical', length=150, command=my_upd)
hr.grid(row=2, column=1)

l_mn = tk.Label(my_w, text='Minute')
l_mn.grid(row=1, column=2, sticky='N')

mn = tk.Scale(my_w, from_=0, to=59,
    orient='vertical', length=150, command=my_upd)
mn.grid(row=2, column=2)

l_sc = tk.Label(my_w, text='Second')
l_sc.grid(row=1, column=3, sticky='N')

sc = tk.Scale(my_w, from_=0, to=59,
    orient='vertical', length=150, command=my_upd)
sc.grid(row=2, column=3)

sel.trace_add('write', my_upd)  # on change of string variable
my_upd()  # Show the date and time while opening
my_w.mainloop()
ttk.Style 🔝

DateEntry inherits from ttk.Entry therefore the styling is done using a ttk style
Use the clam them if style is not working.
import tkinter as tk
from tkinter import ttk
from tkcalendar import DateEntry
from tkinter import font

# Initialize the main window
my_w = tk.Tk()
my_w.geometry('380x200')

# Define a larger font
large_font = font.Font(family='Helvetica', size=12)

# Configure the style for DateEntry
style = ttk.Style(my_w)
style.theme_use('clam')  # Available themes: 'clam', 'alt', 'default', 'classic'

# Customize the DateEntry style
style.configure('my.DateEntry',
                fieldbackground='lightblue',  # Background color of the entry field
                background='dark green',      # Background color when the dropdown is open
                foreground='dark blue',       # Text color in the entry field
                arrowcolor='red',             # Color of the dropdown arrow
                bordercolor='black',          # Border color of the entry field
                darkcolor='gray',             # Color for dark areas (e.g., arrow borders)
                lightcolor='white',           # Color for light areas (e.g., arrow background)
                insertcolor='black',          # Color of the text cursor
                selectbackground='navy',      # Background color of selected text
                selectforeground='white',     # Text color of selected text
                font=large_font)              # Font of the text in the entry field

# Create the DateEntry widget with the custom style
cal = DateEntry(my_w, style='my.DateEntry', selectmode='day', font=large_font)
cal.grid(row=1, column=1, padx=20, pady=20)

# Run the application
my_w.mainloop()
Quick Details of DateEntry Widget 🔝
Class Definition
The DateEntry class is defined as class tkcalendar.DateEntry(master=None, **kw). It's a date selection entry with a drop-down calendar, and it's based on tkinter.ttk.Entry.
Inherited Options
The DateEntry widget inherits options from both ttk.Entry and Calendar widgets.
ttk.Entryoptions include:class,cursor,style,takefocus,xscrollcommand,exportselection,justify,show,state,textvariable, andwidth.Calendaroptions include:year,month,day,firstweekday,weekenddays,mindate,maxdate,showweeknumbers,showothermonthdays,locale,date_pattern, andselectmode. Note that thecursoroption is renamedcalendar_cursorto avoid conflicts with thettk.Entryoption.
Initialization
- The
__init__method creates an entry field with a drop-down calendar for date selection. - If the user input is not a valid date, the entry content is reset to the last valid date when the entry loses focus.
Methods
cget(key): Returns the resource value for a specifiedkey.config(cnf={}, **kw)andconfigure(cnf={}, **kw): Configures the widget's resources using keyword arguments.destroy(): Destroys the widget and its descendants.drop_down(): Displays or hides the drop-down calendar.get_date(): Returns the content of theDateEntryas adatetime.dateinstance.keys(): Returns a list of all resource names for the widget.set_date(date): Sets the value of theDateEntryto a givendate, which can be adatetime.date,datetime.datetime, or a string in the locale's%xformat.state(*args): Modifies or queries the widget's state.
Virtual Events
<<DateEntrySelected>>: This event is generated each time a user selects a date.
#Python #Tkinter #PythonGUI: Implementing Date Picker with tkcalendar's DateEntry Widget
Read the list of formats used in displaying Date & time
Generating Query using FROM-TO dates DateEntry mindate & maxdate Calendar mindate & maxdate tkcalendar
Projects in Tkinter Ttkbootstrap DateEntry

Subhendu Mohapatra
Author
🎥 Join me live on YouTubePassionate about coding and teaching, I publish practical tutorials on PHP, Python, JavaScript, SQL, and web development. My goal is to make learning simple, engaging, and project‑oriented with real examples and source code.
Subscribe to our YouTube Channel here
This article is written by plus2net.com team.
https://www.plus2net.com

01-04-2023 | |
| nice guide | |
 Python Video Tutorials