Entry: Collect single line user input
Show Table of Content
- Attributes of Entry widget
- Reading data of Entry box and entering data
- To Delete text of Entry box
- Using a Reset button
- Resetting all Entry boxes
- Default text in Entry widget
- Disable or Enable Entry widget
- Password entry text
- validate='key'
- validatecommand
- Formatting Inputs
- Listing all attributes
- select_range(0,'end')
- Uses of Entry box
- Select all text on Focus of Entry widget
- Counting Number of char entered
- Commonly used Events of Entry widget
- Difference between KeyPress and KeyRelease events
- Display data from Database table in Entry widget
User input for single line of text. ( for multi line user input use Text)
t1=tk.Entry(parent_window,attributes)parent_window : Declared Parent window attributes : Various attributes can be added, list is given below. 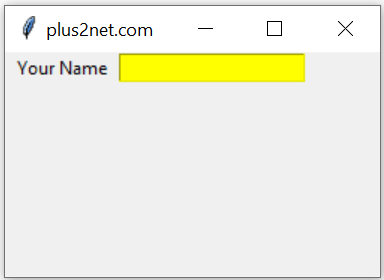
import tkinter as tk
my_w = tk.Tk()
my_w.geometry("250x150")
my_w.title("plus2net.com") # Adding a title
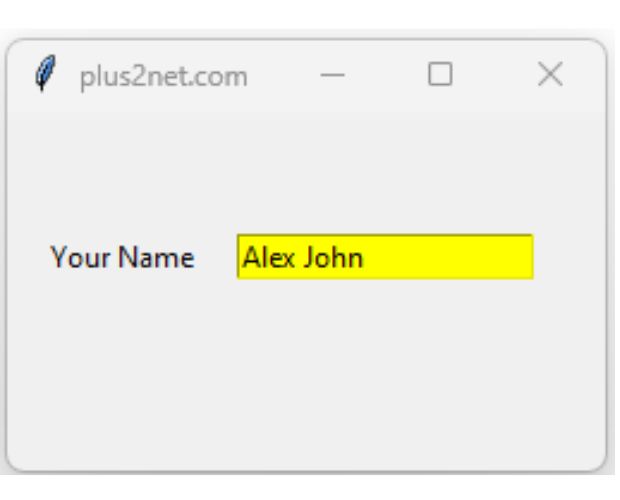
l1 = tk.Label(my_w, text='Your Name', width=10 ) # added one Label
l1.grid(row=1,column=1)
e1 = tk.Entry(my_w, width=20,bg='yellow') # added one Entry box
e1.grid(row=1,column=2)
my_w.mainloop()
Tkinter entry widget with options and methods to manage user inputs. Reading & setting default data
Attributes or Options 🔝
bg | Color of the background. We can use Hex value or colour name. ( bg='green' or bg='#ffff00') | |
bd | Border size, default value is 1 | |
cursor | Shape of the cursor while moving over the Entry widget. A list of shapes are available at Button Page. | |
font | font style ,size used. Check the example below | |
fg | font colour. Check the example below | |
justify | Alignment of text. Values are 'left','center' or 'right' | |
relief | The borders 3 D effect style. It can take these values 'raised' , 'sunken' ,'flat', 'ridge', 'solid' & 'groove' | |
selectbackground | Colour of the background when text is selected | |
selectforeground | Colour of the font when text is selected | |
selectborderwidth | Size of the border around the selection, default value is 0 | |
show | Entries can be masked, especially useful for passwords.. Check the example below. | |
state | Values can be 'disabled', 'normal','readonly'. Check the example below. | |
textvariable | variable associated with the Entry. Used for setting or reading the user entered data. Usually StringVar is used. | |
width | width of the widget, default value is 20 | |
xscrollcommand | Connecting Entry widget to a scrollbar |
Reading data of Entry box and entering data 🔝
We can read the data entered inside the Entry text box ( e1 is the Entry box )e1.get()To Delete text of Entry box 🔝
To clear the text available inside Entry box use this.e1.delete(0,END)Using a Reset button 🔝
We can use one click event of a button to clear or Reset the text entered in an Entry box.import tkinter as tk
my_w = tk.Tk()
my_w.geometry("380x200")
e1=tk.Entry(my_w,text='plus2net',font=24)
e1.grid(row=0,column=0,padx=5,pady=20)
b1=tk.Button(my_w,text='Reset',font=24,command=lambda:e1.delete(0,'end'))
b1.grid(row=0,column=1,padx=10,pady=20)
my_w.mainloop()Resetting all Entry boxes 🔝
Irrespective of number of Entry boxes we used in our application, we can remove all user entered data by using winfo_children() which returns all the widget classes of the Tkinter window. Here is the codefor widget in my_w.winfo_children():
if isinstance(widget, tk.Entry): # If this is an Entry widget
widget.delete(0,'end') # Delete all entries Default text in Entry widget 🔝
We can keep any default text or data from any other input system inside an Entry box. For this we will use one StringVar().We can bind the StringVar() e1_str to our Entry box e1. Now we are adding one default text Welcome to the Entry text.
e1_str=tk.StringVar(my_w) # Declaring String variable
e1 = tk.Entry(my_w,textvariable=e1_str,width=15) # added one Entry box
e1.grid(row=1,column=2)
e1_str.set('Welcome')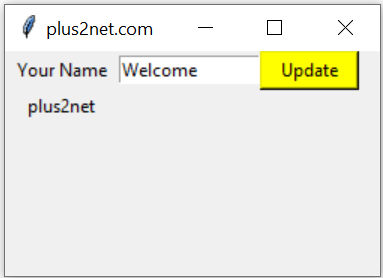
def my_upd():
    my_str.set(e1.get()) # read and assign text to StringVar()
e1_str.set('Welcome')# Update the Entry box textIn next line we will assign the string 'Welcome' to the StringVar() binded to Entry box ( e1 ).
import tkinter as tk
my_w = tk.Tk()
my_w.geometry("250x150")
my_w.title("plus2net.com")  # Adding a title

l1 = tk.Label(my_w,  text='Your Name', width=10 )  # added one Label
l1.grid(row=1,column=1)
e1_str=tk.StringVar()
e1 = tk.Entry(my_w,textvariable=e1_str,width=15) # added one Entry box
e1.grid(row=1,column=2)

b1 = tk.Button(my_w, text='Update', width=8,bg='yellow',
    command=lambda: my_upd())
b1.grid(row=1,column=3)

my_str = tk.StringVar()
# added one Label
l2 = tk.Label(my_w,  text='Output',textvariable=my_str, width=10 )
l2.grid(row=2,column=1)

def my_upd():
    my_str.set(e1.get()) # read and assign text to StringVar()
    e1_str.set('Welcome')# Update the Entry box text
my_w.mainloop()e1.config(bg='red') # change background color to redDisable or Enable Entry widget 🔝
The attribute state takes three values normal , disabled & readonlye1 = tk.Entry(my_w, width=20,bg='yellow', state='disabled')
e1.grid(row=1,column=2) e1 = tk.Entry(my_w, width=20,bg='yellow')
e1.grid(row=1,column=2)
e1.config(state='disabled')Password entry text 🔝
We can mask the user entered text by usingshow='*' or we can use other chars show='#'
e1 = tk.Entry(my_w, show='*')validate='key' 🔝
We can use the attribute validate to trigger validation of user input. This will take values focus, focusin, focusout, key, all, none.How to Validate user entered data
validatecommand 🔝
the callback function to execute based on validate setting.How to Validate user entered data
Formatting Input 🔝
We can format the input by using locale library.Formatting input data
Listing all attributes 🔝
e1.config() is a dictionary with keys as attributes of the entry widget. We can display all keys with its values like this.for options in e1.config():
print(options + ": " + str(e1[options]))background: Aqua
bd: 1
bg: Aqua
borderwidth: 1
cursor: xterm
-----
-----
Tkinter entry options managing foreground & background colour with listing of all options & values
select_range(0,'end') 🔝
We can select the range of text from the Entry widget by using select_range().How select_range() is used in Cut Copy Paste in Entry box
Uses of Entry box 🔝
In practice we will frequently come across requirement of Entry box. Most common requirements are listed here.
How to read the entered text.
How to delete the entered text.
How to configure the font colour and background colour of the text entry box.
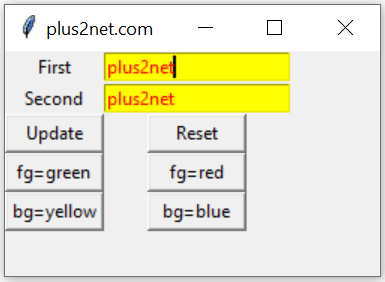
Copy data from first entry box to second entry on button click or using trace method in Tkinter
We will create two Entry boxes. The first entry box e1 we will use to enter the data. On click of the Update button data from first entry box e1 will transfer to second entry box e2. One more button we will use to delete all data from second entry box e2.
By using two buttons we can change the font colour of second entry box e2 to green or red. Similarly by using two more buttons we can change the background colour of second entry box e2.
import tkinter as tk
my_w = tk.Tk()
from tkinter import *
my_w.geometry("250x150")
my_w.title("plus2net.com")  # Adding a title

l1 = tk.Label(my_w,  text='First' )  # added one Label
l1.grid(row=1,column=1)
e1_str=tk.StringVar()
e1 = tk.Entry(my_w,textvariable=e1_str) # added one Entry box
e1.grid(row=1,column=2)


l2 = tk.Label(my_w,  text='Second' )  # added one Label
l2.grid(row=2,column=1)
e2_str=tk.StringVar()
e2 = tk.Entry(my_w,textvariable=e2_str) # added one Entry box
e2.grid(row=2,column=2)

b1 = tk.Button(my_w, text='Update', width=8,
    command=lambda: my_upd())
b1.grid(row=3,column=1)

b2 = tk.Button(my_w, text='Reset', width=8,
    command=lambda: my_reset())
b2.grid(row=3,column=2)
## buttons for changing font colour of Entries

b3 = tk.Button(my_w, text='fg=green', width=8,
    command=lambda: my_config('fg','green'))
b3.grid(row=4,column=1)

b4 = tk.Button(my_w, text='fg=red', width=8,
    command=lambda: my_config('fg','red'))
b4.grid(row=4,column=2)

b5 = tk.Button(my_w, text='bg=yellow', width=8,
    command=lambda: my_config('bg','yellow'))
b5.grid(row=5,column=1)

b6 = tk.Button(my_w, text='bg=blue', width=8,
    command=lambda: my_config('bg','blue'))
b6.grid(row=5,column=2)


def my_upd():
    e2_str.set(e1.get()) # read and assign text to StringVar()
def my_reset():
    e1.delete(0,END) # Delete first Entry
    e2.delete(0,END) # Delete Second Entry
    e1.config(bg='#ffffff',fg='#000000') # reset background
    e2.config(bg='#ffffff',fg='#000000') # reset background
def my_config(type,col):
    if type=='fg':
        e1.config(fg=col)
        e2.config(fg=col)
    elif type=='bg':
        e1.config(bg=col)
        e2.config(bg=col)
my_w.mainloop()
Select all text on Focus of Entry widget 🔝
e1.bind("<FocusIn>",lambda x: e1.select_range(0,tk.END))Counting Number of char entered 🔝
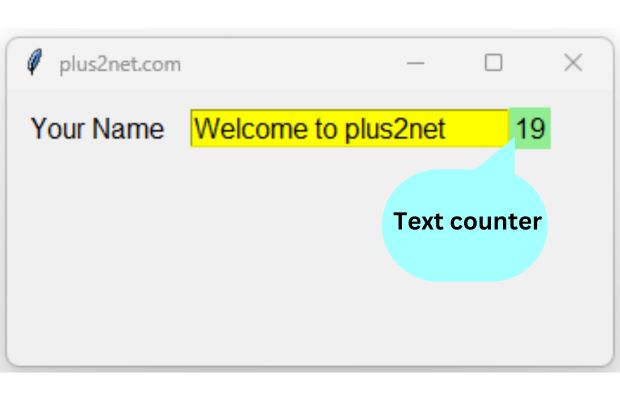
Key Release event to count number of chars entered in a Tkinter Entry box #entry #tkinter #keyEvent
By using Key Release event we can count the number of chars entered by the user in an Entry box. Here we have used len to get the number of chars inside the Entry box. To display the number in a Label using StringVar(), we have converted the number to string by using str().
import tkinter as tk
my_w = tk.Tk()
my_w.geometry("350x150")
my_w.title("plus2net.com")  # Adding a title

l1 = tk.Label(my_w,text='Your Name',width=10,font=20)
l1.grid(row=1,column=1,padx=5,pady=10)

e1 = tk.Entry(my_w,bg='yellow',font=28)
e1.grid(row=1,column=2)
str1=tk.StringVar(value=0) # StringVar for l2
l2=tk.Label(my_w,text=0,
    bg='lightgreen',textvariable=str1,width=2,font=28)
l2.grid(row=1,column=3)

e1.bind("<KeyRelease>",
    lambda x : str1.set(str(len(e1.get()))))
my_w.mainloop()
Commonly used Events of Entry widget 🔝
Here are some commonly used Events with the Entry widget.<FocusIn> : When we click the Entry widget or it is in focus and mouse is inside it. <FocusOut> : When focus is moved out of the Entry widget. Tab key is pressed or Mouse clicked outside. <KeyRelease> : When any key is released.<KeyPress> : When any key is pressed.
import tkinter as tk
my_w = tk.Tk()
my_w.geometry("350x150")
my_w.title("plus2net.com")  # Adding a title

l1 = tk.Label(my_w,  text='Name', width=5,font=22 )  #
l1.grid(row=1,column=1,pady=50)

e1 = tk.Entry(my_w,bg='yellow',width=12,font=22)
e1.grid(row=1,column=2,padx=2)

str1=tk.StringVar()
e2 = tk.Entry(my_w,bg='#BFEFFF',width=12,font=22,textvariable=str1)
e2.grid(row=1,column=3,padx=5)

def my_upd(event):
    str1.set(e1.get())

e1.bind('<FocusIn>',lambda n:e1.config(bg='lightgreen'))
e1.bind('<FocusOut>',lambda n:e1.config(bg='lightyellow'))
e1.bind('<KeyRelease>',my_upd)

my_w.mainloop()
Difference between KeyPress and KeyRelease event 🔝
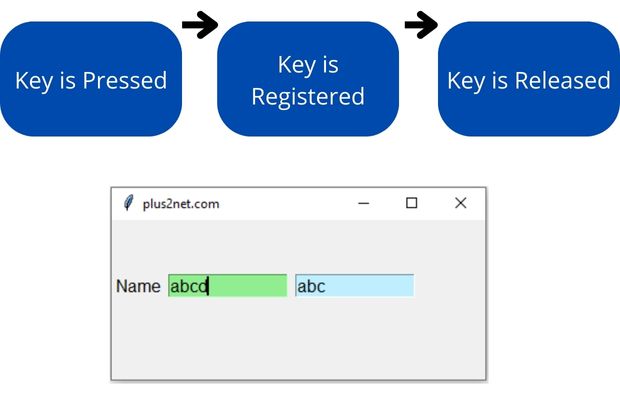
Replace the last line in above code with KeyRelease event and check the difference.
e1.bind('<KeyPress>',my_upd)Display data from Database table in Entry widget 🔝
First connect to database and execute the query to get data. Create a Tkinter window with Entry widget and display the data by assigning value option of StringVar.
from sqlalchemy import create_engine
from sqlalchemy import text
# Connect to database using your user id and password
my_conn = create_engine("mysql+mysqldb://userid:password@localhost/database_name")
r_set = my_conn.execute(text("SELECT name FROM student WHERE id=6"))  # execute query
my_result = r_set.fetchone()  # get the data
print(my_result[0])  # print to console

# Create Tkinter window and show the value
import tkinter as tk

my_w = tk.Tk()
my_w.geometry("250x150")
my_w.title("plus2net.com")  # Adding a title

l1 = tk.Label(my_w, text="Your Name", width=10)  # added one Label
l1.grid(row=1, column=1)
e1_str = tk.StringVar(value=my_result[0])  # default value taken from database
e1 = tk.Entry(my_w, width=20, bg="yellow", textvariable=e1_str)  # added one Entry box
e1.grid(row=1, column=2)

my_w.mainloop()
View and Download tkinter-entry2.ipynb file
Tkinter Text How to Validate user entered data Dynamically create Entry box with Label Cut Copy Paste in Entry box Configure Background based on number of Chars entered Change Lower case to Upper case char
Convert Feet to Meter and vice versa
Tkinter Autocomplete using Entry & Listbox. simpledialog to take user inputs

Subhendu Mohapatra
Author
🎥 Join me live on YouTubePassionate about coding and teaching, I publish practical tutorials on PHP, Python, JavaScript, SQL, and web development. My goal is to make learning simple, engaging, and project‑oriented with real examples and source code.
Subscribe to our YouTube Channel here
This article is written by plus2net.com team.
https://www.plus2net.com

 Python Video Tutorials