Text : Multi-line data entry widget
- Reading data of a Text widget
- Copy text to a Label
- Total number of chars inside the Text widget
- Deleting last char inside Text widget
- insert() : Adding string to text widget
- Delete ( or empty ) text box
- Remove all inputs from all text widgets
- Focus text box
- Methods
- tag_add(), tag_config() & tag_remove()
- Using buttons to trigger events using tags
- Adding Hyperlink inside Text widget
- Selecting all data from Text box : Cut Copy Paste
- Undo and Redo
- Listing all attributes
- Details on Attributes of a textbox
- How to Add Events to Tkinter Text Widget
- Questions

We will keep one Label along with a text box.

Tkinter Text style & to read input & display text on click event of button by get() & set() methods
User input for multi-line of text. ( for single line of text use Entry)
t1=tk.Text(parent_window,options)parent_window : Declared Parent window options : Various options can be added, list is given below.
import tkinter as tk
my_w = tk.Tk() # Parent window
my_w.geometry("400x180") # Width height of parent window

l1 = tk.Label(my_w,  text='Address')  # added one Label
l1.grid(row=1,column=1,padx=5,pady=50) # placed on grid

t1 = tk.Text(my_w, width=40,bg='yellow' , height=4) # Text
t1.grid(row=1,column=2)  # placed on grid

my_w.mainloop()Reading data of a Text widget 🔝
Read data from the text box, starting from the first character to the end.t1.get("1.0",END)To remove the line break at the end, modify it as follows.
t1.get("1.0",'end-1c')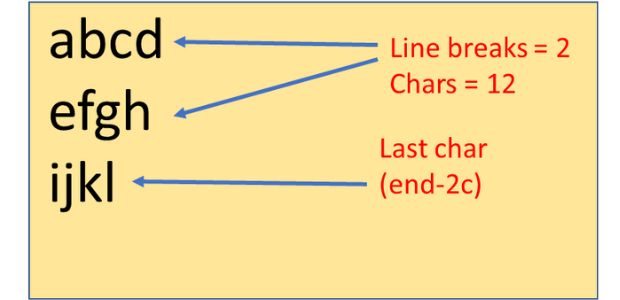
For a multi-line text above code will remove line break at the last line only. To calculate the total number of chars the user has entered inside the text widget, we have to count the number of line breaks ( excluding the last one ).
len() : Return the number of elements present in an iterable
count() : Counts the number of matching string present.
Copy text to a Label 🔝

When the "Update" button (b1) is clicked, the my_upd function is called, which reads the content from t1 and updates the second label (l2) with this text, replacing its initial "I will update" message. The GUI layout uses the grid system to position widgets neatly across two rows, making it user-friendly and organized.
import tkinter as tk
from tkinter import BOTH, END, LEFT
my_w = tk.Tk()
my_w.geometry("500x300")
font1=['Arial',22,'normal']
def my_upd():
    #my_str.set(t1.get("1.0",END))  # read the text box data and update the label
    l2.config(text=t1.get("1.0",'end-2c'))

my_str = tk.StringVar() # textvariable of 2nd Label

l1 = tk.Label(my_w,  text='Name', font=font1) # added one Label
l1.grid(row=1,column=1,padx=2)

t1 = tk.Text(my_w,  height=2, width=10,bg='yellow',font=font1)# added one text box
t1.grid(row=1,column=2)

b1 = tk.Button(my_w, text='Update', width=10,bg='red',command=lambda: my_upd()) # button added
b1.grid(row=1,column=3)

l2 = tk.Label(my_w,  text='I will update', width=20,bg='lightgreen' ,font=font1) # added one Label
l2.grid(row=2,column=1,columnspan=3,padx=10,pady=20)
#my_str.set(" I will update") # default text for Lable l2
t1.focus()
my_w.mainloop() # to keep the window open
Total number of chars inside the Text widget 🔝
my_str=t1.get("1.0",'end-1c') # excluding the last line break char.
breaks=my_str.count('\n')  # Number of line breaks ( except last one )
char_numbers=len(my_str)-breaks # total chars excluding line breaks
Deleting last char inside Text widget 🔝
t1.delete('end-2c')insert() : Adding string to text widget 🔝
Adding data to a text box my_str1 is the string variable to insert.t2.insert(tk.END, my_str1) # adding at the endt2.insert('1.0','Welcome ')# first line first positiont2.insert('1.5','Welcome ')# first line 5th positionNote that the widely used option textvariable is not available with Text widget
There are many options we can add to text box, the list is available below.
Now let us add the click event of the button linked to text box. We will enter data in our text box , on click of the button the entered data will be displayed at another Label.
import tkinter as tk
from tkinter import BOTH, END, LEFT
my_w = tk.Tk()
my_w.geometry("500x300")

def my_upd():
    my_str.set(t1.get("1.0",END))  # read the text box data and update the label

my_str = tk.StringVar()

l1 = tk.Label(my_w,  text='Your Name', width=10 ) # added one Label
l1.grid(row=1,column=1)

t1 = tk.Text(my_w,  height=1, width=20,bg='yellow')# added one text box
#t1=Entry(my_w, width=10)
t1.grid(row=1,column=2)

b1 = tk.Button(my_w, text='Update', width=10,bg='red',command=lambda: my_upd()) # button added
b1.grid(row=1,column=3)

l2 = tk.Label(my_w,  textvariable=my_str, width=20 ) # added one Label
l2.grid(row=1,column=4)
my_str.set(" I will update")

my_w.mainloop()import tkinter as tk
from tkinter import BOTH, END, LEFT
my_w = tk.Tk()
my_w.geometry("500x400")
def my_upd():
my_str1=t1.get("1.0",END) # read from one text box t1
t2.insert(tk.END, my_str1) # Add to another text box t2
my_str = tk.StringVar()
l1 = tk.Label(my_w, text='Your Name', width=10 ) # added one Label
l1.grid(row=1,column=1)
t1 = tk.Text(my_w, height=1, width=20,bg='yellow')# added one text box
#t1=Entry(my_w, width=10)
t1.grid(row=1,column=2)
b1 = tk.Button(my_w, text='Update', width=10,bg='red',command=lambda: my_upd()) # button added
b1.grid(row=1,column=3)
t2 = tk.Text(my_w, height=1, width=15, bg='#00f000' ) # added one textbox to read
t2.grid(row=1,column=4)
my_w.mainloop()Delete ( or empty ) text box 🔝
We can clear data from the first text box after updating the second. In above code you can two more lines inside the function.def my_upd():
my_str1=t1.get("1.0",END) # read from one text box t1
t2.insert(tk.END, my_str1) # Add to another text box t2
t1.delete('1.0',END) # Delete from position 0 till end
t1.update() # update the deleteRemove all inputs from all text widgets 🔝
Irrespective of number of Text boxes we used in our application, we can remove all user entered data by using winfo_children() which returns all the widget classes of the Tkinter window. Here is the codefor widget in my_w.winfo_children():
if isinstance(widget, tk.Text): # If this is an Entry widget
widget.delete(0,'end') # Delete all entries Focus text box 🔝
To keep the ( blinking ) cursor inside text boxt1.focus() Methods 🔝
Delete chars from start position to end positionl2.delete(1.4,1.7) # from 4th till 7th position of line onel2.delete(1.0,END) # from starting till endget()
print(l2.get(1.4,1.7)) # print from 4th till 7th position of line one
print(l2.get(1.0,END))  # Print from starting till end
tag_add(), tag_config() & tag_remove() 🔝
import tkinter as tk
from tkinter import BOTH, END, LEFT
my_w = tk.Tk()
my_w.geometry("400x300")
l1 = tk.Label(my_w,text='Your Name', width=10) #added one Label
l1.grid(row=1,column=1)
t1 = tk.Text(my_w,width=35,height=4) #text box
t1.grid(row=1,column=2,columnspan=2,pady=30)
font1=('Times',16,'underline')
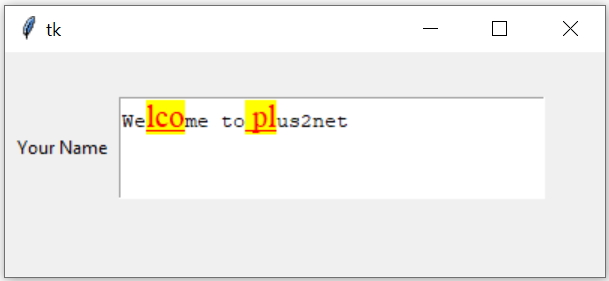
t1.insert(tk.END, "Welcome to plus2net")
t1.tag_add("my_hg", "1.2", "1.13") # tag name my_hg is created
t1.tag_config("my_hg",background="yellow",foreground="red",font=font1)
t1.tag_remove('my_hg','1.5','1.10') # tag is removed from part
my_w.mainloop()Using buttons to trigger events using tags 🔝
We can destroy the tag by using tag_delete(). Similarly we can use tag_remove() and tag_config() by using button clicks.#t1.tag_delete('my_hg')
b1=tk.Button(my_w,text='Remove tag',command=lambda:t1.tag_remove('my_hg','1.0','1.7'))
b1.grid(row=2,column=2,pady=10)
b2=tk.Button(my_w,text='Green tag',command=lambda:t1.tag_config('my_hg',background="green",foreground="red",font=font1))
b2.grid(row=2,column=3,pady=10)Adding hyperlink inside text widget 🔝
import tkinter as tk
import webbrowser

def open_link(url):
    webbrowser.open(url)

my_w = tk.Tk()
my_w.geometry("400x200")
text = tk.Text(my_w, height=5, width=30, cursor="hand2")
text.grid(row=1,column=1,padx=20,pady=20)
text.insert(tk.INSERT, "Visit ")
text.insert(tk.INSERT, "Google", 'link')
text.tag_configure('link', foreground='blue', underline=True)
text.tag_bind('link', '<Button-1>', lambda e: open_link("https://www.plus2net.com"))

my_w.mainloop()
Selecting all data from Text box : Cut Copy Paste 🔝
def select_all(): # to select all text inside Text box
    e1.tag_add("sel", "1.0","end") # all text selected
e1.tag_config("sel",background="green",foreground="red")Undo and redo 🔝
Set attribute undo to truet1=tk.Text(my_w,height=4,bg='yellow',undo=True)
Tkinter text widget adding tags by usign tag_add(), tag_config(),tag_remove() and tag_delete()
Listing all attributes 🔝
for option in t1.config():
    print(option + ' :' ,str(t1[option]))
Details on Attributes of a textbox 🔝
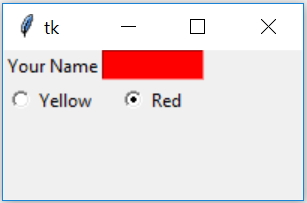 | |
| bg | Background colour of the text boxWe have two radio buttons , on select of radio buttons we can change the background colour of the text box. t1.configure(bg=r1_v.get()) Read more on Radio buttons Full code is here |
| bd | Border around the Text. Default width is 2 |
| cursor | cursor that will appear once the mouse is over the text box
|
| exportselection | Selection is to be exported or not. The default is usually for widgets to export selection.
|
| font | Managing font size, family, type etc
Managing font using Menu bar |
 | |
| fg | Colour used for fg
|
| height | Height in number of lines
|
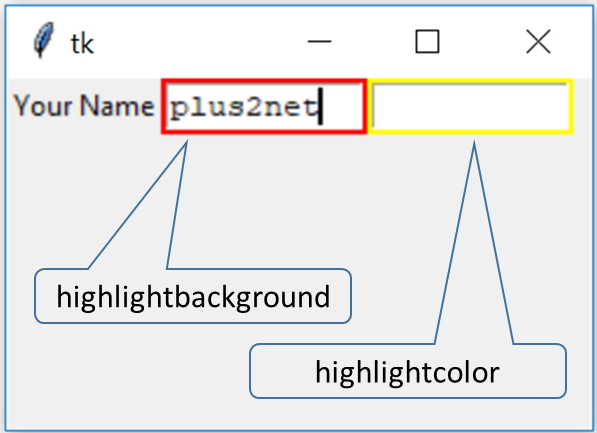 |
highlightbackground
|
focus highlight color ( the rectangle around the text box ) when text box is not in focus. ( Note keep highlightthickness = 2 to get a visible output of the rectangle around the text box ) |
focus highlight ( the rectangle around the text box ) color when text box is in focus
|
highlightthickness
The width of the focus heighlight. ( the rectangle around the text box ) Default value is 1.
| |
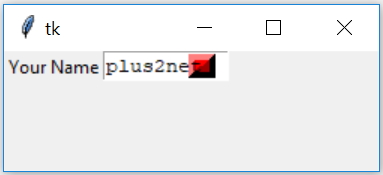 | |
insertbackground
| Blinking Cursor background colour. Here we kept insertwidth=15 to make the cursor thick enough to make it visible. We have changed insertborderwidth=10 to make the 3 D effect visible. |
insertborderwidth
Widht of the border of Cursor to give 3 D Effect.
|
The off time in milliseconds for the blinking cursor. For 0 value it will not blink.
|
The on time in milliseconds for the blinking cursor.
|
Width of the blinking cursor |
| justify | Text justification . Values can be LEFT RIGHT or CENTER |
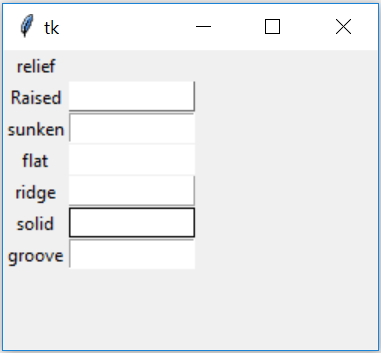 | |
| relief The text box 3 D effect style. It can take these values raised , sunken ,flat, ridge, solid & groove |
| selectbackground | The background colour of the selected text inside the textbox.
|
| selectborderwidth | The width of the boarder around selected text |
| selectforeground | The colour of the font of selected text
|
| width | Width in number of chars |
| xscrollcommand | Add scroll bar to text box |
| wrap | values can be char, none, word
How to use Checkbutton to wrap text in Entry widget |
How to Add Events to Tkinter Text Widget 🔝
The Tkinter Text widget is versatile and allows you to bind events to it, enabling interactive functionality. Here's how you can add events to a Tkinter Text widget:Steps to Add Events to a Tkinter Text Widget
- Create the Text widget.
- Use the bind() method of the widget to associate an event with a callback function.
- Define the callback function to handle the event.
Example: Handling Keyboard Events
import tkinter as tk

# Callback function to handle the event
def on_key_press(event):
    print(f"Key pressed: {event.char}")

# Callback for mouse click
def on_mouse_click(event):
    print(f"Mouse clicked at position: {event.x}, {event.y}")

# Create the main application window
root = tk.Tk()
root.title("Text Widget Event Example")

# Create a Text widget
text_widget = tk.Text(root, width=40, height=10)
text_widget.pack(pady=10)

# Bind events to the Text widget
text_widget.bind("<KeyPress>", on_key_press)  # Key press event
text_widget.bind("<Button-1>", on_mouse_click)  # Left mouse click event

# Start the Tkinter main loop
root.mainloop()
Explanation of Code
- Key Press Event (<KeyPress>): Triggered when a key is pressed. The event.char property holds the character of the key pressed.
- Mouse Click Event (<Button-1>): Triggered when the left mouse button is clicked within the widget. The event.x and event.y properties provide the click's coordinates.
Common Events for Text Widget
Here are some commonly used events that you can bind to a Text widget:- <KeyPress>: Detect key presses.
- <KeyRelease>: Detect key releases.
- <Button-1>: Detect left mouse button clicks.
- <Button-3>: Detect right mouse button clicks.
- <Motion>: Detect mouse movement.
- <Enter>: Triggered when the mouse enters the widget area.
- <Leave>: Triggered when the mouse leaves the widget area.
Notes
- The bound callback functions receive an event object as an argument, which provides detailed information about the event.
- You can bind multiple events to the same Text widget for richer interactivity.
- Exercise on Text
- Ask user to enter Name, marks ( in three subjects Physics, Chemistry, Math ) and attendance of a student. On Update , the data will be stored in a Dictionary and finally in a CSV file. ( Break it in parts, First display the data using print(), then create Dictionary and then save as CSV file. )
- Create one user data entry box in the window and on click of the Save button the text entered in the entry box will be saved into one text file using the filedialog.
( Solution ) Save data entered by user in Tkinter window - Save the above user entered data to one PDF file.
( Solution ) Save data entered by user in Tkinter window to PDF file
Questions 🔝
- How can you create a Text widget in a Tkinter application and what are the basic options available for customization?
- What methods are available in the Tkinter Text widget for inserting and retrieving text?
- How do you configure the height and width of a Text widget in Tkinter, and what units are used for these dimensions?
- In Tkinter's Text widget, how can you implement text scrolling with Scrollbars?
- Can you apply formatting (such as font changes, colors, or styles) to specific parts of the text within a Text widget? If so, how?
- How do you handle events within a Text widget, such as detecting when a user changes the text or clicks a specific part of the text?
- What are "tags" in the context of a Tkinter Text widget and how are they used to manage text properties and events?
- How can you implement undo and redo functionality in a Tkinter Text widget?
- In the context of a Tkinter Text widget, how do you work with embedded widgets or images within the text flow?
- What is the difference between the .get() and .insert() methods in the context of the Tkinter Text widget, and when would you use each?
Tool to generate Hashtags from a string

Subhendu Mohapatra
Author
🎥 Join me live on YouTubePassionate about coding and teaching, I publish practical tutorials on PHP, Python, JavaScript, SQL, and web development. My goal is to make learning simple, engaging, and project‑oriented with real examples and source code.
Subscribe to our YouTube Channel here
This article is written by plus2net.com team.
https://www.plus2net.com

20-07-2021 | |
| i would like to know if you had an simple textbox say height=525, width=450 that is empty, you add a label to the textbox at line 1.0, the cursor starts at 1.0 how do i get the cursor to start at line 3.110 i have tried widgetname.focus() and widgetname..mark_set("insert", position x,y) but the cursor still start at 1.0 any help would be great | |
 Python Video Tutorials