Python tkinter Canvas
 Canvas can be used to create graphics by using Lines, rectangles , Arcs etc. It can be used to hold different types of widgets.
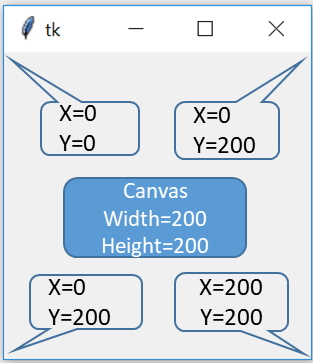
X - Horizontal coordinates
Y - Vertical coordinates
Basics of Python Tkinter
Tkinter canvas to add items like line, text , rectangle , oval, polygon, arc and Images with options
import tkinter as tk
my_w = tk.Tk()
my_c = tk.Canvas(my_w,width=200,height=200)
my_c.pack()
my_w.mainloop()create_text
import tkinter as tk
my_w = tk.Tk()
my_c = tk.Canvas(my_w,width=350,height=150)
my_c.pack()
my_c.create_text(175,40,fill='#c0c0c0',font="Times 22  bold",text="Welcome to plus2net.com")
my_w.mainloop()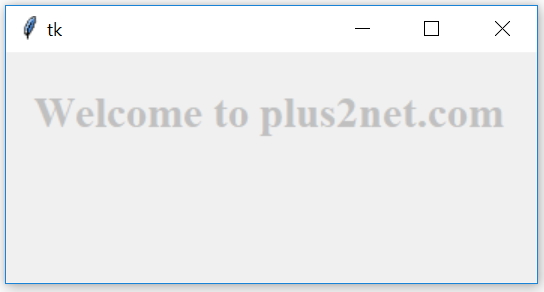
create_line
import tkinter as tk
my_w = tk.Tk()
my_c = tk.Canvas(my_w,width=100,height=100)
my_c.pack()
x1=0
y1=50
x2=90
y2=50
my_c.create_line(x1,y1, x2,y2, fill="#ff00ff")
my_w.mainloop()my_c.create_line(x1,y1, x2,y2, fill="#ff00ff",width=5)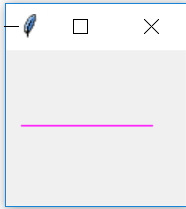
create_rectangle
import tkinter as tk
my_w = tk.Tk()
my_c = tk.Canvas(my_w,width=200,height=200)
my_c.pack()
my_c.create_rectangle(80,80,110,110,fill='#c0c0c0')
my_w.mainloop()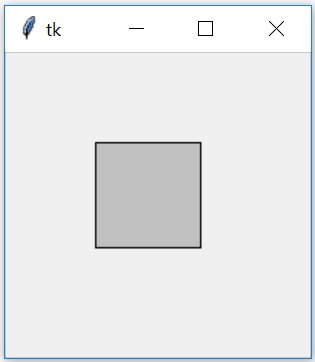
create_oval
We will draw one oval using create_oval
import tkinter as tk
my_w = tk.Tk()
my_c = tk.Canvas(my_w,width=150,height=150)
my_c.pack()
my_c.create_oval(25,25,125,125,fill='#c0c0c0')
my_w.mainloop()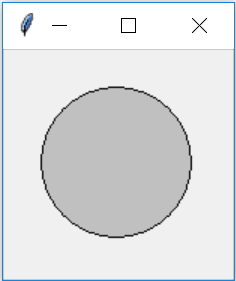
Create one Circle by using create_oval
import tkinter as tk
my_w = tk.Tk()
my_c = tk.Canvas(my_w,width=200,height=200)
my_c.pack()
def my_circle(my_canvas,x,y,r):
    my_id=my_canvas.create_oval(x-r,y-r,x+r,y+r,fill='#c0c0c0')
    return my_id
my_circle(my_c,60,60,15)
#my_c.create_oval(60,60,130,130,fill='#c0c0c0')
my_w.mainloop()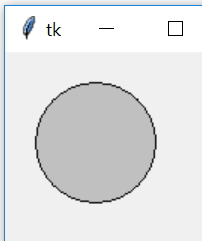
create_image
import tkinter as tk
my_w = tk.Toplevel()
from PIL import Image, ImageTk
my_c = tk.Canvas(my_w,width=200,height=200)
my_c.pack()
#image = Image.open("icon-dwn.png")
f_name = tk.PhotoImage(file='icon-dwn.png')
my_img = my_c.create_image(50, 50,  image=f_name)
my_w.mainloop()
create_arc
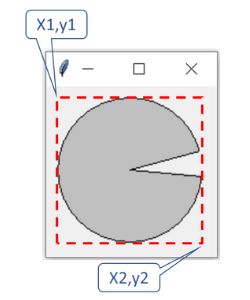
import tkinter as tk
my_w = tk.Tk()
my_c = tk.Canvas(my_w,width=150,height=150)
my_c.pack()
#my_c.create_arc(10,10,130,130,start=15,extent=160,fill='#c0c0c0')
my_c.create_arc(10,10,140,140,start=15,extent=340,fill='#c0c0c0')
my_w.mainloop()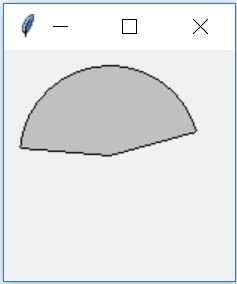
create_polygon
import tkinter as tk
my_w = tk.Tk()
my_c = tk.Canvas(my_w,width=150,height=150)
my_c.pack()
my_c.create_polygon(5,40,15,120,130,70,35,5,fill='#c0c0c0')
my_w.mainloop()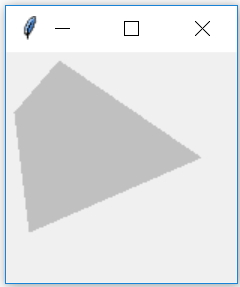
create_bitmap
import tkinter as tk
my_w = tk.Tk()
my_c = tk.Canvas(my_w,width=200,height=150)
my_c.pack()
my_c.create_bitmap( 50,50,bitmap='question')
my_w.mainloop()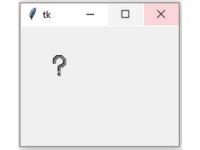
More on Tkinter Bitmap
Options
fill | Colour used to fill the shape | |
width | Line width of the item ( or its outline) | |
outline | Colour of the outline ( rectangle , Oval etc. ) | |
dash | Draw dashed line instead of solid Line width of the item ( or its outline). alternates short and long pixels. ( 2,5,210) | |
outline | Colour of the outline ( rectangle , Oval etc. ) | |
stipple | pattern fill instead of solid fill colour. gray75,gray50 etc.. | |
state | normal, disabled or hidden . Default value is normal | |
activefill | Colour when active ( mouse pointer is over the item ) | |
activeoutline | Colour of the outline when active ( Mouse is over the item ) | |
activedash | Same as dash ( above ) when active ( Mouse is over it ) | |
activewidth | Same as width ( above ) when active ( Mouse is over it ) | |
disableddash | When the item is disabled ( state=disabled) | |
disabledfill | ||
disabledoutline | ||
disabledoutlinestipple | ||
disabledstipple | ||
disabledwidth | ||
relief | Values are flat, groove, raised, ridge, solid, or sunken Check the example below how canvas is used as a vertical button. |
All options of Canvas can be displayed.
print(canvas.config().keys())for options in canvas.config():
print(options + ": " + str(canvas[options]))Using stipple and activestipple options

This Tkinter program creates a rectangle with a fill color of tomato (#ff6347), a stipple pattern (gray50), and changes to gold (#ffd700) with a lighter stipple when hovered. Inside the rectangle, the rectangle options are displayed as text in dark blue, using a bold font.
import tkinter as tk
my_w = tk.Tk()
my_c = tk.Canvas(my_w, width=400, height=400)
my_c.pack()
# Adding 'stipple' and 'activestipple' options to the rectangle
my_c.create_rectangle(
20, 20, 380, 380,
fill='#ff6347',
stipple='gray50', # Pattern for the rectangle fill
activefill='#ffd700', # Fill color when active (mouse hover)
activestipple='gray25' # Pattern for active fill
)
# Displaying rectangle options as text within the rectangle
text = "fill='#ff6347'\nstipple='gray50'\nactivefill='#ffd700'\nactivestipple='gray25'"
my_c.create_text(200, 200, text=text, fill='darkblue', font=('Arial', 14, 'bold'))
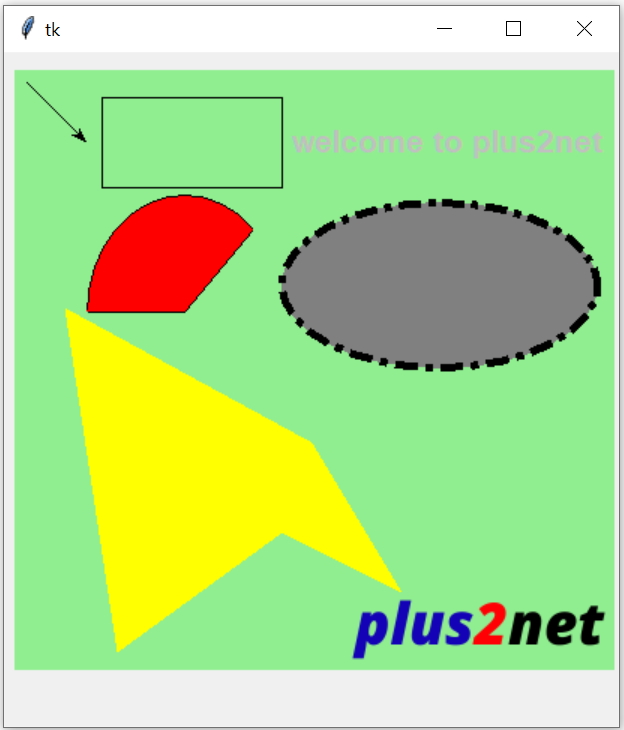
my_w.mainloop()Tkinter Canvas with Shapes, Text, and Image
This Tkinter code creates a canvas with various shapes, text, and an image. It includes a rectangle, an oval with custom dash and stipple patterns, a line with an arrow, an arc, and a polygon filled with yellow. Additionally, a welcoming text message is displayed, and an external image is loaded onto the canvas using a PhotoImage.
import tkinter as tk
my_w = tk.Tk()
width,height=410,410 # set the variables
d=str(width)+"x"+str(height+40)
my_w.geometry(d)
c1 = tk.Canvas(my_w, width=width-10, height=height-10,bg='lightgreen')
c1.grid(row=1,column=0,padx=5,pady=10)
c1.create_text(290,50,fill='#c0c0c0',font='Time 16 bold',text='welcome to plus2net')
my_rect=c1.create_rectangle(60, 20, 180, 80)
c1.create_oval(180, 90, 390, 200,fill='gray',dash=(25,5,1,10),activedash=(50,10),stipple='gray75',width=5,activestipple='gray25')
c1.create_line(10, 10, 50, 50,width=1,arrow='last')
c1.create_arc(50, 85, 180, 240, start=45, extent=135, fill="red")
c1.create_polygon(35,160, 70, 390, 180, 310,260, 350, 200, 250, fill='yellow')
f_name=tk.PhotoImage(file='D:\\top2.png')
my_img=c1.create_image(315,375,image=f_name)
#c1.delete(my_rect)
my_w.mainloop()
Using canvas as Background image
Here the variable path_image holds the path of the directory storing the image ( bg2.png )frame_m_left is the Frame we used. This frame can hold other widgets. Here by using sticky='nw' we are keeping the 0,0 position to top left edge of the image.
bg=tk.PhotoImage(file=path_image+'bg2.png')
c1 = tk.Canvas(frame_m_left,width=1000,height=500)
c1.grid(row=0,column=0,columnspan=4,rowspan=4,sticky='nw',padx=0)
c1.create_image(0,0,image=bg,anchor='nw')
Vertical text on Canvas to use as Button
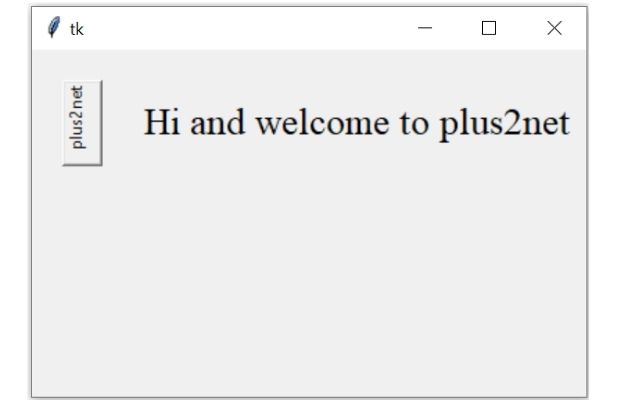
By using Canvas option angle we can rotate text. Here the width and height of the canvas has to match with the length of the text string and line height ( linespace ) of the font used.
Tkinter canvas as button to display vertical or rotated text with mouse events to trigger function
On Mouse click and mouse release events we configure the relief option of the canvas. Here on Mouse click the function my_task() is triggered to perform some additional task along with configuring the relief option to 'sunken'.
#canvas.bind("<ButtonPress-1>",lambda x:x.widget.configure(relief='sunken'))
canvas.bind("<ButtonPress-1>",lambda x:my_task()) # Mouse button pressed
canvas.bind("<ButtonRelease-1>",lambda x:x.widget.configure(relief='raised'))import tkinter as tk
import tkinter.font as tkfont
my_w = tk.Tk()
my_w.geometry("400x250")
font = tkfont.nametofont("TkDefaultFont")
my_str="plus2net " # string over the button to display.
height=font.measure(my_str) + 10 # used as canvas height
width=font.metrics()['linespace'] + 10 # as canvas width
canvas=tk.Canvas(my_w,height=height,width=width,
background="SystemButtonFace",borderwidth=2, relief='raised')
canvas.create_text((4,4),angle='90',anchor='ne',text=my_str,
fill='SystemButtonText',font=font)
canvas.grid(row=0,column=0,padx=20,pady=20)
l1_str=tk.StringVar(value='Welcome') # message on click event of cavas
l1=tk.Label(my_w,textvariable=l1_str,font=('Times',20,'normal'))
l1.grid(row=0,column=1,padx=5,pady=20)
def my_task(): # to execute when mouse button is released.
canvas.configure(relief='sunken')
l1_str.set('Hi and welcome to plus2net')
#canvas.bind("<ButtonPress-1>",lambda x:x.widget.configure(relief='sunken'))
canvas.bind("<ButtonPress-1>",lambda x:my_task()) # Mouse button pressed
canvas.bind("<ButtonRelease-1>",lambda x:x.widget.configure(relief='raised'))
my_w.mainloop()Example: Placing Tkinter Canvas in Grid Layout

import tkinter as tk
my_w = tk.Tk() # Create main window
my_w.geometry("400x300")

# Configure rows and columns to be resizable
my_w.rowconfigure(0, weight=1)
my_w.columnconfigure(0, weight=1)

# Create Canvas with background color
canvas = tk.Canvas(my_w, bg="lightblue")
canvas.grid(row=0, column=0, sticky="nsew")

# Draw an oval on the canvas
canvas.create_oval(50, 50, 150, 150, fill="yellow", outline="black")

my_w.mainloop()
Explanation:
- The canvas is set within a grid layout, allowing it to expand as the window resizes.
- The sticky="nsew" option ensures the canvas fills its cell completely in all directions.
Multiple grid cells to hold the shapes

This example demonstrates how to use a grid layout in Tkinter to place multiple canvases in separate cells, each containing unique shapes such as a rectangle, oval, and polygon.
import tkinter as tk

my_w = tk.Tk()
my_w.geometry("620x350")

# Create canvases in different grid cells
c1 = tk.Canvas(my_w, width=180, height=180, bg='lightyellow')
c1.grid(row=0, column=0, padx=10, pady=10)
c2 = tk.Canvas(my_w, width=180, height=180, bg='lightgreen')
c2.grid(row=0, column=1, padx=10, pady=10)
c3 = tk.Canvas(my_w, width=180, height=180, bg='lightblue')
c3.grid(row=0, column=2, padx=10, pady=10)

# Draw shapes in different canvases
c1.create_rectangle(30, 30, 150, 100, fill='red')
c2.create_oval(30, 30, 150, 150, fill='blue')
c3.create_polygon(30, 150, 90, 30, 150, 150, fill='orange')

my_w.mainloop()
Interactive Tkinter Circles with Background Color Change

This Tkinter program creates a window with three colored circles (red, green, blue). When each circle is clicked, it not only changes its own color but also updates the background color of the canvas to match. The canvas is built using Tkinter's grid layout and offers an interactive way to visually respond to user clicks.
The itemconfig() method in Tkinter allows you to modify the properties (such as color, outline, or fill) of an existing item on a canvas after it has been created. For example, you can change the fill color of a shape dynamically by calling my_canvas.itemconfig(item, fill='new_color').
import tkinter as tk

def change_circle_color(event, circle, new_color):
    my_c.itemconfig(circle, fill=new_color)  # Change circle color
    my_c.config(bg=new_color)

my_w = tk.Tk()
my_w.geometry("300x300")

# Create a canvas
my_c = tk.Canvas(my_w, width=300, height=300)
my_c.pack()

# Draw three circles (ovals) on the canvas
circle1 = my_c.create_oval(50, 50, 120, 120, fill='red', outline='black')
circle2 = my_c.create_oval(130, 50, 200, 120, fill='green', outline='black')
circle3 = my_c.create_oval(210, 50, 280, 120, fill='blue', outline='black')

# Bind each circle to change color on click
my_c.tag_bind(circle1, '<Button-1>', lambda event: change_circle_color(event, circle1, 'red'))
my_c.tag_bind(circle2, '<Button-1>', lambda event: change_circle_color(event, circle2, 'green'))
my_c.tag_bind(circle3, '<Button-1>', lambda event: change_circle_color(event, circle3, 'blue'))

my_w.mainloop()
Animation using Rectangles & Circles
Moving element in Canvas Moving widgets or Images on Canvas by using move()
Sin & cos curves in Canvas Scale value in Canvas Arc and pointer

Subhendu Mohapatra
Author
🎥 Join me live on YouTubePassionate about coding and teaching, I publish practical tutorials on PHP, Python, JavaScript, SQL, and web development. My goal is to make learning simple, engaging, and project‑oriented with real examples and source code.
Subscribe to our YouTube Channel here
This article is written by plus2net.com team.
https://www.plus2net.com

 Python Video Tutorials