Python tkinter Button
- Updating Label text on Click of a Button
- Enable Disable button
- Understanding Events
- Reading the attribute by using cget()
- invoke() to trigger events without clicking
- flash() : Drawing user attention
- Counting Number of clicks
- Validating inputs before activating the button
- List of Button attributes and values
- Colourful Buttons by using images
- Delete, hide and restore a Button
- List of Cursor shapes while mouse hover a button


This code we will add one button.
import tkinter as tk
my_w = tk.Tk() # parent window.
my_w.geometry("320x200")  # Size of the window, width x height
my_font=('times', 28, 'bold') # font style to use on button

b1 = tk.Button(my_w, text='I am a Button',
   bg='yellow',font=my_font,fg='green')
b1.grid(row=2,column=2,padx=30,pady=30)

my_w.mainloop()
Tkinter Button adding style foreground background font boarder relief state
There are many optional options we can add to button, the list is available below.
- command attribute is used to specify a function or a method to be executed when a Tkinter widget (like a button) is triggered by an event, such as a button click.
- lambda: Anonymous, single-line functions for quick tasks.
Now let us add the click event of the button. This will close the window.
b1 = tk.Button(my_w, text='Hi  Welcome', width=20,bg='yellow',
command=my_w.destroy)b1 = tk.Button(my_w, text='Hi Welcome', width=20,bg='yellow',
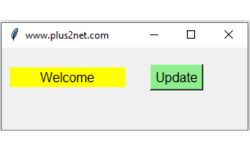
command=lambda: my_upd())Updating Label text on Click of a Button 🔝

import tkinter as tk
my_w=tk.Tk()
my_w.geometry('300x100') # width and height of the window
my_w.title('www.plus2net.com') # adding a title

# adding a Label with some default text, this text to be changed.
lb1 = tk.Label(my_w,  text='Welcome', width=15,bg='yellow',font=22 )
lb1.grid(row=1,column=1,padx=10)

# On click of this button the text on above Label will change.
bt1=tk.Button(my_w,text='Update', font=22,bg='lightgreen',
    command=lambda:lb1.config(text='plus2net',bg='lightblue'))
bt1.grid(row=1,column=2,padx=20,pady=20)

my_w.mainloop() # hold the window for user interaction
Enable Disable button 🔝


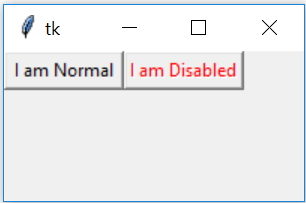
We can enable or disable a button and manage the text over the button. Here is the code to disable or enable 2nd button by using 1st button. The text also changes based on status
import tkinter  as tk
from tkinter import *
my_w = tk.Tk()
my_w.geometry("400x250")
b1 = tk.Button(my_w, text='Disable',command=lambda: my_fun())
b1.grid(row=1,column=1)

b2 = tk.Button(my_w, text='I am Enabled ', width=15)
b2.grid(row=1,column=2)

def my_fun():
    st=b2["state"]
    if(st=="normal"):
        b2["state"]="disabled"
        b2["text"]="I am Disabled"
        b1["text"]="Enable"
    else:
        b2["state"]="normal"
        b2["text"]="I am Enabled"
        b1["text"]="Disable"
my_w.mainloop()Understanding Events 🔝
By using config() method we can change the attributes of the button based on different Events.
Mouse enter and leave events of a button in a Tkinter Window
import tkinter as tk
my_w = tk.Tk()
my_w.geometry("350x150")  # width x height of window
bt1=tk.Button(my_w,text='Submit',bg='yellow',font=18,width=20)
bt1.grid(row=0,column=0,padx=80,pady=50)
def my_upd():
    bt1.config(text='Welcome',bg='lightgreen')
    # write your code here

#bt1.bind('<Enter>',lambda e:bt1.config(text='Welcome',bg='lightgreen'))
bt1.bind('<Enter>',lambda e:my_upd()) # Mouse Enter event
bt1.bind('<Leave>',lambda e:bt1.config(text='Thanks',bg='yellow'))
my_w.mainloop() # Keep the window open 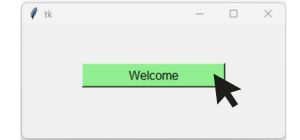
Drag and drop a button using the place layout.
Tkinter Button click event and reading by cget() and configuration of option values changing state
We will add one more button and on click of this button the colour of our Close button will change. Here is the code.
import tkinter as tk
my_w = tk.Tk()
my_w.geometry("500x500")

def my_upd():
    b2.config(bg='red')

b1 = tk.Button(my_w, text='Change Color', width=50,bg='yellow',
  command=lambda: my_upd())
b1.grid(row=2,column=2)

b2 = tk.Button(my_w, text='Close', width=20,
	bg='yellow',command=my_w.destroy)
b2.grid(row=2,column=3)

my_w.mainloop()By using above code we can change any attribute of a button, now we will learn how to read the attribute and then change the same.
Reading the attribute by using cget() 🔝
import tkinter as tk
my_w = tk.Tk()
my_w.geometry("600x200")

def my_upd():
    w=b2.cget('width') # read the width of the button
    w=w+5              # increase width by 5
    b2.config(width=w)

b1 = tk.Button(my_w, text='+', width=10,bg='yellow',
	command=lambda: my_upd())
b1.grid(row=1,column=1)

b2 = tk.Button(my_w, text='Close', width=10,bg='red',
	command=my_w.destroy)
b2.grid(row=1,column=2)

my_w.mainloop()import tkinter as tk
my_w = tk.Tk()
my_w.geometry("400x200")
def my_upd():
w=b1.cget('text') # read the text written over the button
if w=='+':
b1['text']='-' # Update text option
else:
b1.config(text='+') # update text option
font1=['Times',30,'bold'] # set the font style
b1 = tk.Button(my_w, text='+', width=10,bg='yellow', font=font1,
command=lambda: my_upd())
b1.grid(row=1,column=1,padx=20,pady=50)
my_w.mainloop()invoke() to Trigger Events without Clicking 🔝
There are two methods, flash() and invoke()invoke() method to Trigger events without Clicking the button
We can simulate the button click event by using invoke().
invoke(): Button Press event without Clicking
flash() : Drawing user attention 🔝
We can flash() the button by changing the colour from active to normal several times.flash(): Blinking the Button to draw user attention
Counting Number of Clicks of a Button 🔝
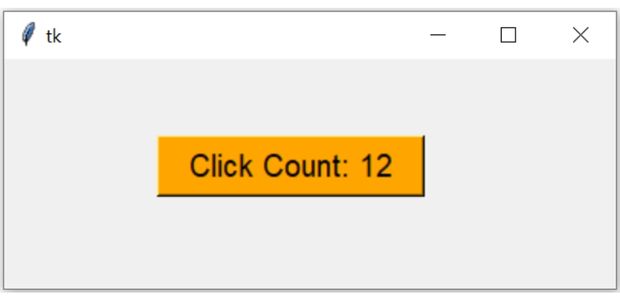
We will count the number of clicks on a button and display the same value on the button.
import tkinter as tk
my_w = tk.Tk() # Parent window
my_w.geometry("400x150")  # width and height
count=0 # initial value of counter

def my_upd():
    global count
    count=count+1 # increase by 1
    b1.config(text='Count: '+str(count)) # update text

b1=tk.Button(my_w,text='Count: 0 ',width=12,
	command=lambda:my_upd(),bg='orange',font=12)
b1.grid(row=0,column=0,padx=100,pady=50)
my_w.mainloop()
Adding a reset button
We can reset the counter value to 0 or we can reset the display to 0 but start from previous counter value.One more button b2 is added to Reset the counter.
import tkinter as tk
my_w = tk.Tk() # Parent window
my_w.geometry("400x150")  # width and height
count=0 # initial value of counter

def my_upd():
    global count
    count=count+1 # increase by 1
    b1.config(text='Count: '+str(count)) # update text

def my_reset():
    global count
    count=0
    b1.config(text='Count: 0')

b1=tk.Button(my_w,text='Count: 0 ',width=12,
	command=lambda:my_upd(),bg='orange',font=12)
b1.grid(row=0,column=0,padx=50,pady=50)

#b2=tk.Button(my_w,text='Reset',width=7,command=lambda:b1.config(text='Count: 0'))
b2=tk.Button(my_w,text='Reset',width=7,command=lambda:my_reset())
b2.grid(row=0,column=1)
my_w.mainloop()
Counting and displaying number of clicks on a button inside a Tkinter window
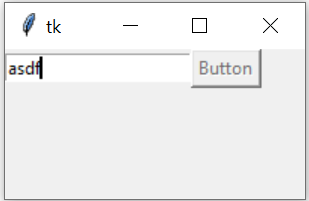
Validating inputs before activating the button 🔝
Tkinter manage state of a button to disable or enable based on number of char entered in Entry field
By using any Entry button user can enter data and we can ensure that minimum 5 chars are to be entered before the user is allowed to click the Button. We may extend this to multiple condition checking while using many inputs. Here is a simple code in which we are keeping the button in disabled condition ( state=’disabled’ ) as long as the user has entered minimum required chars in the input Entry box.
import tkinter as tk
my_w=tk.Tk()
my_w.geometry('200x100')
my_str=tk.StringVar(my_w)
e1=tk.Entry(my_w,textvariable=my_str)
e1.grid(row=0,column=0)
b1=tk.Button(my_w,text='Button',state='disabled')
b1.grid(row=0,column=1)
def my_upd(*args):
    if(len(my_str.get())>4): # Minimum 5 char length
        b1.config(state='normal') # Enable the button
    else:
        b1.config(state='disabled') # disable the button
my_str.trace('w',my_upd) # event listener
my_w.mainloop()List of Button attributes and values 🔝
Tkinter Button list of options with values and updating values
import tkinter as tk
my_w = tk.Tk()
my_w.geometry("600x300") # Width and height of the window

b1=tk.Button(my_w,text='Button1')
b1.grid(row=0,column=1,padx=20,pady=60)

print("Total Number of options : ",len(b1.keys())) # 35

b1['bd']=10 # updating value of border width option to 10

for b in b1.keys():
    print(b,'=',b1[b]) # Option name and value

my_w.mainloop()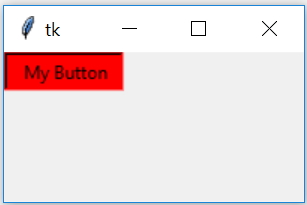
Background Colour of the button when button is active or pressed |
Foreground color ( font ) of the button when button is active or pressed.
|
| Alignment of font over the button. values can be n, ne, e, se, s, sw, w, nw, or center |
background Background color of the button.
|
bitmap Display bitmaps on the button.
More on Tkinter Bitmap |
| bg | Same as background |
bd Same as borderwidthbd=0. To remove the border onClick we can use config() to set the bd=0.
|
command A callback function to execute when the button is pressed
|
| cursor shape of the cursor when it is placed over the button. A list of cursor shapes are given below. |
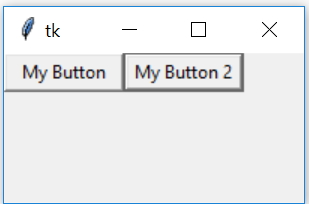
| default One extra border is added to active button.
This can have two values active or normal Out of two buttons My Button 2 ( right one ) is kept as active button. |
disabledforeground
The foreground colour when the button is disabled ( state='disabled')
|
| font Font size style of the button |
| fg | Same as foreground |
| height | Height of the buttons ( We can manage size of the button by using height and width ) |
highlightbackground
Border color when the button is not in focus.
|
highlightcolor
Border colour when the button is in focus.
|
highlightthickness
Width of the border when highlighted
|
| image | Image we can display on the button Read more on how to display image over a button Images used over button to create ON / Off switch Read more on how to display MySQL Blob data using button |
| justify | Align multiple line of text. It can be LEFT , RIGHT or CENTER |
padx Horizontal padding between text and border
|
pady Vertical padding between text and border
|
| relief | The Button ( borders ) 3 D effect style. It can take these values raised (default), sunken ,flat, ridge, solid & groove |
import tkinter as tk
my_w = tk.Tk()
my_w.geometry("250x200")
l1 = tk.Label(my_w,text='Button relief' )
l1.grid(row=1,column=1)

l1 = tk.Label(my_w,  text='Raised' ) #
l1.grid(row=2,column=1)

t1 = tk.Button(my_w,height=1,relief='raised')
t1.grid(row=2,column=2)

l1 = tk.Label(my_w,text='sunken' ) #
l1.grid(row=3,column=1)

t1 = tk.Button(my_w,height=1,relief='sunken')
t1.grid(row=3,column=2)

l1 = tk.Label(my_w,text='flat' ) #
l1.grid(row=4,column=1)

t1 = tk.Button(my_w,height=1,relief='flat')
t1.grid(row=4,column=2)

l1 = tk.Label(my_w,text='ridge' )
l1.grid(row=5,column=1)
t1 = tk.Button(my_w,height=1,relief='ridge')
t1.grid(row=5,column=2)

l1 = tk.Label(my_w,text='solid' ) # added one Label
l1.grid(row=6,column=1)
t1 = tk.Button(my_w,height=1,relief='solid')
t1.grid(row=6,column=2)

l1 = tk.Label(my_w,text='groove' ) # added one Label
l1.grid(row=7,column=1)

t1 = tk.Button(my_w,height=1,relief='groove')
t1.grid(row=7,column=2)

my_w.mainloop()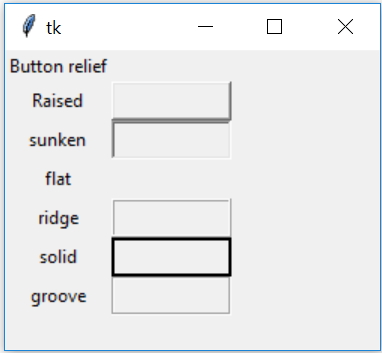
| overrelief Similar to relief ( as above ) but all effects takes place when Mouse is over the button. You can change the above code by using overrelief in place of relief |
| state | values= normal, active or disabled
|
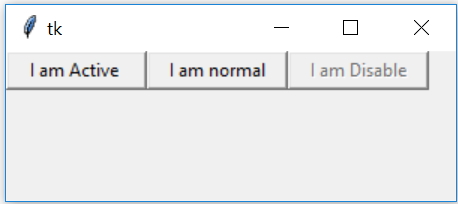
| takefocus : By using Tab you can shift the focus. Value can be True or False. By setting takefocus to False we can skip the focus while using tab.Here the focus shifts between first and second button by skipping the third button |
| text | The text written over the button
|
textvariable We can use a variable to manage the text of a button.
|
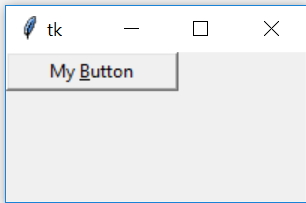
underline Underline the Char given by the position. Here char B is underlined. |
| width | width of the button in Chars |
wraplength When the text should be wrapped written over the button |
Colourful Buttons by using images 🔝
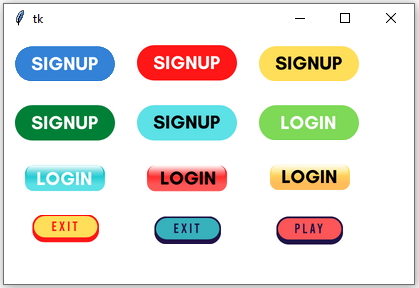
Tkinter colourful buttons using image and background activebackground options to match window color
Change the main window background colour to match the button , here it is set to white (
#ffffff )
import tkinter as tk
my_w = tk.Tk()
my_w.geometry("410x250")  # Size of the window
my_w.configure(background='#ffffff') # white background for windowbd=0 ) , background colour of button to white ( bg='#ffffff'). When button is pressed the background colour should match with window colour ( white here ) (activebackground='#ffffff'). With these setting use matching image to display as button. Change the path in below code to read the image file.
Here is the code.
my_img4 = tk.PhotoImage(file="b4.png")  # place image in same folder as your script
b4=tk.Button(my_w,image=my_img4,bd=0,bg='#ffffff',activebackground='#ffffff')
b4.grid(row=2,column=1,padx=10,pady=10)
Delete , hide and restore a Button 🔝
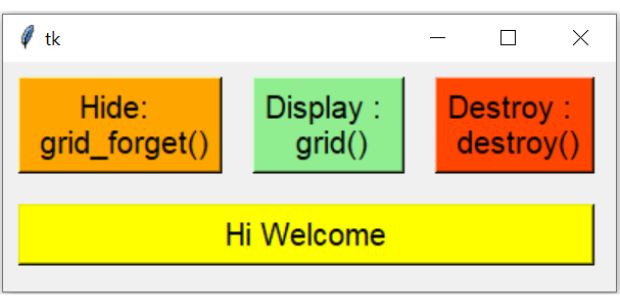
We can remove a button by using grid_forget(). Same can be restored by using grid(). To delete the button permanently we have to use destroy()
import tkinter as tk
my_w = tk.Tk()
my_w.geometry("400x150")

b1=tk.Button(my_w,text='Hide: \n grid_forget()',
    command=lambda:b4.grid_forget(),bg='orange',font=12)
b1.grid(row=0,column=0,padx=2,pady=10)
b2=tk.Button(my_w,text='Display : \n grid()',
    command=lambda:b4.grid(row=1,column=0,pady=10,
    padx=2,columnspan=3,sticky='ew'),bg='lightgreen',font=12)
b2.grid(row=0,column=1,padx=2,pady=10)
b3=tk.Button(my_w,text='Destroy : \n destroy()',
    command=lambda:b4.destroy(),bg='orange red',font=12)
b3.grid(row=0,column=2,padx=2)

b4 = tk.Button(my_w, text='Hi Welcome', width=10,font=14,bg='yellow')
b4.grid(row=1,column=0,pady=10,padx=2,columnspan=3,sticky='ew')
my_w.mainloop()Exercise on buttons
- Using the above concept keep two buttons one with + to increase the button width and other one is with – to decrease the width of the close button.
- Keep a set of ( say 6 ) buttons with different background colours. By clicking any button you can pass the same colour to Close button.
- Change in mouse cursor : By clicking respective button mouse over icons should change. Use one common function and receive different options as parameter. A list of accepted mouse options are available here.
- Based on the week number, display Yes or No on Click of a button
- Manage the width of a button by changing value of a Spinbox.
Cursor shapes on Mouse hover 🔝
List of values for the cursor options can be used for cursor (cursor=X_cursor ) when we place mouse over the button.
| X_cursor arrow based_arrow_down based_arrow_up boat bogosity bottom_left_corner bottom_right_corner bottom_side bottom_tee box_spiral center_ptr circle clock coffee_mug cross cross_reverse crosshair diamond_cross |
dot dotbox double_arrow draft_large draft_small draped_box exchange fleur gobbler gumby hand1 hand2 heart icon iron_cross left_ptr left_side left_tee leftbutton ll_angle | lr_angle man middlebutton mouse pencil pirate plus question_arrow right_ptr right_side right_tee rightbutton rtl_logo sailboat sb_down_arrow sb_h_double_arrow sb_left_arrow sb_right_arrow sb_up_arrow sb_v_double_arrow | shuttle sizing spider spraycan star target tcross top_left_arrow top_left_corner top_right_corner top_side top_tee trek ul_angle umbrella ur_angle watch xterm |
Images used over button to create ON / Off switch
How Reset button is used to delete all user entered data and selections
StringVar() Label Input Validation

Subhendu Mohapatra
Author
🎥 Join me live on YouTubePassionate about coding and teaching, I publish practical tutorials on PHP, Python, JavaScript, SQL, and web development. My goal is to make learning simple, engaging, and project‑oriented with real examples and source code.
Subscribe to our YouTube Channel here
This article is written by plus2net.com team.
https://www.plus2net.com

 Python Video Tutorials