Python tkinter LabelFrame

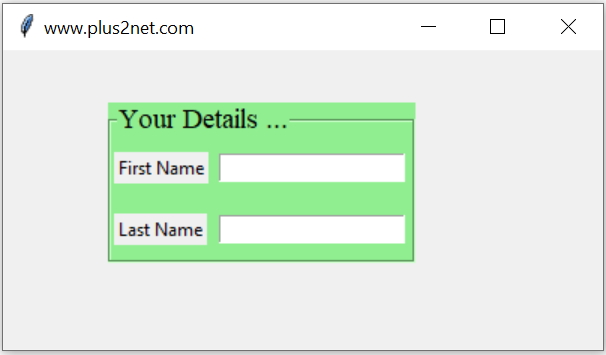
Understanding LableFrame
import tkinter as tk

my_w = tk.Tk()
my_w.geometry("400x200")  # Size of the window
my_w.title("www.plus2net.com")  # Adding a title
font1=('Times',14,'normal')

lf=tk.LabelFrame(my_w,text='Your Details ...',
	font=font1,bg='lightgreen')
lf.grid(row=0,column=0,padx=70,pady=35)

l1=tk.Label(lf,text='First Name')
l1.grid(row=0,column=1,padx=2,pady=10)

e1=tk.Entry(lf,width=20)
e1.grid(row=0,column=2,padx=5)

l2=tk.Label(lf,text='Last Name')
l2.grid(row=1,column=1,padx=2,pady=10)

e2=tk.Entry(lf,width=20)
e2.grid(row=1,column=2,padx=5)

my_w.mainloop()  # Keep the window open
Config options for LabelFrame
background | Background colour to use, check the Output in above code for lightgreen background colour |
bg | Same as background |
borderwidth | Width of the border of the Frame ( check examples below ) |
bd | Same as borderwidth |
class | Assign class , default is Frame |
colormap | specify which color map to use |
container | Default is 0 |
cursor | List of cursor shape is available here . The shape of mouse pointer to be displayed over the frame |
fg | Foreground colour |
font | Font family, size and style ( see example ) |
height | Default is 0 |
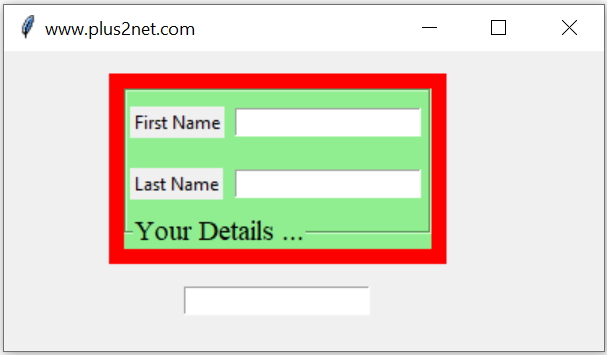
highlightbackground | Default is system specific, Border colour when not in focus ( increase the highlightthickness to observe ). |
highlightcolor | Default is system specific,Border colour when in focus ( increase the highlightthickness to observe ) |
highlightthicknes | Default is 0 |
labelanchor | Alignment of Label Text, values can be e, en, es, n, ne, nw, s, se, sw, w, wn, or ws See the example below. |
labelwidget | Widget can be used as Label, if given then this is used in place of text option. |
padx | Horizontal padding, Default is 0 |
pady | Vertical padding, Default is 0 |
relief | flat ( default ). The border decoration , values are flat, groove, raised, ridge, solid, or sunken See the example at Button widget |
takefocus | If true , tab can be used to move focus, Default is 0 |
visual | No Default |
width | Default is 0 |
Example

lf=tk.LabelFrame(my_w,text='Your Details ...',font=font1,
bg='lightgreen', highlightbackground='red',highlightcolor='yellow',
highlightthickness=10,cursor='circle',
labelanchor='sw')
Example: Using LabelFrame with Widgets Inside

One way to enhance the use of a `LabelFrame` is by grouping related widgets like `Entry`, `Label`, `Button` together to create more interactive forms or control panels.
More on Grid Layout
import tkinter as tk

my_w = tk.Tk() # Main window
my_w.geometry("400x300") # with and height of the window

# Create a LabelFrame
lf = tk.LabelFrame(my_w, text="User Details",
		font=('Arial', 14), bg='lightgray', padx=10, pady=10)
lf.pack(padx=10, pady=10)

# Add widgets inside LabelFrame
tk.Label(lf, text="First Name").grid(row=0, column=0, padx=5, pady=5)
tk.Entry(lf, width=20).grid(row=0, column=1, padx=5, pady=5)

tk.Label(lf, text="Last Name").grid(row=1, column=0, padx=5, pady=5)
tk.Entry(lf, width=20).grid(row=1, column=1, padx=5, pady=5)

tk.Button(lf, text="Submit").grid(row=2, column=1, padx=5, pady=10)

my_w.mainloop()
Dynamic LabelFrame with Expand Option

By using the `expand` option, we can make the `LabelFrame` responsive to the window resizing. This is useful for applications where you want the grouped widgets to adjust to screen size dynamically.
More on Pack Layout with Fill and Expand options
import tkinter as tk

my_w = tk.Tk() # Main window
my_w.geometry("400x300") # width and height of the window

# Creating a LabelFrame with expand option
lf = tk.LabelFrame(my_w, text="User Details",
		font=('Arial', 14), bg='lightblue', padx=10, pady=10)
lf.pack(fill=tk.BOTH, expand=True, padx=10, pady=10)

# Adding widgets inside LabelFrame
tk.Label(lf, text="Username").pack(padx=5, pady=5)
tk.Entry(lf, width=30).pack(padx=5, pady=5)

tk.Label(lf, text="Password").pack(padx=5, pady=5)
tk.Entry(lf, width=30, show="*").pack(padx=5, pady=5)

tk.Button(lf, text="Login").pack(pady=10)

my_w.mainloop()
Use Case: Nested LabelFrames

In more complex GUIs, you can use nested `LabelFrame`s to create hierarchical structures for better organization. For instance, creating separate sections for user details and preferences inside a main frame.
import tkinter as tk

my_w = tk.Tk() # Main window
my_w.geometry("400x400") # width and height of the window

# Main LabelFrame
main_lf = tk.LabelFrame(my_w, text="Main Settings",
		font=('Arial', 14), bg='lightgreen', padx=10, pady=10)
main_lf.pack(fill=tk.BOTH, expand=True, padx=10, pady=10)

# Nested LabelFrame 1 for User Info
user_lf = tk.LabelFrame(main_lf, text="User Information", padx=10, pady=10)
user_lf.pack(fill=tk.X, padx=5, pady=5)

tk.Label(user_lf, text="First Name").grid(row=0, column=0, padx=5, pady=5)
tk.Entry(user_lf).grid(row=0, column=1, padx=5, pady=5)

tk.Label(user_lf, text="Last Name").grid(row=1, column=0, padx=5, pady=5)
tk.Entry(user_lf).grid(row=1, column=1, padx=5, pady=5)

# Nested LabelFrame 2 for Preferences
pref_lf = tk.LabelFrame(main_lf, text="Preferences", padx=10, pady=10)
pref_lf.pack(fill=tk.X, padx=5, pady=5)

tk.Checkbutton(pref_lf, text="Enable Notifications").pack(anchor=tk.W)
tk.Checkbutton(pref_lf, text="Enable Dark Mode").pack(anchor=tk.W)

my_w.mainloop()
Conclusion
The Tkinter LabelFrame widget is a powerful tool for grouping related widgets within a labeled frame, making our GUI more structured and user-friendly. By exploring features like nesting, dynamic resizing, and padding, we can enhance the functionality and aesthetics of your application. Understanding how to utilize LabelFrame effectively helps us create organized and responsive interfaces in our Python Tkinter projects, improving both usability and design.
Grid Layout Python Tkinter pack place layout rowconfigure() & columnconfigure() Frame

Subhendu Mohapatra
Author
🎥 Join me live on YouTubePassionate about coding and teaching, I publish practical tutorials on PHP, Python, JavaScript, SQL, and web development. My goal is to make learning simple, engaging, and project‑oriented with real examples and source code.
Subscribe to our YouTube Channel here

 Python Video Tutorials