Python tkinter Toplevel for Child window
Tkinter Toplevel to open child window on button click and to close child window from parent & child
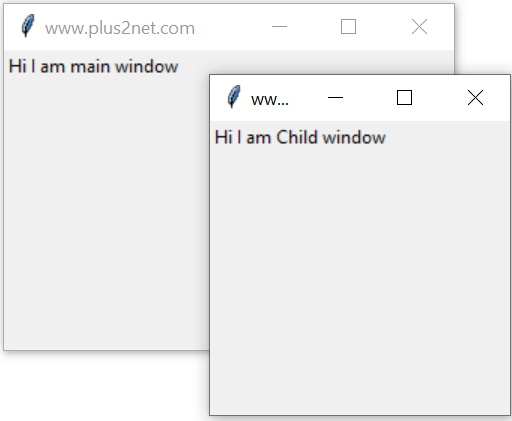
Here is one sample code to create two windows from starting.
import tkinter as tk
from tkinter import *

my_w = tk.Tk()
my_w.geometry("200x200")  # Size of the window
my_w.title("www.plus2net.com")  # Adding a title

# create one label
my_str = tk.StringVar()
l1 = tk.Label(my_w,  textvariable=my_str )
l1.grid(row=1,column=2)
my_str.set("Hi I am main window")

# child window
my_w_child=Toplevel(my_w) # Child window
my_w_child.geometry("200x200")  # Size of the window
my_w_child.title("www.plus2net.com")

my_str1 = tk.StringVar()
l1 = tk.Label(my_w_child,  textvariable=my_str1 )
l1.grid(row=1,column=2)
my_str1.set("Hi I am Child window")

my_w.mainloop()Opening the Child window on Button click
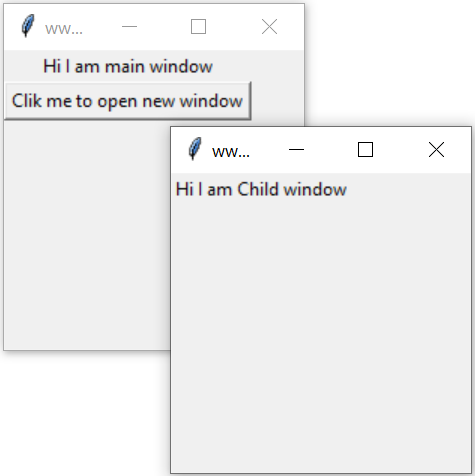
Above code will open both the windows ( parent and child ) at the beginning. We will change this by keeping the code for child window inside a function my_open(). We will use one button on parent window and click event of this will trigger the function my_open() to open the child window.
import tkinter as tk
from tkinter import *
my_w = tk.Tk()
my_w.geometry("200x200")  # Size of the window
my_w.title("www.plus2net.com")  # Adding a title

# create one label
my_str = tk.StringVar()
l1 = tk.Label(my_w,  textvariable=my_str )
l1.grid(row=1,column=2)
my_str.set("Hi I am main window")
# add one button
b1 = tk.Button(my_w, text='Click me to open a new window',
               command=lambda:my_open())
b1.grid(row=2,column=2)

def my_open():
    my_w_child=Toplevel(my_w) # Child window
    my_w_child.geometry("200x200")  # Size of the window
    my_w_child.title("www.plus2net.com")

    my_str1 = tk.StringVar()
    l1 = tk.Label(my_w_child,  textvariable=my_str1 )
    l1.grid(row=1,column=2)
    my_str1.set("Hi I am Child window")
my_w.mainloop()
Child window with close buttons
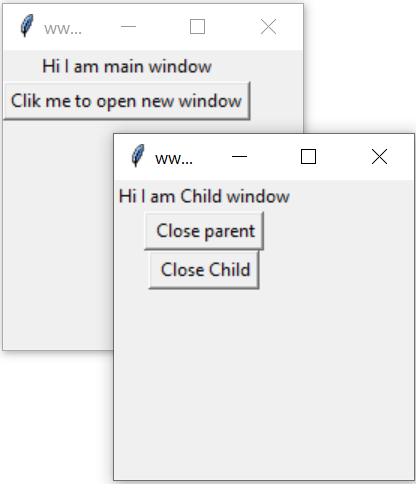
Our child window can have two buttons, one button can close child window and other one can close parent window. While closing parent window child window will also close.
import tkinter as tk
from tkinter import *
my_w = tk.Tk()
my_w.geometry("200x200")  # Size of the window
my_w.title("www.plus2net.com")  # Adding a title

# create one label
my_str = tk.StringVar()
l1 = tk.Label(my_w,  textvariable=my_str )
l1.grid(row=1,column=2)
my_str.set("Hi I am main window")
# add one button
b1 = tk.Button(my_w, text='Click me to open a new window',
               command=lambda:my_open())
b1.grid(row=2,column=2)

def my_open():
    my_w_child=Toplevel(my_w) # Child window
    my_w_child.geometry("200x200")  # Size of the window
    my_w_child.title("www.plus2net.com")

    my_str1 = tk.StringVar()
    l1 = tk.Label(my_w_child,  textvariable=my_str1 )
    l1.grid(row=1,column=2)
    my_str1.set("Hi I am Child window")
    b2 = tk.Button(my_w_child, text=' Close parent',
                   command=my_w.destroy)
    b2.grid(row=2,column=2)

    b3 = tk.Button(my_w_child, text=' Close Child',
                   command=my_w_child.destroy)
    b3.grid(row=3,column=2)
my_w.mainloop()
Closing the child from Parent
This button is created inside the function my_open() along with the child window, however it is placed in the parent window.def my_open():
my_w_child=tk.Toplevel(my_w)
my_w_child.geometry("200x200")
my_w_child.title('www.plus2net.com')
my_str1=tk.StringVar()
l1=tk.Label(my_w_child,textvariable=my_str1)
l1.grid(row=1,column=2)
my_str1.set('Hi I am child window')
b2=tk.Button(my_w_child,text='Close child',command=my_w_child.destroy)
b2.grid(row=2,column=2)
b3=tk.Button(my_w_child,text='Close Parent',command=my_w.destroy)
b3.grid(row=4,column=2)
b4=tk.Button(my_w,text='Close child',command=my_w_child.destroy)
b4.grid(row=3,column=2)Remove functionality of Parent from Child
From Tkinter Toplevel child window disable - enable parent window also hide and restore main window
On Button click we can remove all actions of Parent window my_w ( user is required to interact only with Child window my_w_child ) , here Parent window is available ( visible ) but disabled.
We are using grab_set() with click event of b3 button in Child window ( my_w_child )
b3 = tk.Button(my_w_child, text='Disable parent',
command=lambda:my_w_child.grab_set())b4 = tk.Button(my_w_child, text='Enable parent',
command=lambda:my_w_child.grab_release())Hide & display Parent
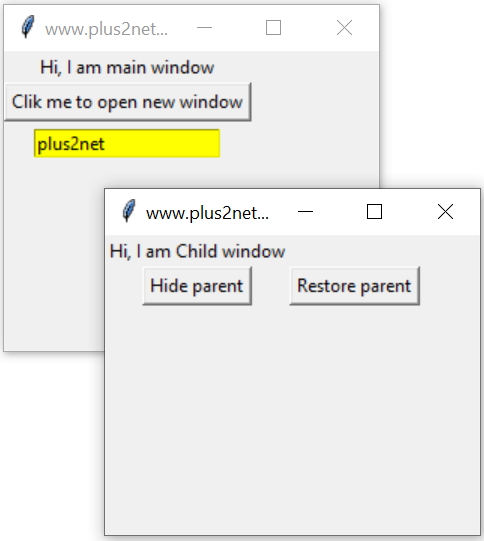
To Make the Parent window invisible and then restore the same we can use
withdraw()
b3 = tk.Button(my_w_child, text='Withdraw',
command=lambda:my_w.withdraw())deiconify().
b4 = tk.Button(my_w_child, text='Deiconify',
command=lambda:my_w.deiconify())config
We can add options to our child window by using config. Here is a button to change the background colour of the child window.b4 = tk.Button(my_w_child, text='Red',
command=lambda:my_w_child.config(bg='red')) # change background color of parent from child
b4 = tk.Button(my_w_child, text='Parent Colour',
command=lambda:my_w.config(bg='red'))
b4.grid(row=4,column=2)
# change background color of child from parent
b5 = tk.Button(my_w, text='Child Colour',
command=lambda:my_w_child.config(bg='green'))
b5.grid(row=5,column=2)bg=Background color
bd=Border width
colormap=color map to use
container=container
cursor=style of mouse pointer
height=window height
highlightbackground=highlight the region when not in focus
highlightcolor=colour when in focus
Toplevel without title bar
We can add this line to remove title bar. Use this line inside function my_open() after declaring my_w_childmy_w_child.wm_overrideredirect(True)Creating a Circular Custom Tkinter Window with Transparent Background

It uses the Canvas widget to draw a circle and leverages overrideredirect() to remove the default window decorations. The window contains a button centered inside the circle for closing it, providing a clean and unique custom-shaped window for GUI applications.
- overrideredirect(True) removes the title bar and borders from the window.
- attributes('-transparentcolor', 'white') makes the white background of the window transparent, revealing only the circular shape.
- A Canvas widget is used to draw an oval (create_oval()), which acts as a circular window.
import tkinter as tk

my_w = tk.Tk()
my_w.geometry("200x200+100+100") # with and height with opening coordinates
my_w.title("www.plus2net.com")

# Create one button
b1 = tk.Button(my_w, text='Click to open circular window', command=lambda: my_open())
b1.grid(row=2, column=2)

def my_open():
    x_offset = my_w.winfo_x() + 150
    y_offset = my_w.winfo_y() + 120

    # Create child window
    my_w_child = tk.Toplevel(my_w)
    my_w_child.geometry(f"200x200+{x_offset}+{y_offset}")
    my_w_child.overrideredirect(True)  # Remove window borders
    my_w_child.attributes('-transparentcolor', 'white') #Make white background transparent
    my_w_child.config(bg="white")  # Set background to transparent

    # Create a circular shape using Canvas
    canvas = tk.Canvas(my_w_child, width=200, height=200, bg="white", highlightthickness=0)
    canvas.create_oval(10, 10, 190, 190, fill="lightblue")  # Create circle
    canvas.pack()

    # Add a button inside the circular window
    b2 = tk.Button(my_w_child, text="Close", command=my_w_child.destroy)
    canvas.create_window(100, 100, window=b2)  # Place button in the center of the circle

my_w.mainloop()
Moving the Child Window with Adjustable Step Control

The circle (in the child window) can be moved in four directions using buttons in the parent window. Additionally, a slider adjusts the movement step or "speed," allowing for precise control over each shift of the child window across the screen.
import tkinter as tk

def move_window(dx, dy):
    # Move the child window globally on the screen
    global my_w_child
    x = my_w_child.winfo_x() + dx
    y = my_w_child.winfo_y() + dy
    my_w_child.geometry(f"+{x}+{y}")

def update_step(value):
    global step_value
    step_value = int(value)

my_w = tk.Tk()
my_w.geometry("400x300+100+100")
my_w.title("www.plus2net.com")

# Default step value
step_value = 10

# Slider to adjust step value
slider = tk.Scale(my_w, from_=1, to=100, orient="horizontal", label="Move Step", command=update_step)
slider.set(10)
slider.grid(row=0, column=2, columnspan=2)

# Create buttons for movement in the parent window
font1=['Arial',18]
# Create buttons for movement in the parent window
tk.Button(my_w, text='Up',font=font1, bg='lightgreen',
          command=lambda: move_window(0, -step_value)).grid(row=0, column=1,padx=20,pady=20)
tk.Button(my_w, text='Left',font=font1, bg='khaki',
          command=lambda: move_window(-step_value, 0)).grid(row=1, column=0,padx=20,pady=20)
tk.Button(my_w, text='Right',font=font1,bg='khaki',
          command=lambda: move_window(step_value, 0)).grid(row=1, column=2)
tk.Button(my_w, text='Down', font=font1, bg='lightgreen',
          command=lambda: move_window(0, step_value)).grid(row=2, column=1,pady=20)

b1 = tk.Button(my_w, text='Open circular window', command=lambda: my_open())
b1.grid(row=3, column=1,columnspan=2)

def my_open():
    global my_w_child
    x_offset = my_w.winfo_x() + 250
    y_offset = my_w.winfo_y() + 120

    # Create child window
    my_w_child = tk.Toplevel(my_w)
    my_w_child.geometry(f"200x200+{x_offset}+{y_offset}")
    my_w_child.overrideredirect(True)  # Remove window borders
    my_w_child.attributes('-transparentcolor', 'white')  # Make white background transparent
    my_w_child.config(bg="white")  # Set background to transparent

    # Create a circular shape using Canvas
    canvas = tk.Canvas(my_w_child, width=200, height=200, bg="white", highlightthickness=0)
    canvas.create_oval(10, 10, 190, 190, fill="lightblue")  # Create circle
    canvas.pack()

    # Add a button inside the circular window
    b2 = tk.Button(my_w_child, text="Close", command=my_w_child.destroy)
    canvas.create_window(100, 100, window=b2)

my_w.mainloop()
Displaying Student Records and Class Distribution Pie Chart using Tkinter and Matplotlib

This Python Tkinter application displays 10 student records in the parent window and visualizes the class distribution in a pie chart. The data is presented in a grid format, showing student ID, name, class, and marks. A button in the parent window allows the user to generate a pie chart that breaks down the number of students in each class. The pie chart is rendered using the matplotlib library, providing a clear visual representation of the student distribution.
import tkinter as tk
import csv
import os
from tkinter import messagebox
from collections import Counter
import matplotlib.pyplot as plt

# Sample student data from the URL you provided
student_data = [
    [1, "John", "Four", 75, "Male"],
    [2, "Sara", "Four", 85, "Female"],
    [3, "Mike", "Five", 65, "Male"],
    [4, "Anna", "Six", 90, "Female"],
    [5, "Tom", "Three", 50, "Male"],
    [6, "Lisa", "Six", 77, "Female"],
    [7, "Peter", "Four", 85, "Male"],
    [8, "Judy", "Five", 80, "Female"],
    [9, "Alex", "Five", 60, "Male"],
    [10, "Rose", "Three", 95, "Female"]
]

# Function to display the pie chart
def show_pie_chart():
    # Count the number of students in each class
    classes = [student[2] for student in student_data]
    class_count = Counter(classes)

    # Prepare data for the pie chart
    labels = class_count.keys()
    sizes = class_count.values()

    # Create the pie chart
    fig, ax = plt.subplots()
    ax.pie(sizes, labels=labels, autopct='%1.1f%%', startangle=90)
    ax.axis('equal')  # Equal aspect ratio ensures that pie is drawn as a circle.
    plt.title("Class Distribution of Students")
    plt.show()

# Tkinter window setup
my_w = tk.Tk()
my_w.title("Student Records")
my_w.geometry("400x400")

# Display 10 records in the parent window
tk.Label(my_w, text="ID", font=("Arial", 10, "bold")).grid(row=0, column=0)
tk.Label(my_w, text="Name", font=("Arial", 10, "bold")).grid(row=0, column=1)
tk.Label(my_w, text="Class", font=("Arial", 10, "bold")).grid(row=0, column=2)
tk.Label(my_w, text="Mark", font=("Arial", 10, "bold")).grid(row=0, column=3)

# Display student data
for i, student in enumerate(student_data):
    tk.Label(my_w, text=student[0]).grid(row=i + 1, column=0)
    tk.Label(my_w, text=student[1]).grid(row=i + 1, column=1)
    tk.Label(my_w, text=student[2]).grid(row=i + 1, column=2)
    tk.Label(my_w, text=student[3]).grid(row=i + 1, column=3)

# Button to display pie chart
btn = tk.Button(my_w, text="Show Pie Chart", command=show_pie_chart)
btn.grid(row=11, column=1, columnspan=2, pady=10)

my_w.mainloop()
Using #Toplevel in #Python #Tkinter for Custom Child Windows - #PythonGUI Guide
View & Download tkinter-toplevel ipynb file (.html format)
Passing data from Parent window to Child window Showing Message before Closing of Child window

Subhendu Mohapatra
Author
🎥 Join me live on YouTubePassionate about coding and teaching, I publish practical tutorials on PHP, Python, JavaScript, SQL, and web development. My goal is to make learning simple, engaging, and project‑oriented with real examples and source code.
Subscribe to our YouTube Channel here
This article is written by plus2net.com team.
https://www.plus2net.com

 Python Video Tutorials