Python Tkinter Grid Layout — Arrange Widgets in Rows and Columns
- Understanding row and column
- anchor: Widget Alignment in Grid
- Sticky Option
- Columnspan
- Rowspan
- padx,pady,ipadx,ipady
- grid_size
- grid_slaves: List of widgets in the grid
- grid_remove: Temporarily remove the widget from grid
- grid_forget: Remove the widget from current location
- Remove the widget after some time delay
- Remove all widgets or from a location
- Delete widget from grid
- grid_info() : information about the widget in grid
- Example: Creating a Grid of Buttons Using Loops
- Choosing Between grid(), pack(), and place() in Tkinter Layouts
The
grid() layout manager places widgets in a table-like structure using rows and columns. It is the most commonly used layout in Tkinter.
.
Empty rows and columns are ignored. ( row=3 is same as row=1 if row=1 and row=2 are not used)
Another method of layout is Pack, never mix Pack and grid in same window.
Another method of layout is Pack, never mix Pack and grid in same window.
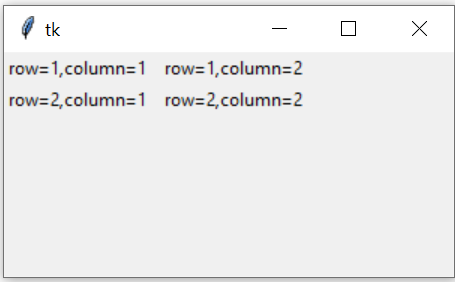
Understanding row and column 🔝
Tkinter Grid layout management by row & columns & aligning in both horizontal & vertical directions
Horizontal placement is done by rows and vertical placement is done by columns.
# Import the tkinter library for creating the GUI
import tkinter as tk

# Create the main window instance
my_w = tk.Tk()

# Set the size of the window to 300x200 pixels
my_w.geometry("300x200")

# Create a label and place it in row 1, column 1
l1 = tk.Label(my_w, text='row=1,column=1 ')
l1.grid(row=1, column=1)

# Create a label and place it in row 1, column 2
l2 = tk.Label(my_w, text=' row=1,column=2')
l2.grid(row=1, column=2)

# Create a label and place it in row 2, column 1
l3 = tk.Label(my_w, text='row=2,column=1 ')
l3.grid(row=2, column=1)

# Create a label and place it in row 2, column 2
l4 = tk.Label(my_w, text=' row=2,column=2')
l4.grid(row=2, column=2)

# Run the event loop to display the window
my_w.mainloop()anchor: Widget Alignment in Grid 🔝

We can use the anchor attribute to customize widget alignment within the grid cell, such as aligning text or widgets to the top-left, bottom-right, or center of the cell.
import tkinter as tk

my_w = tk.Tk()
my_w.geometry("300x150")  # Adding labels with different anchor points

label1 = tk.Label(
    my_w,
    text='Top Left',
    anchor='nw',
    bg='yellow',
    height=3,
    width=15
)
label1.grid(row=0, column=0, sticky='nsew')

label2 = tk.Label(
    my_w,
    text='Bottom Right',
    anchor='se',
    bg='yellow',
    height=3,
    width=15
)
label2.grid(row=1, column=1, sticky='nsew')

my_w.mainloop()- anchor helps position text or widgets within the grid cell, offering more fine-grained control over their layout.
- You can align widgets to the top-left (nw), bottom-right (se), or any other direction using combinations like n, s, e, w.
- Sticky: Determines the widget's alignment and stretch within its grid cell.
- Anchor: Controls the alignment of content inside the widget.
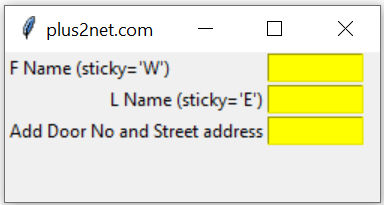
sticky option 🔝
If the component size is less than the available grid space, then we can use 'E','W','N','S' to align right left top and bottom.Check F Name and L Name is aligned to left and right. We can align the components to top and bottom also.
import tkinter as tk
my_w = tk.Tk()
my_w.geometry("250x100")
my_w.title("plus2net.com")  # Adding a title

l1 = tk.Label(my_w,  text='F Name (sticky=\'W\')' ) #added one Label
l1.grid(row=1,column=1,sticky='W')

e1 = tk.Entry(my_w,   width=10,bg='yellow') # added one Entry box
e1.grid(row=1,column=2)

l2 = tk.Label(my_w,  text='L Name (sticky=\'E\')')  #
l2.grid(row=2,column=1,sticky='E')

e2 = tk.Entry(my_w,   width=10,bg='yellow') # added one Entry box
e2.grid(row=2,column=2)

l3 = tk.Label(my_w,  text='Add Door No and Street address')
l3.grid(row=3,column=1,sticky='W')

e3 = tk.Entry(my_w,   width=10,bg='yellow') # added one Entry box
e3.grid(row=3,column=2)

my_w.mainloop()sticky='NSEW' mean occupy all the available space in all directions.
columnspan option 🔝
Tkinter window grid layout using rowspan and columnspan to manage multiple rows and columns
By default
columnspan=1, we can set to different value by increasing it to expand more than one column. 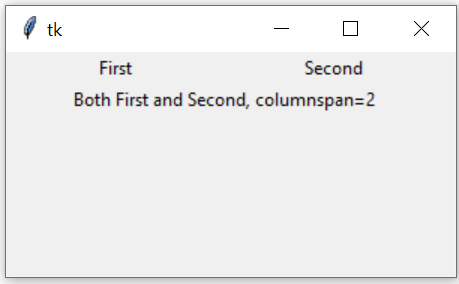
l1 = tk.Label(my_w, text='First', width=20)
l1.grid(row=1,column=1)
l2 = tk.Label(my_w, text='Second', width=20)
l2.grid(row=1,column=2)

l3 = tk.Label(my_w, text='Both First and Second, columnspan=2')
l3.grid(row=2,column=1,columnspan=2)
rowspan options 🔝
We can userowspan=3 to expand to three rows. 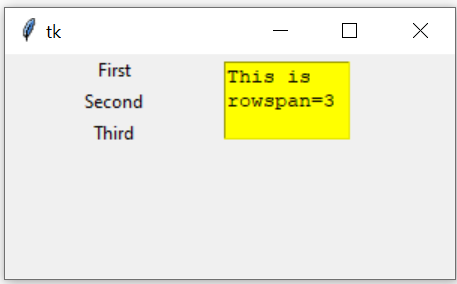
import tkinter as tk
my_w = tk.Tk()
my_w.geometry("300x150")
l1 = tk.Label(my_w, text='First', width=20)
l1.grid(row=1,column=1)
l2 = tk.Label(my_w, text='Second', width=20)
l2.grid(row=2,column=1)
l3 = tk.Label(my_w, text='Third', width=20)
l3.grid(row=3,column=1)

t1 = tk.Text(my_w,  height=3, width=8,bg='yellow') #text box
t1.grid(row=1,column=2,rowspan=3)

my_w.mainloop()
padx, pady, ipadx, ipady options 🔝
Tkinter window grid layout using padx pady and internal padding by using ipadx, ipady

ipadx and ipady adds inner padding or the internal padding of the widget border.
l4=tk.Label(my_w,text='ipadx=50,ipady=50',
	borderwidth=2,relief='ridge')
l4.grid(row=2,column=2,ipadx=50,ipady=50)l4=tk.Label(my_w,text='padx=50,pady=50',
borderwidth=2,relief='ridge')
l4.grid(row=2,column=2,padx=50,pady=50)grid_size() 🔝
This will return a tuple showing the total number of columns and rows used in the grid. In this example we have used upto row=3 and column=3 so we will get output as (4, 4).import tkinter as tk
my_w = tk.Tk()
my_w.geometry("300x150")
l1 = tk.Label(my_w, text='First', width=8)
l1.grid(row=1,column=1)
l2 = tk.Label(my_w, text='Second', width=8)
l2.grid(row=2,column=2)
l3 = tk.Label(my_w, text='Third', width=8)
l3.grid(row=3,column=3)
print(my_w.grid_size()) # tuple columns , rows
my_w.mainloop()(4, 4)column=2 for last element.
l3 = tk.Label(my_w, text='Third', width=8)
l3.grid(row=3,column=2) (3, 4)grid_slaves(row=None, column=None) 🔝
We will get a list of widgets manage by the grid.import tkinter as tk
my_w = tk.Tk()
my_w.geometry("300x150")
l1 = tk.Label(my_w, text='First', width=8)
l1.grid(row=1,column=1)
l2 = tk.Label(my_w, text='Second', width=8)
l2.grid(row=2,column=2)
l3 = tk.Label(my_w, text='Third', width=8)
l3.grid(row=3,column=2)
print(my_w.grid_slaves())
my_w.mainloop()[<tkinter.Label object .!label3>, <tkinter.Label object .!label2>,
<tkinter.Label object .!label>]print(my_w.grid_slaves(row=2,column=2)) [<tkinter.Label object .!label2>]grid_remove() 🔝
Remove the widget from the particular grid. Can be added again.import tkinter as tk
my_w = tk.Tk()
my_w.geometry("300x150")
l1 = tk.Label(my_w, text='First', width=8)
l1.grid(row=1,column=1)
l2 = tk.Label(my_w, text='Second', width=8)
l2.grid(row=2,column=2)
l3 = tk.Label(my_w, text='Third', width=8)
l3.grid(row=3,column=2)
l3.grid_remove()
my_w.mainloop()l3.grid() Understanding grid_forget() 🔝
The grid_forget() method is a built-in Tkinter function used to unmap a widget from the grid manager.
- Temporary Hiding: Unlike
destroy(), which deletes the widget permanently,grid_forget()simply hides it from view. The widget still exists in the background, allowing it to be reapplied to the layout later. - Clearing the Layout: It is effectively used to "clear" the table before a search. By looping through the grid slaves and calling
grid_forget(), we can remove all data rows instantly without losing the underlying objects. - Flexible Re-entry: When you want to show the widget again, you must call
grid()with specific row and column coordinates. This makes it perfect for dynamic filtering where the position of a row might change based on the search results.
l3.grid_forget()l3.grid(row=3,column=2)Removing after some time delay 🔝
We can use the widget as message box and want to remove it after 3 seconds.l3.after(3000, lambda: l3.grid_remove() )Remove all widgets 🔝
for w in my_w.grid_slaves(): # Loop through each row
    w.grid_forget() # remove the row
Remove all widgets of 2nd row only
for w in my_w.grid_slaves(2):
w.grid_forget() #for w in my_w.grid_slaves(2): #
# w.grid_forget() # remove all elements of 2nd row
#for w in my_w.grid_slaves(2):w.grid_forget()
[w.grid_forget() for w in my_w.grid_slaves(2)]Remove all widgets of 2nd column
for w in my_w.grid_slaves(None,2):
    w.grid_forget()
Delete widgets 🔝
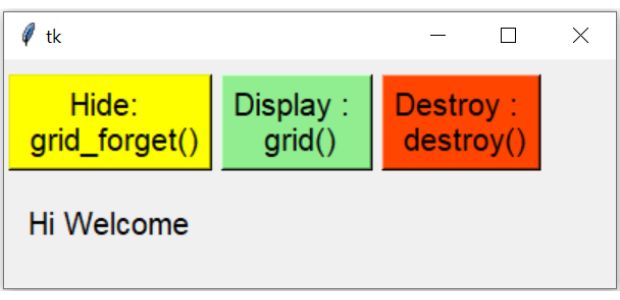
By using destroy() method we can delete a widget permanently. We can't restore it again.
import tkinter as tk
my_w = tk.Tk()
my_w.geometry("300x150")

b1=tk.Button(my_w,text='Hide: \n grid_forget()',
      command=lambda:l1.grid_forget())
b1.grid(row=0,column=0,padx=2,pady=10)
b2=tk.Button(my_w,text='Display : \n grid()',
      command=lambda:l1.grid())
b2.grid(row=0,column=1,padx=2,pady=10)
b3=tk.Button(my_w,text='Destroy : \n destroy()',
      command=lambda:l1.destroy())
b3.grid(row=0,column=2,padx=2)

l1 = tk.Label(my_w, text='Hi Welcome', width=10)
l1.grid(row=1,column=0,pady=10)
my_w.mainloop()
By using grid_slaves() and grid_forget() we can refresh the window after any delete or update operation. See example of deleting record
grid_info() 🔝
All information about the widget layout in the grid.import tkinter as tk
from tkinter import *
my_w = tk.Tk()
my_w.geometry("400x200") # Size of the window
my_w.title("www.plus2net.com") # Adding a title
l1 = tk.Label(my_w, text='row=1,column=1 ')
l1.grid(row=1,column=1,padx=10,pady=10,ipadx=3,ipady=4)
#dictionary elements(row,column,ipadx,ipday,sticky,rowspan,columnspan)
print(l1.grid_info()) # dictionary all elements value
print(l1.grid_info()['column'])# 1
print(l1.grid_info()['padx']) # 10
my_w.mainloop() # Keep the window openExample: Creating a Grid of Buttons Using Loops 🔝

import tkinter as tk
my_w = tk.Tk() # Main window
my_w.geometry("300x300")

# Create a 5x5 grid of buttons
for i in range(5):
    for j in range(5):
        btn = tk.Button(my_w, text=f"({i},{j})", width=8, height=2)
        btn.grid(row=i, column=j, padx=5, pady=5)

my_w.mainloop()
Explanation:
- The outer loop iterates over rows, and the inner loop iterates over columns.
- Each button is labeled with its grid position using `(i, j)` as text.
- padx and pady add spacing around each button.
Choosing Between grid(), pack(), and place() in Tkinter Layouts 🔝
In this podcast, we compare the three primary layout managers in Python's Tkinter: grid(), pack(), and place(). Discover how each method works to position and arrange widgets in your application, along with the pros and cons of using each. The tutorial offers practical insights into choosing the right layout manager for different scenarios, helping you design efficient and user-friendly GUIs in Python.
rowconfigure() & columnconfigure()
Understanding Layout Management in Python Tkinter - Grid, Pack, and Place #tkinter #pythonGUI
Pack Layout in Tkinter place layout Frame

Subhendu Mohapatra
Author
🎥 Join me live on YouTubePassionate about coding and teaching, I publish practical tutorials on PHP, Python, JavaScript, SQL, and web development. My goal is to make learning simple, engaging, and project‑oriented with real examples and source code.
Subscribe to our YouTube Channel here
This article is written by plus2net.com team.
https://www.plus2net.com

29-03-2021 | |
| CAN YOU SEND ME EBOOKS ON TKINTER | |
11-03-2023 | |
| En.grid(coumn=0, row=0, columnspan=3, ipadx=4, ipady=8) | |
 Python Video Tutorials