Dynamically managing Labels
Tkinter dynamic creation of Labels by managing rows and columns based on multi-dimensional list
All Labels we will use are added to our application based on the elements present in the data source. Here source can be a list, any excel page, or any database or from any CSV ( comma separated value ) file.
Here the Labels are created dynamically based on the data source requirments.
We will start with a simple list as data source and create Labels.
Let us start from a basic layout of our Tkinter window.
import tkinter  as tk
my_w = tk.Tk()
font1=('Times',22,'normal') # font family, size, style
my_w.geometry("400x300")  # width and height of the window

l1=['abc','def','ghi','jkl'] # List as source of data
my_row=0 # Starting row number
for data in l1:
    my_label=tk.Label(my_w,text=data,font=font1)
    my_label.grid(row=my_row,column=0,padx=20,pady=5)
    my_row=my_row+1 # Go to Next row by adding 1
my_w.mainloop()
Number of rows and columns
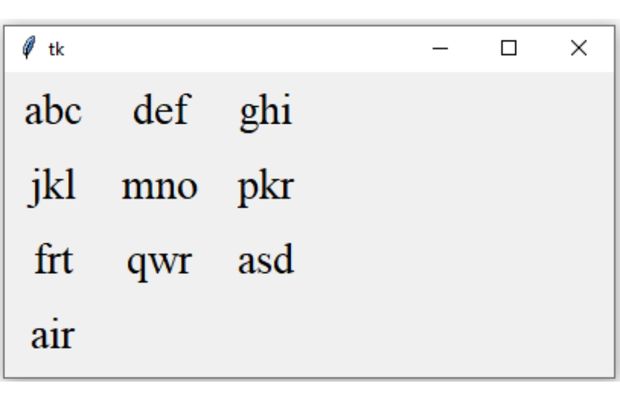
Number of labels required can change, here we are keeping two variables my_row and my_col to update the number of rows and columns based on the input conditions.import tkinter as tk
my_w = tk.Tk()
font1=('Times',22,'normal') # font family, size, style
my_w.geometry("400x300") # width and height of the window
l1=['abc','def','ghi','jkl','mno','pkr','frt','qwr','asd','air']
my_row,my_col=0,0 # First row and first column values are set here
for data in l1:
my_label=tk.Label(my_w,text=data,font=font1)
my_label.grid(row=my_row,column=my_col,padx=10,pady=5)
my_col=my_col+1 # Increase column to next on Left side
if(my_col>=3): # Maximum Number of elements in a row reached
my_row=my_row+1 # Go to Next row
my_col=0 # column start from left
my_w.mainloop() Storing the reference of the Labels
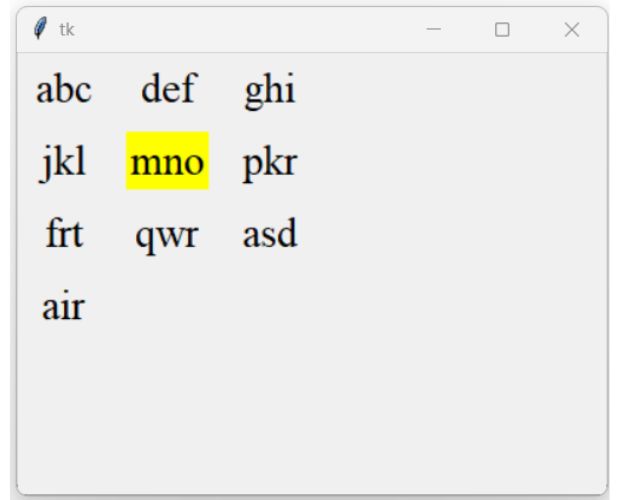
To store the references of the Label widgets we will create one blank list. To this list we will add reference of our Label widgets by using list append method.
import tkinter  as tk
my_w = tk.Tk()
font1=('Times',22,'normal') # font family, size, style
my_w.geometry("400x300")  # width and height of the window
l1=['abc','def','ghi','jkl','mno','pkr','frt','qwr','asd','air']
my_row,my_col=0,0
my_labels=[] # to store the reference of all Labels
for data in l1:
    my_label=tk.Label(my_w,text=data,font=font1)
    my_label.grid(row=my_row,column=my_col,padx=10,pady=5)
    my_col=my_col+1 # Increase column to next on Left side
    if(my_col>=3):  # Maximum Number of elements in a row reached
        my_row=my_row+1 # Go to Next row
        my_col=0 # column start from left
    my_labels.append(my_label)

my_labels[4].config(bg='yellow')#The option is changed using the references
my_w.mainloop()
Managing the geometry ( width and height )
Based on the number of rows we can adjust the height of the window by updating the geometry.
import tkinter  as tk
my_w = tk.Tk()
font1=('Times',22,'normal') # font family, size, style
width,height=400,200
d=str(width)+"x"+str(height)
my_w.geometry(d)  # width and height of the window
l1=['abc','def','ghi','jkl','mno','pkr','frt','qwr','asd','air']
my_row,my_col=1,0

for data in l1:
    my_label=tk.Label(my_w,text=data,font=font1)
    my_label.grid(row=my_row,column=my_col,padx=10,pady=5)
    my_col=my_col+1 # Increase column to next on Left side
    if(my_col>=3):  # Maximum Number of elements in a row reached
        my_row=my_row+1 # Go to Next row
        my_col=0 # column start from left

height=my_row*50 # calculate new height based on number of rows
d=str(width)+"x"+str(height) # string with new height
my_w.geometry(d) # Update the new dimensions

my_w.mainloop()
Two-dimensional list as source
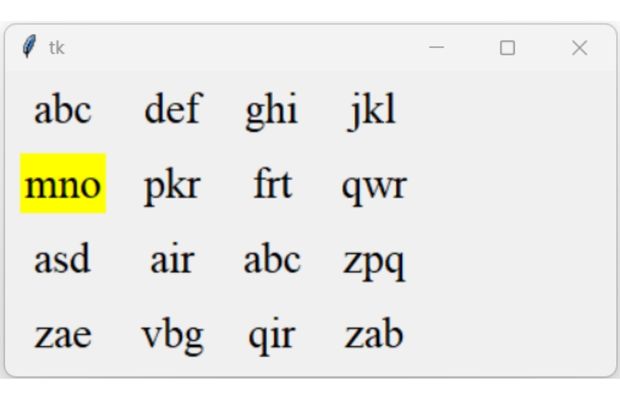
We can display elements of a multi-dimensional list elements in a window by using Labels. Here is our code.
import tkinter  as tk
my_w = tk.Tk()
font1=('Times',22,'normal') # font family, size, style
width,height=400,200
d=str(width)+"x"+str(height)
my_w.geometry(d)  # width and height of the window

l1=[['abc','def','ghi','jkl'],
    ['mno','pkr','frt','qwr'],
    ['asd','air','abc','zpq'],
    ['zae','vbg','qir','zab']]

my_row,my_col=1,0 # First row and first column values are set here
my_labels=[] # to store the reference of all Labels

for data in l1: # get each row of the list as data
    for my_col in range(len(data)): # get each element of the row of data
        my_label=tk.Label(my_w,text=data[my_col],font=font1)
        my_label.grid(row=my_row,column=my_col,padx=10,pady=5)
        my_labels.append(my_label) # add the reference
    my_row=my_row+1 # Go to Next row

height=my_row*40 #  calculate new height based on number of rows
d=str(width)+"x"+str(height) # string with new height
my_w.geometry(d) # Update the dimension of the window
my_labels[4].config(bg='yellow')

my_w.mainloop()Dynamically adding separators below the rows
Displaying Data from Different Sources
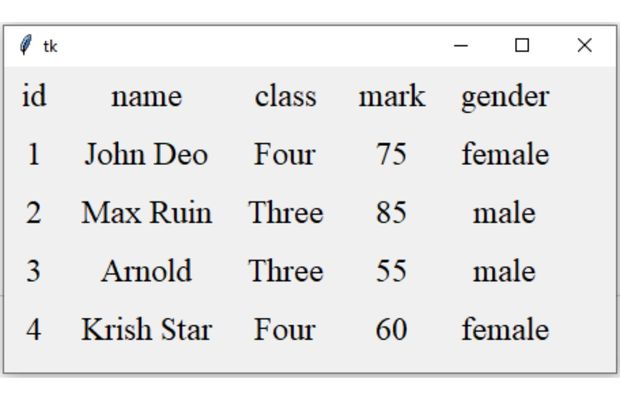
We will use openpyxl library and read data from Student Excel file.
from openpyxl import load_workbook
import tkinter  as tk
my_w = tk.Tk()
width,height=450,150 # width and height of the window
d=str(width)+'x'+str(height) # string to set dimension
my_w.geometry(d) # Initial Dimension is set
font1=('Times',18,'normal') # font to be used in Labels
my_row,my_col=1,0
my_labels=[] # to store reference of Labels

wb = load_workbook(filename='E:\\testing\\student.xlsx', read_only=True)
ws = wb['student'] # connecting to sheet
for data in ws.iter_rows(max_col=5,max_row=10,values_only=True):
    for my_col in range(len(data)):
        my_label=tk.Label(my_w,text=data[my_col],font=font1)
        my_label.grid(row=my_row,column=my_col,padx=10,pady=5)
        my_labels.append(my_label)
    my_row=my_row+1
wb.close()# Close the workbook after reading

height=(my_row-1)*45 # height based on number of rows
d=str(width)+'x'+str(height) # String with new width & height
my_w.geometry(d) #Update window width & height
my_w.mainloop()
Tkinter Labels to display data from different sources like Excel , SQLite and MySQL student table
Using SQLite database we can collect records from Student table and display records.
We used try except error handling to display any error.
from sqlalchemy import create_engine
from sqlalchemy.exc import SQLAlchemyError
my_path="E:\\testing\\sqlite\\my_db.db" #Change the path
my_conn = create_engine("sqlite:///"+ my_path)#SQLite Connection

import tkinter  as tk
my_w = tk.Tk()
width,height=450,150 # width and height of the window
d=str(width)+'x'+str(height) # string to set dimension
my_w.geometry(d) # Initial Dimension is set
font1=('Times',18,'normal') # font to be used in Labels
my_row,my_col=1,0
my_labels=[] # to store reference of Labels
try:
    r_set=my_conn.execute('SELECT * from student LIMIT 0,2')
except SQLAlchemyError as e:
  error=str(e.__dict__['orig'])
  print(error)
else:
    for data in r_set:
        for my_col in range(len(data)):
            my_label=tk.Label(my_w,text=data[my_col],font=font1)
            my_label.grid(row=my_row,column=my_col,padx=10,pady=5)
            my_labels.append(my_label)
        my_row=my_row+1
height=(my_row-1)*45 # height based on number of rows
d=str(width)+'x'+str(height) # String with new width & height
my_w.geometry(d) #Update window width & height
my_w.mainloop()#my_path="E:\\testing\\sqlite\\my_db.db" #Change the path
#my_conn = create_engine("sqlite:///"+ my_path)#SQLite Connection
my_conn = create_engine("mysql+mysqldb://userid:pw@localhost/my_db")
Subhendu Mohapatra
Author
🎥 Join me live on YouTubePassionate about coding and teaching, I publish practical tutorials on PHP, Python, JavaScript, SQL, and web development. My goal is to make learning simple, engaging, and project‑oriented with real examples and source code.
Subscribe to our YouTube Channel here
This article is written by plus2net.com team.
https://www.plus2net.com

 Python Video Tutorials