Menubutton: Button with Dropdown Options for User Selection
t1=tk.Menubutton(parent_window,options)parent_window : Declared Parent window options : Various options can be added, list is given below. 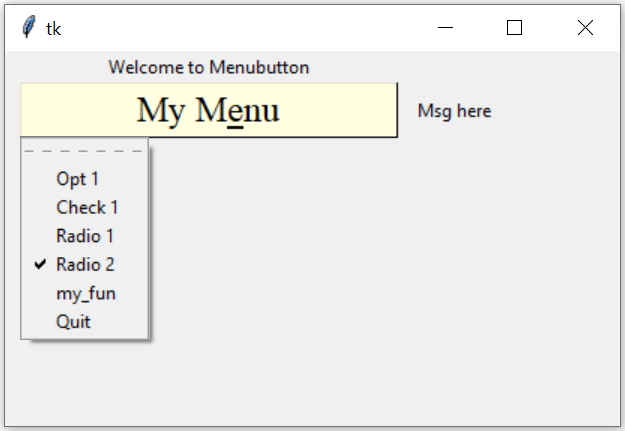
import tkinter as tk
my_w = tk.Tk()
my_w.geometry("410x250")  # Size of the window
l1=tk.Label(my_w,text='Welcome to Menubutton')
l1.grid(row=1,column=1)
l2=tk.Label(my_w,text='Msg here')
l2.grid(row=2,column=2)
str1=tk.StringVar()
font1=('Times',18,'normal')

mb=tk.Menubutton(my_w,text='My Menu',
  activebackground='lightyellow',font=font1,
  underline=4,relief='raised',width=20)
mb.grid(row=2,column=1,padx=10)

mb.menu=tk.Menu(mb)
mb['menu']=mb.menu

int1=tk.IntVar(value=0)
optvar=tk.IntVar(value=1)
def my_fun():
    print("This is inside my_fun")
    l2.config(text='I am from function ')
mb.menu.add_command(label = "Opt 1",command=lambda:print(str1.get() ))
mb.menu.add_checkbutton(label='Check 1',variable=int1,onvalue=5,offvalue=6,command=lambda:print(int1.get()))
mb.menu.add_radiobutton(label='Radio 1',value=0,variable=optvar,command=lambda:l2.config(text=optvar.get()))
mb.menu.add_radiobutton(label='Radio 2',value=1,variable=optvar,command=lambda:print(optvar.get()))
mb.menu.add_command(label='my_fun',command=lambda:my_fun())
mb.menu.add_command(label='Quit',command=my_w.quit)

my_w.mainloop()  # Keep the window open
Options
activebackground | Colour of the background when Menubutton is active | |
activeforeground | Colour of the foreground ( font ) when Menubutton is active | |
anchor | Direction in which the text to be placed, values can be n, ne, e, se, s, sw, w, nw, or center | |
bg | Color of the background. We can use Hex value or colour name. ( bg='green' or bg='#ffff00') | |
bd | Border size, default value is 2 | |
bitmap | | |
cursor | Shape of the cursor while moving over the Entry widget. A list of shapes are available at Button Page. | |
fg | font colour. Check the example below | |
font | font family, font style ,font style to use ( tuple ) . Check the example below | |
direction | Opening of menu. Values can be left, right,below or flush Check the Example code given below | |
disabledforeground | Colour of the foreground ( font ) when state is disabled. | |
height | Height of the menubutton in number of lines. | |
justify | Alignment of text. Values are 'left','center' or 'right' | |
padx | Space to be left at left and right side of the text | |
pady | Space to be left at top and bottom side of the text | |
relief | The borders 3 D effect style. It can take these values 'raised' , 'sunken' ,'flat', 'ridge', 'solid' & 'groove' | |
state | Values can be 'disabled', 'normal','active'. Check the example below. | |
text | Text to be displayed | |
textvariable | variable associated with the menubutton text. Usually StringVar is used. | |
underline | Index position of text ( starting from 0 ) to be underlined. | |
width | width of the widget, default value is 20 | |
wraplength | Lines to be broken ( next line ) after the input number of chars. |
State Option to disable menubutton
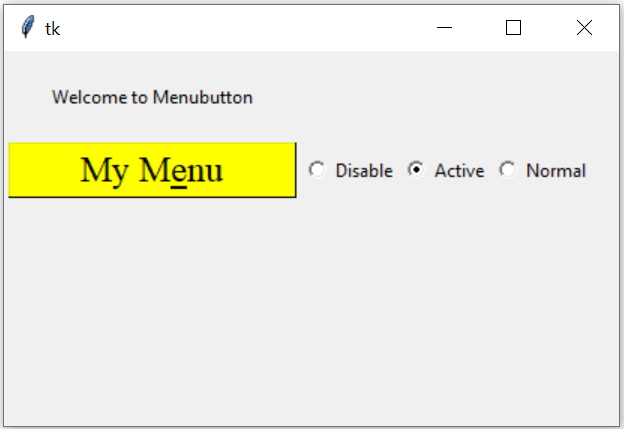
We will use radio buttons to change the state option of the Menubutton. On click of radio buttons the Config method of Menubutton is used to change the state to three different values, disabled, active and normal.
import tkinter as tk
my_w = tk.Tk()
my_w.geometry("410x250")  # Size of the window
l1=tk.Label(my_w,text='Welcome to Menubutton')
l1.grid(row=1,column=1)
r_v=tk.IntVar()

str1=tk.StringVar()
font1=('Times',18,'normal')
mb=tk.Menubutton(my_w,text='My Menu',
  activebackground='yellow',font=font1,
  underline=4,relief='raised',width=15)
mb.grid(row=2,column=1,padx=3)
mb.menu=tk.Menu(mb)
mb['menu']=mb.menu
mb.menu.add_command(label = "Opt 1")
mb.menu.add_command(label='Quit',command=my_w.quit)

r1 = tk.Radiobutton(my_w, text='Disable', variable=r_v,
     value='1',command=lambda:mb.config(state='disabled'))
r1.grid(row=2,column=2)
r2 = tk.Radiobutton(my_w, text='Active', variable=r_v,
    value='2',command=lambda:mb.config(state='active'))
r2.grid(row=2,column=3)
r3 = tk.Radiobutton(my_w, text='Normal', variable=r_v,
    value='3',command=lambda:mb.config(state='normal'))
r3.grid(row=2,column=4)

my_w.mainloop()  # Keep the window open
Managing textvariable option of Menubutton
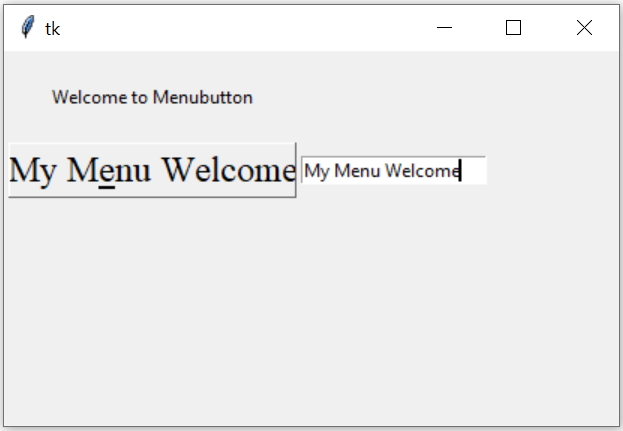
We will use one String variable ( str1 ) and through this we will change the text appearing on the Menubutton. This string variable ( str1 ) is also connected to Entry button where user can input data to update the text appearing on the Menubutton.
import tkinter as tk
my_w = tk.Tk()
my_w.geometry("410x250")  # Size of the window
l1=tk.Label(my_w,text='Welcome to Menubutton')
l1.grid(row=1,column=1,pady=20,padx=10)
r_v=tk.IntVar()

str1=tk.StringVar(value='My Menu')
font1=('Times',18,'normal')
mb=tk.Menubutton(my_w,activebackground='yellow',font=font1,
  underline=4,relief='raised',width=15,textvariable=str1)
mb.grid(row=2,column=1,padx=3)
mb.menu=tk.Menu(mb)
mb['menu']=mb.menu
mb.menu.add_command(label = "Opt 1")
mb.menu.add_command(label='Quit',command=my_w.quit)

e1=tk.Entry(my_w,textvariable=str1)
e1.grid(row=2,column=2)

my_w.mainloop()  # Keep the window open
Example: MenuButton Opening in Different Directions

The direction option allows us to control the opening direction of the dropdown menu in the MenuButton. It can be set to left, right, below, or flush, depending on the interface requirements.
import tkinter as tk

my_w = tk.Tk()
my_w.geometry("400x300")

# MenuButton opening to the right
mb1 = tk.Menubutton(my_w, text='Menu Right', relief='raised',
    direction='right', bg='#f0e68c', font=("Arial", 12))
mb1.grid(row=0, column=0, padx=50, pady=30)
menu1 = tk.Menu(mb1, tearoff=0)
mb1.config(menu=menu1)
menu1.add_command(label="Option 1")
menu1.add_command(label="Option 2")
menu1.add_command(label="Option 3")

# MenuButton opening to the left
mb2 = tk.Menubutton(my_w, text='Menu Left', relief='raised',
    direction='left', bg='#add8e6', font=("Arial", 12))
mb2.grid(row=0, column=1, padx=10, pady=10)
menu2 = tk.Menu(mb2, tearoff=0)
mb2.config(menu=menu2)
menu2.add_command(label="Option A")
menu2.add_command(label="Option B")
menu2.add_command(label="Option C")

# MenuButton opening below
mb3 = tk.Menubutton(my_w, text='Menu Below', relief='raised',
     direction='below', bg='#90ee90', font=("Arial", 12))
mb3.grid(row=1, column=0, padx=10, pady=10)
menu3 = tk.Menu(mb3, tearoff=0)
mb3.config(menu=menu3)
menu3.add_command(label="Item 1")
menu3.add_command(label="Item 2")
menu3.add_command(label="Item 3")

# MenuButton with flush direction
mb4 = tk.Menubutton(my_w, text='Menu Flush', relief='raised',
    direction='flush', bg='#ffcccb', font=("Arial", 12))
mb4.grid(row=1, column=1, padx=10, pady=10)
menu4 = tk.Menu(mb4, tearoff=0)
mb4.config(menu=menu4)
menu4.add_command(label="Choice X")
menu4.add_command(label="Choice Y")
menu4.add_command(label="Choice Z")

my_w.mainloop()
Example: MenuButton with Multiple Cascading Menus

We can expand the basic MenuButton by adding cascading submenus, allowing for a more complex menu structure within the button itself.
import tkinter as tk

my_w = tk.Tk()
my_w.geometry("300x200") # width and height of the window
font1=['Arial',18,'normal'] # font style

# Create a MenuButton
mb = tk.Menubutton(my_w, text='Options',
    relief='raised',bg='lightgreen',font=font1)
mb.grid(row=0, column=0, padx=50, pady=30)

# Add a main menu to the MenuButton
main_menu = tk.Menu(mb, tearoff=0,font=font1,bg='greenyellow')
mb.config(menu=main_menu)

# Add submenus
file_menu = tk.Menu(main_menu, tearoff=0,bg='yellow',font=font1)
edit_menu = tk.Menu(main_menu, tearoff=0,bg='khaki',font=font1)

# Add commands to submenus
file_menu.add_command(label="New", command=lambda: print("New File"))
file_menu.add_command(label="Open", command=lambda: print("Open File"))
file_menu.add_command(label="Save", command=lambda: print("Save File"))

edit_menu.add_command(label="Cut", command=lambda: print("Cut"))
edit_menu.add_command(label="Copy", command=lambda: print("Copy"))
edit_menu.add_command(label="Paste", command=lambda: print("Paste"))

# Add the submenus to the main menu
main_menu.add_cascade(label="File", menu=file_menu)
main_menu.add_cascade(label="Edit", menu=edit_menu)

my_w.mainloop() # Keep the window open
Difference between Menu and MenuButton in Tkinter
Menu: A Menu widget is used to create a traditional menu bar or pop-up menus. It provides a list of commands, and can be nested for hierarchical menus (e.g., File, Edit, View). It is generally used in creating the full menu structure of a GUI.
MenuButton: A MenuButton is a button that, when clicked, opens a dropdown menu. It is used for creating context menus or dropdown lists where users can select an option from a group.
Tkinter menu Tkinter OptionMenu Combobox

Subhendu Mohapatra
Author
🎥 Join me live on YouTubePassionate about coding and teaching, I publish practical tutorials on PHP, Python, JavaScript, SQL, and web development. My goal is to make learning simple, engaging, and project‑oriented with real examples and source code.
Subscribe to our YouTube Channel here

 Python Video Tutorials