Python tkinter Spinbox
- How to set default value for Spinbox
- Reading the value of Spinbox with on change of selection
- Enable disable Spinbox
- Methods
- Using delete and insert methods
- Creating Interlinked Spinboxes in Tkinter for Range Selection
- Understanding Events while using Spinbox
- Dynamic Spinbox Interlinking Using the FocusOut Event
- Dynamic Spinbox Validation with Real-Time Feedback
- Adding new options / values
- Inter connecting Spinbox and Scale widgets
- Options
- Projects using Spinbox
- Questions

Using Spinbox user can select value from a range of given options.
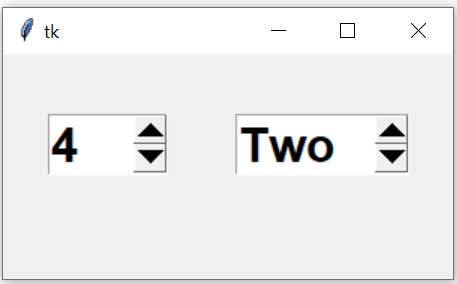
Two SpinBox widgets, one for integer and other one is for string selection by user.
import tkinter as tk
from tkinter import *
my_w = tk.Tk()
my_w.geometry("300x150")  # Size of the window
my_w.title("www.plus2net.com")  # Adding a title

sb1 = Spinbox(my_w, from_= 0, to = 10,width=5)
sb1.grid(row=1,column=1,padx=20,pady=20)

my_list=['One', 'Two', 'Three', 'Four', 'Five']
sb2 = Spinbox(my_w,values=my_list,width=10)
sb2.grid(row=1,column=2,padx=20,pady=20)

my_w.mainloop() # Keep the window openHow to set default value for Spinbox 🔝
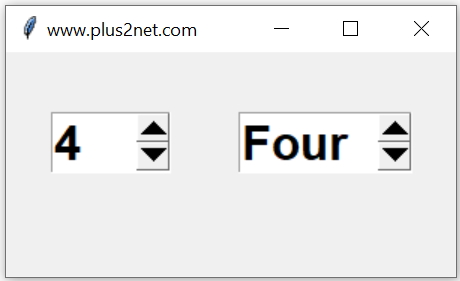
By using StringVar we can set the default value of the Spinbox. Here for both the types ( number and string ) of Spinbox widgets, two different string variables ( t1 and t2 ) are used and by using set() method the default values are set.
We must set the value
t2.set('Four') after creating the widget.
t1 = StringVar() # string variable
sb1 = Spinbox(my_w, from_= 0, to = 10,width=5,textvariable=t1)
sb1.grid(row=1,column=1,padx=20,pady=20)
t1.set(5) # set value for string variable

t2=StringVar() # string variable
my_list=['One', 'Two', 'Three', 'Four', 'Five']
sb2 = Spinbox(my_w,values=my_list,width=10,textvariable=t2)
sb2.grid(row=1,column=2,padx=20,pady=20)
t2.set('Four')#set value for string vaiable
Reading the value of Spinbox with on change of selection 🔝
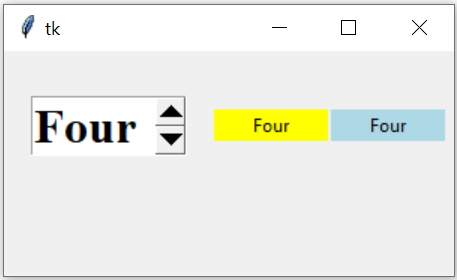
We used two Labels here. The first Label ( l1 ) is connected to the Spinbox ( sb2 ) through StringVar t2. So once the selection of Spinbox is changed the value of StringVar t2 is reflected in Label ( l1).
The second Label ( l2 ) gets its value by this line
l2.config(text=sb2.get()) inside the function desp(). This function desp() is triggered through the command attribute of Spinbox ( command=desp )
import tkinter as tk
from tkinter import *
my_w = tk.Tk()
my_w.geometry("300x150")

def desp():
    l2.config(text=sb2.get()) # 2nd Label value
    print(sb2.get()) # output at console
    print(t2.get())  # output at console

font1=('Times',24,'bold')
t2 = StringVar() # connected to 1st Label and Spinbox
my_tuple=['One', 'Two', 'Three', 'Four', 'Five']
sb2 = Spinbox(my_w,values=my_tuple,font=font1,width=5,
    textvariable=t2, command=desp)
sb2.grid(row=1,column=2,padx=18,pady=30)

l1 = tk.Label(my_w,  textvariable=t2, width=10,bg='yellow' )
l1.grid(row=1,column=3)

l2 = tk.Label(my_w,  width=10 ,text='data here',bg='lightblue')
l2.grid(row=1,column=4,padx=2)
my_w.mainloop()  # Keep the window open
Enable disable Spinbox 🔝
To disable we can use option state or use config().sb1 = Spinbox(my_w, from_= 0, to = 10, state='disabled')sb1.config(state='disabled')state='normal'
sb1.config(state='normal')state='readonly'
sb1.config(state='readonly')Methods 🔝
delete(first, last=None): Delete one or more characters from the element. get: Returns the Spinbox string ( Check above examples)insert(index,string): Place the string at Index position. index(index): Returns numerical Index. identify(x,y):Returns the name of the widget at position x, yinvoke:Causes the specified element to be invokedUsing delete and insert methods 🔝
We will remove four and place FOUR as element.t2 = StringVar()
my_list=['One', 'Two', 'Three', 'Four', 'Five']
sb2 = Spinbox(my_w,values=my_list, textvariable=t2, width=10)
sb2.grid(row=1,column=2,padx=20)
t2.set('Four')
sb2.delete(0,'end') # replace from 0 position till end
sb2.insert(0,'FOUR') # add string from 0 positionstate='readonly' or state='disabled'
Creating Interlinked Spinboxes in Tkinter for Range Selection 🔝
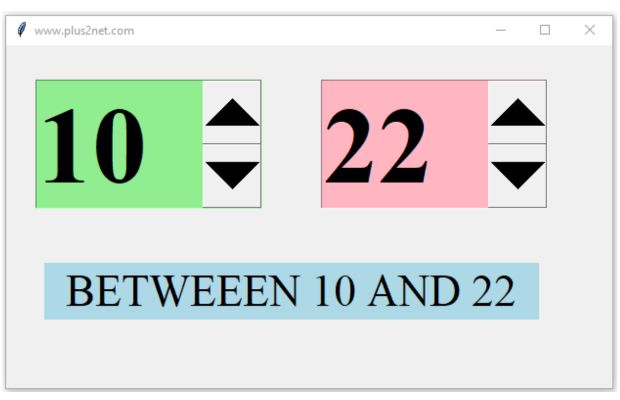
We will create two interlinked Tkinter Spinbox widgets that allow the user to select a range of values, we'll set up the first Spinbox to control the minimum value and the second to control the maximum value of the range.
The key here is to ensure that the value in the first Spinbox (min value) is always less than or equal to the value in the second Spinbox (max value). Similarly the value in second Spinbox is always greater than or equal to value in first Spinbox.
import tkinter as tk
my_w = tk.Tk()
my_w.geometry("620x350")  # Size of the window
my_w.title("www.plus2net.com")  # Adding a title

font1=('Times',84,'bold') # Higher font for Spinbox
font2=('Times',34,'normal') # Higher font for Label text

def my_upd():
    sb2.config(from_=sb1.get()) # set lower limit for second Spinbox
    sb1.config(to=sb2.get())    # set upper limit for first Spinbox
    lb1.config(text='BETWEEEN ' + sb1.get() + ' AND ' + sb2.get()) # Label text

v1=tk.IntVar(value=10) #  for first Spinbox
sb1 = tk.Spinbox(my_w, from_= 0, to = 100,width=3,textvariable=v1,
                 font=font1,bg='lightgreen',command=my_upd)
sb1.grid(row=1,column=1,padx=30,pady=35)

v2=tk.IntVar(value=20) # for second Spinbox
sb2 = tk.Spinbox(my_w, from_= 0, to = 100,width=3,textvariable=v2,
                 font=font1,bg='lightpink',command=my_upd)
sb2.grid(row=1,column=2,padx=30,pady=20)

lb1=tk.Label(my_w,text='Query here',font=font2, bg='lightblue',width=20)
lb1.grid(row=2,column=1,columnspan=2,padx=30, pady=20)

my_w.mainloop()  # Keep the window open
In this example, we initially used the command parameter to trigger the function, but this approach only captures changes when the up and down arrows are used. If the user directly types a value in the Spinbox, the function does not automatically respond, causing the update or validation to fail.
To solve this, we can bind specific events instead of relying solely on command. By using events like <KeyRelease> and <FocusOut>, we can ensure that the function is triggered whenever the user makes changes, whether by typing or using the arrows.
# Binding events to ensure updates for typed changes
sb1.bind("<FocusOut>", my_upd)
sb2.bind("<FocusOut>", my_upd)
#sb1.bind("<KeyRelease>", my_upd)
#sb2.bind("<KeyRelease>", my_upd)
Also, remember to update the function to dynamically adjust the Spinbox ranges based on user input:
def my_upd(*args):
    sb2.config(from_=sb1.get())  # Sets the lower limit for the second Spinbox
    sb1.config(to=sb2.get())     # Sets the upper limit for the first Spinbox
    lb1.config(text='BETWEEN ' + sb1.get() + ' AND ' + sb2.get())  # Updates label text
With this setup, the function will run anytime the value changes, keeping the Spinbox values in sync and the display updated regardless of input method.
Understanding Events while using Spinbox 🔝
<FocusOut>: Triggered when the Spinbox loses focus.<FocusIn>: Triggered when the Spinbox gains focus.<Return>or<Enter>: Triggered when the Enter key is pressed while the Spinbox is in focus.<ButtonRelease>: Triggered when the user releases a mouse button (often used withButton-1,Button-2, etc., for specific buttons).<KeyRelease>: Triggered when any key is released while the Spinbox is in focus (useful for checking the value after every keystroke).
Using the command Parameter
The command parameter can call a function every time the value is updated by the user (through the up/down arrows). It’s helpful when you want a change to trigger the update but doesn’t respond to direct typing changes.
Dynamic Spinbox Interlinking Using the FocusOut Event 🔝

This Tkinter program creates a simple GUI with two interlinked Spinbox widgets, allowing users to select a country and then view a list of states corresponding to that country. A dictionary stores each country as a key with its states as values. When a country is selected, the update_states function updates the state_spinbox to display the relevant states. The interface includes labels for each Spinbox, and the layout is managed using the grid system. This approach provides an interactive way to dynamically adjust the Spinbox options based on the user’s selection.
import tkinter as tk
root = tk.Tk() # parent window
root.geometry("410x300") # width and height of window
root.title("Country and State Selector")

font1=('Times',24,'bold') # Higher font for Spinbox
font2=('Times',24,'normal') # Higher font for Label text

# Dictionary with countries as keys and lists of states as values
country_states = {
    "USA": ["California", "Texas", "New York", "Florida", "Illinois"],
    "India": ["Maharashtra", "Gujarat", "Tamil Nadu", "West Bengal", "Punjab"],
    "Canada": ["Ontario", "Quebec", "Alberta", "British Columbia", "Manitoba"],
    "Australia": ["New South Wales", "Victoria", "Queensland", "Tasmania", "Western Australia"],
    "Brazil": ["São Paulo", "Rio de Janeiro", "Bahia", "Paraná", "Minas Gerais"]
}

def update_states(*args):
    # Get the selected country and update the states Spinbox values
    selected_country = country_spinbox.get()
    state_spinbox.config(values=country_states[selected_country]) # update with new value


# Label and Spinbox for Country Selection
country_label = tk.Label(root, text="Country:",font=font2)
country_label.grid(row=0, column=0, padx=3, pady=5, sticky="e")
country_spinbox = tk.Spinbox(root, values=list(country_states.keys()),
        width=7,font=font1,bg='pink', command=update_states)
country_spinbox.grid(row=0, column=1, padx=1, pady=5,sticky="w")

# Label and Spinbox for State Selection
state_label = tk.Label(root, text="State:",font=font2)
state_label.grid(row=1, column=0, padx=3, pady=15, sticky="e")
state_spinbox = tk.Spinbox(root, values=country_states["USA"],
        width=16,font=font1,bg='lightgreen')  # Default to USA states
state_spinbox.grid(row=1, column=1, padx=1, pady=15,sticky="w")

# Link country Spinbox change to update_states function
country_spinbox.bind("<FocusOut>", update_states)  # Update when focus leaves the Spinbox

root.mainloop()
Dynamic Spinbox Validation with Real-Time Feedback 🔝

This Tkinter program creates a Spinbox that only accepts numeric input, providing instant feedback with color changes: green for valid entries and red for invalid ones. Using the validate and validatecommand options, the Spinbox triggers a function on each key press, updating the background color dynamically based on the input’s validity. This enhances user experience by visually indicating valid and invalid inputs in real time.
More on Tkinter Validation
import tkinter as tk
my_w = tk.Tk() # parent window
my_w.geometry("300x200") # width height
my_w.title("Spinbox Validation Example")
font1 = ('Times', 24, 'bold')  # Higher font for Spinbox

def validate_input(new_value):
    # Check if the input is a digit or empty (allows clearing the input)
    if new_value.isdigit() or new_value == "":
        # Set background to green after successful validation
        my_w.after(1, lambda: spinbox.config(bg='lightgreen'))
        return True
    else:
        # Set background to red if validation fails
        my_w.after(1, lambda: spinbox.config(bg='red'))
        return False
# Register the validate function with Tkinter
vcmd = (my_w.register(validate_input), '%P')

# Label for Spinbox
label = tk.Label(my_w, text="Number:", font=font1)
label.grid(row=0, column=0, padx=10, pady=10, sticky="e")

# Spinbox with validation to accept only numeric input
spinbox = tk.Spinbox(my_w, from_=0, to=100, validate="key",
	width=5, font=font1, validatecommand=vcmd)
spinbox.grid(row=0, column=1, padx=10, pady=10)

my_w.mainloop()
Adding new options / values 🔝
When we used from_ and to to add a range, we can change these values by using config()sb1.config(from_=40,to=50) # starting from 40 to 50my_list=['One','Two','Three','Four','Five']
sb2=tk.Spinbox(my_w,values=my_list,width=10,textvariable=t2)
sb2.grid(row=1,column=2)
my_list.insert(5,'Six') # added option six at index position 5
sb2.config(values=my_list)Inter connecting Spinbox and Scale widgets 🔝
We can add one horizontal scrollbar by using one Scale widget. Here both are connected so changes in any one will reflect in both.We used one common StringVar sv here.
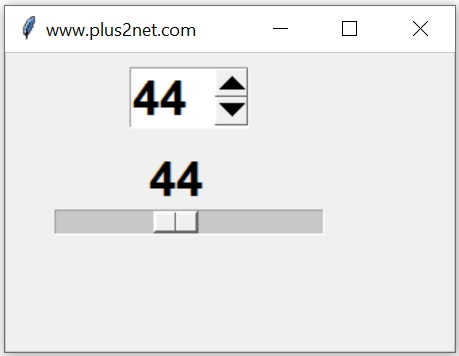
import tkinter as tk
from tkinter import *
my_w = tk.Tk()
my_w.geometry("300x200")
my_w.title("www.plus2net.com")

font1=('Arial',24,'bold')
sv = StringVar() #string variable
sb = Spinbox(my_w,textvariable=sv,font=font1,
     width=3,from_=0,to=100)
sb.grid(row=1,column=1,padx=30,pady=10)

sc = Scale(my_w, from_=0, to=100, font=font1,
    orient=HORIZONTAL,variable=sv,length=180)
sc.grid(row=2,column=1,padx=30)

my_w.mainloop()  # Keep the window open
Options 🔝
activebackground | Color of the slider when Mouse is over it. | |
bg | Color of the slider and arrowheads when Mouse is NOT over it. | |
bd | Border width of the widget | |
command | When state is changed call the function. ( Example above ) | |
bd | Border width of the widget | |
cursor | Shape of the cursor while moving over the Spinbox ( List of cursor shapes ) | |
disabledbackground | Background color when it is disabled | |
disabledforeground | Foreground color when it is disabled | |
font | Font family size style | |
fg | Foreground colour | |
format | Format the display, showing decimal place or starting with zero etc. | |
from_ | Start value of Spinbox, check examples above. | |
increment | Step value of change when we use the arrow buttons. | |
justify | Alignment of text inside. ( left , center, right ) | |
relief | Border style, ( raised, sunken,flat,ridge,solid,groove ) Check the Button for sample images | |
state | state of Spinbox , ( disabled, normal, readonly) Check the examples above | |
validate | When to Validate the input ( none,focus,focusin,focusout,key,all) | |
validatecommand | Callback function to execute validation | |
to | End value of Spinbox, check examples above. | |
repeatdelay | Delay in changing value when you press the Up or down arrow and holding it ( for first time ) in milliseconds | |
repeatinterval | Delay in changing value in each step when you press the Up or down arrow and holding it in milliseconds | |
xscrollcommand | Used with set method of scrollbar | |
wrap | Boolean, default value is False. If it is set to True then value starts ( repeat ) from lower limit ( from_) after the maximum value ( to ) is reached. | |
width | Control the width of the spinbox ( examples above) | |
vcmd | See validatecommand above | |
values | The options we can add, see examples above (sb2) | |
textvariable | The variable to connect to the widget, check the examples above where we used t2 the StrVariable to sb2 |
Projects using Spinbox 🔝
- Display two Spinboxes showing numbers and on click of a button display the sum of the selected numbers.
- Collect all student names from MySQL table and display them using Spinbox. On submit of a button display full details of the selected record ( student ).
Questions 🔝
- What is a Spinbox widget in Tkinter and how does it differ from an Entry widget?
- How can you create a Spinbox widget in Tkinter that only accepts numeric values?
- Explain how to set and retrieve the value from a Spinbox widget in Tkinter.
- How can you link the values of two Spinbox widgets to define a range (minimum and maximum values) in Tkinter?
- Describe how to configure a Spinbox widget in Tkinter to change its values in steps of 5.
- What are the key methods and options available for a Spinbox widget in Tkinter?
- How can you use the command option in a Spinbox widget in Tkinter? Provide an example.
- Discuss how to apply validation to a Tkinter Spinbox to ensure users can only enter valid dates.
- How would you style a Tkinter Spinbox widget to match a specific GUI theme?
- Explain how to make a Tkinter Spinbox widget read-only while still allowing users to scroll through values.
- Provide an example of using a Spinbox widget in a real-world application scenario in Tkinter.
- How can you dynamically update the range of a Spinbox based on another widget’s state or input in Tkinter?
MySQL , SQLite,CSV and Json data is used to add options for Spinbox
Dynamically managing Spinboxes

Subhendu Mohapatra
Author
🎥 Join me live on YouTubePassionate about coding and teaching, I publish practical tutorials on PHP, Python, JavaScript, SQL, and web development. My goal is to make learning simple, engaging, and project‑oriented with real examples and source code.
Subscribe to our YouTube Channel here

 Python Video Tutorials