canvas move(), Movement of items
Moving rectangle on a Tkinter Canvas by using move() in two directions by using a button
canvas.move(widget,x,y)widget : Item to move on canvasx : Jump or step value in right direction( - value for left side movement)y : Jump of step value in down direction ( - value for Up side movement)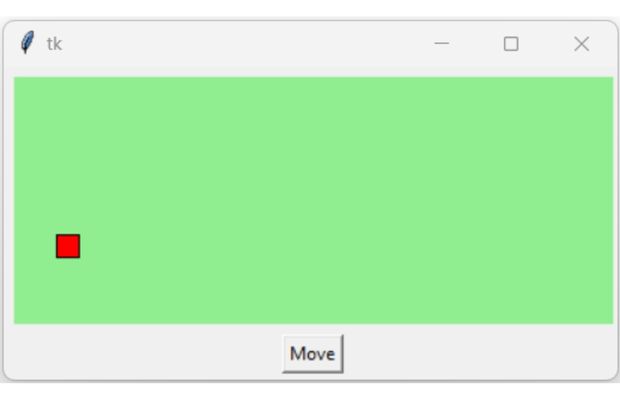
On click of the button we execute the function my_move(), inside this function we will use move() to shift the rectangle r1 in right-down direction.
import tkinter as tk
my_w = tk.Tk()
width,height=410,210 # set the variables
c_width,c_height=width-10,height-45 # canvas width height
d=str(width)+"x"+str(height) # window dimensions
my_w.geometry(d) # window height and width

c1 = tk.Canvas(my_w, width=c_width, height=c_height,bg='lightgreen')
c1.grid(row=1,column=0,padx=5,pady=5)

step=5 # value of each incremental movement, change this
x1,y1=5,int(c_height/2) # left top coordinate of rectangle
x2,y2=x1+15,y1+15      # right bottom cooridnate of rectangle
r1=c1.create_rectangle(x1, y1, x2,y2,fill='red')  # draw rectangle

def my_move(event):
    c1.move(r1,step,step) # increase x and y both, move right-down

b1=tk.Button(my_w,text='Move',command=lambda:my_move('x'))
b1.grid(row=2,column=0)
my_w.mainloop()
Buttons to move element in different directions
Moving rectangle on a Tkinter Canvas by using four buttons or directional arrow keys
We placed four buttons and each button will trigger respective function to move the rectangle in different directions.
import tkinter as tk
my_w = tk.Tk()
width,height=410,230 # set the variables
c_width,c_height=width-15,height-75 # canvas width height
d=str(width)+"x"+str(height)
my_w.geometry(d)
c1 = tk.Canvas(my_w, width=c_width, height=c_height,bg='lightgreen')
c1.grid(row=0,column=0,columnspan=3,padx=5,pady=2)

step=5 # value of each incremental movement, change this
x1,y1=5,int(c_height/2) # starting position
x2,y2=x1+15,y1+15      # starting position
r1=c1.create_rectangle(x1, y1, x2,y2,fill='red')  # draw rectangle

def my_left(event):
    c1.move(r1,-step,0) # Move Left direction without any up or down movement
def my_right(event):
    c1.move(r1,step,0) # Move right
def my_up(event):
    c1.move(r1,0,-step) # Move up
def my_down(event):
    c1.move(r1,0,step) # Move down

b1=tk.Button(my_w,text='Up',font=18,bg='yellow',command=lambda:my_up('x'))
b1.grid(row=1,column=1,padx=2,pady=2,sticky='ew')
b2=tk.Button(my_w,text='Left',font=18,bg='yellow',command=lambda:my_left('x'))
b2.grid(row=2,column=0,padx=2,pady=2,sticky='ew')
b3=tk.Button(my_w,text='Down',font=18,bg='yellow',command=lambda:my_down('x'))
b3.grid(row=2,column=1,padx=2,pady=2,sticky='ew')
b4=tk.Button(my_w,text='Right',font=18,bg='yellow',command=lambda:my_right('x'))
b4.grid(row=2,column=2,padx=2,pady=2,sticky='ew')

my_w.mainloop()
Movement using arrow keys
Here we are adding four directional arrow keys to trigger the matching functions.More about tkinter events
Include this code before my_w.mainloop()
my_w.bind('<Right>',my_right) # right arrow key is pressed
my_w.bind('<Left>',my_left)   # left arrow key is pressed
my_w.bind('<Up>',my_up)       # Up arrow key is pressed
my_w.bind('<Down>',my_down)   # Down arrow key is pressed
Moving Image
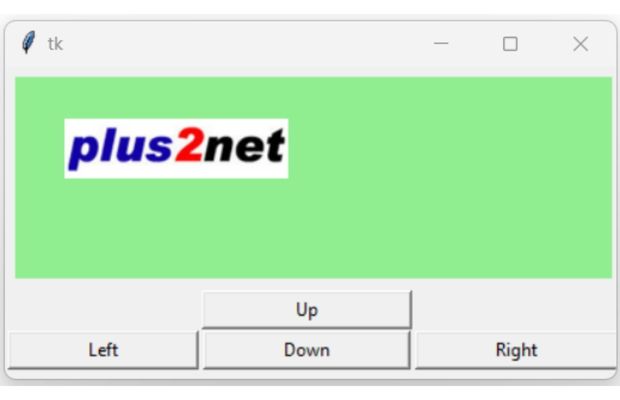
In above code we used one rectangle as object to move. In place of rectangle we will use one image, here we are keeping the same nam r1 so the same code can be used.
#r1=c1.create_rectangle(x1, y1, x2,y2,fill='red')  # comment this line
my_path = tk.PhotoImage(file = "E:\\plus2net.png") # Update your file path here
r1 = c1.create_image(100, 50,  image=my_path)
Moving image using Mouse ( Drag and Drop )
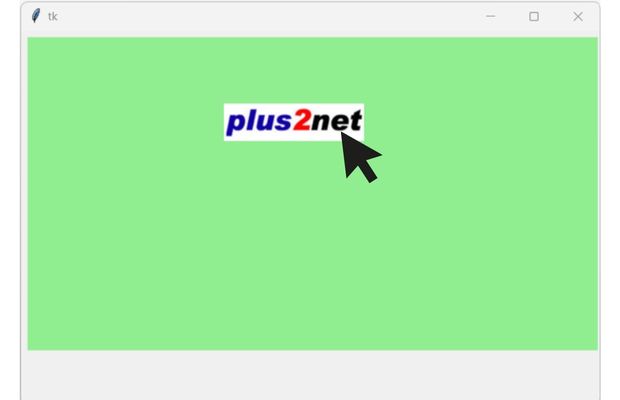
We can move the image by pressing and dragging the mouse left button.
import tkinter as tk
my_w = tk.Tk()
width,height=910,810 # set the variables
c_width,c_height=width-10,height-65 # canvas width height
d=str(width)+"x"+str(height)
my_w.geometry(d)
c1 = tk.Canvas(my_w, width=c_width, height=c_height,bg='lightgreen')
c1.grid(row=0,column=0,columnspan=3,padx=5,pady=5)

my_path = tk.PhotoImage(file = "E:\\plus2net.png") # Update your image path
x1,y1=100,25 # Image position coordinate ( initial )
r1 = c1.create_image(x1,y1,  image=my_path)

def my_callback(event):
    global x1,y1
    step_x=event.x-x1 # Change in x value ( Horizontal)
    step_y=event.y-y1 # Change in y value ( vertical )
    #print(x1,y1)
    c1.move(r1,step_x,step_y) # Move image to new position
    x1=event.x  # Set the new position as image x coordinate
    y1=event.y  # Set the new position as image y coordinate

my_w.bind('<B1-Motion>',my_callback) # Mouse left button press and move
my_w.mainloop()- Image will jump to the starting point of mouse drag coordinate and then follow the mouse. The mouse can start the drag from any location in the canvas and the image will follow.
- If we have more than one image in the same canvas then all images will follow the mouse movement
We will collect the width and height of the image and then the x, y position of the image.
If the mouse drag operation is starting within the x,y position including the half of the height and width of the image then only the image will follow the mouse.
The incremental movement of the image is taken from the incremental movement of the mouse.
import tkinter as tk
my_w = tk.Tk()
width,height=620,400 # set the variables
c_width,c_height=width-10,height-65 # canvas width height
d=str(width)+"x"+str(height)
my_w.geometry(d)
c1 = tk.Canvas(my_w, width=c_width, height=c_height,bg='lightgreen')
c1.grid(row=0,column=0,columnspan=3,padx=5,pady=5)

my_path = tk.PhotoImage(file = "H:\\top2.png") # Update your image path
img_width,img_height=int(my_path.width()/2),int(my_path.height()/2)
x1,y1=90,20 # Image position coordinate ( initial )
r1 = c1.create_image(x1,y1,  image=my_path)
x_new,y_new=0,0 # to store the Initial mouse click position
def my_callback(event):
    global x1,y1,x_new,y_new # get the current coordinates of the image
    if(event.x<=x1+img_width and event.x>=x1-img_width and event.y<=y1+img_height and event.y>=y1-img_height):
        x1=event.x  # Set the new position as image x coordinate
        y1=event.y  # Set the new position as image y coordinate
        step_x=event.x-x_new # Change in x value ( Horizontal)
        step_y=event.y-y_new # Change in y value ( vertical )
        c1.move(r1,step_x,step_y) # Move image to new position
        x_new,y_new=x1,y1

def my_position(event):
    global x_new,y_new
    global x_new,y_new # collect the mouse left buttton press coordinates

my_w.bind('<B1-Motion>',my_callback) # Mouse left button pressed and move
my_w.bind('<Button-1>',my_position) # Mouse left button pressed
my_w.mainloop()Tkinter Canvas Animation using Rectangles & Circles
Sin & cos curves in Canvas

Subhendu Mohapatra
Author
🎥 Join me live on YouTubePassionate about coding and teaching, I publish practical tutorials on PHP, Python, JavaScript, SQL, and web development. My goal is to make learning simple, engaging, and project‑oriented with real examples and source code.
Subscribe to our YouTube Channel here
This article is written by plus2net.com team.
https://www.plus2net.com

 Python Video Tutorials