Pagination of MySQL rows in Treeview
Connect to MySQL database display rows from MySQL.
Read our tutorial on how to display MySQL records in Treeview.
We will add pagination feature to this.
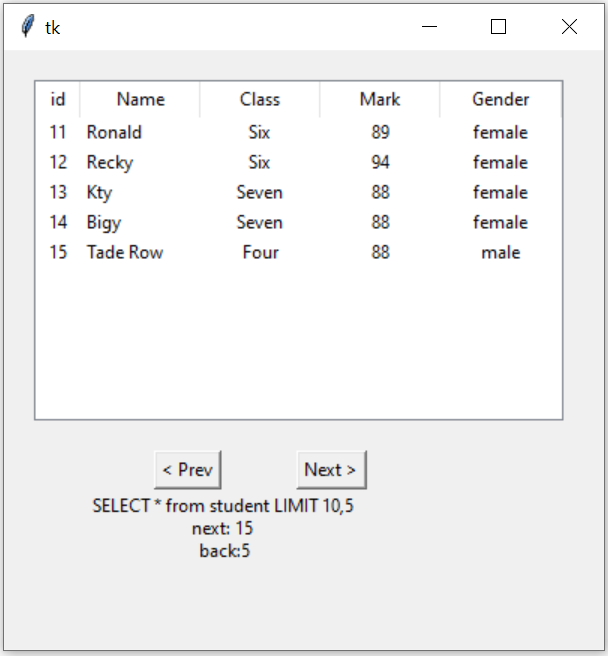
Tkitner Treeview paging of MySQL records by LIMIT query using Previous and next set of records
Code Explanation: Breaking Down the Activities
1. Importing Required Modules
from tkinter import ttk
import tkinter as tk
from sqlalchemy import create_engine, text
- ttk: Provides advanced widgets like Treeview.
- create_engine: Establishes a connection with the database.
- text: Allows executing parameterized SQL queries.
2. Setting Up the Database Connection
my_conn = create_engine("mysql+mysqldb://root:test@localhost/my_tutorial")
my_conn = my_conn.connect()  # Establish the connection to MySQL
- my_conn: This is the connection object used to execute SQL queries.
3. Fetching Total Number of Records
r_set = my_conn.execute(text("SELECT count(*) as no from STUDENT"))
data_row = r_set.fetchone()
no_rec = data_row[0]  # Total number of rows in the table
limit = 5  # Number of records to display per page
- no_rec: Holds the total number of records in the student table.
- limit: Controls how many rows are displayed per page.
4. Setting Up the Tkinter Window
my_w = tk.Tk()  # Create the main window
my_w.geometry("400x400")  # Set window dimensions
my_str = tk.StringVar()  # For displaying query information
- my_w: The main window for the application.
- my_str: A string variable used to display the current SQL query.
5. Defining the Function to Display Data
def my_display(offset):
    trv = ttk.Treeview(my_w, selectmode='browse')
    trv.grid(row=1, column=2, padx=20, pady=20, columnspan=3)
    ...
- This function dynamically fetches and displays rows from the database in the Treeview widget.
- offset: Determines the starting row for the SQL query.
6. Creating the Treeview Widget
trv['columns'] = ('1', '2', '3', '4', '5')
trv['show'] = 'headings'
trv.column('1', width=30, anchor='c')
trv.column('2', width=80, anchor='w')
trv.heading('1', text='id')
trv.heading('2', text='Name')
...
- The Treeview widget is configured with columns for ID, Name, Class, Mark, and Gender.
7. Fetching Data for the Current Page
# q = "SELECT * from student LIMIT " + str(offset) + "," + str(limit)
q = "SELECT * FROM student LIMIT :offset , :limit"
r_set = my_conn.execute(text(q), {'offset': offset, 'limit': limit})

# Adding rows to Treeview
for dt in r_set:
    trv.insert("", 'end', iid=dt[0], text=dt[0],
values=(dt[0], dt[1], dt[2], dt[3], dt[4]))- q: Constructs the SQL query with the current offset and limit by using parameterized query.
- Rows are fetched and added to the Treeview widget using the insert method.
8. Enabling and Disabling Navigation Buttons
back = offset - limit
next = offset + limit
b1 = tk.Button(my_w, text='< Prev', command=lambda: my_display(back))
b1.grid(row=2, column=2, sticky='E')
b2 = tk.Button(my_w, text='Next >', command=lambda: my_display(next))
b2.grid(row=2, column=3)

if(no_rec <= next):
    b2['state'] = 'disabled'  # Disable Next button
else:
    b2['state'] = 'active'  # Enable Next button

if(back >= 0):
    b1['state'] = 'active'  # Enable Prev button
else:
    b1['state'] = 'disabled'  # Disable Prev button
- The Next button is disabled if we are on the last page of records.
- The Previous button is disabled if we are on the first page.
9. Displaying Query Information
my_str.set(q + '\nnext: ' + str(next) + "\n back:" + str(back))
l1 = tk.Label(my_w, textvariable=my_str)
l1.grid(row=3, column=1, columnspan=3)
- The label dynamically displays the SQL query and pagination details.
With Tkinter - Treeview the Full code is here
from tkinter import ttk
import tkinter as tk
from sqlalchemy import create_engine,text
my_conn = create_engine("mysql+mysqldb://root:test@localhost/my_tutorial")
my_conn=my_conn.connect() # database connection object or connection string
###### end of connection ####
r_set=my_conn.execute(text("SELECT count(*) as no from STUDENT"))
data_row=r_set.fetchone()
no_rec=data_row[0] # Total number of rows in table
limit = 5; # No of records to be shown per page or view.
##### tkinter window ######
from tkinter import ttk
import tkinter  as tk
my_w = tk.Tk()
my_w.geometry("400x400") # width and height of the window
my_str = tk.StringVar() # to display query at end
def my_display(offset):
    ###
    trv = ttk.Treeview(my_w, selectmode ='browse')

    trv.grid(row=1,column=2,padx=20,pady=20,columnspan=3)
# number of columns
    trv["columns"] = ("1", "2", "3","4","5")

# Defining heading
    trv['show'] = 'headings'

# width of columns and alignment
    trv.column("1", width = 30, anchor ='c')
    trv.column("2", width = 80, anchor ='w')
    trv.column("3", width = 80, anchor ='c')
    trv.column("4", width = 80, anchor ='c')
    trv.column("5", width = 80, anchor ='c')

# Headings
# respective columns
    trv.heading("1", text ="id")
    trv.heading("2", text ="Name")
    trv.heading("3", text ="Class")
    trv.heading("4", text ="Mark")
    trv.heading("5", text ="Gender")
    ###
    #q="SELECT * from student LIMIT "+ str(offset) +","+str(limit)
    q="SELECT * FROM student LIMIT :offset , :limit"
    r_set=my_conn.execute(text(q),{'offset':offset,'limit':limit})
    # Adding rows to Treeview
    for dt in r_set:
        trv.insert("", 'end',iid=dt[0], text=dt[0],
               values =(dt[0],dt[1],dt[2],dt[3],dt[4]))

    # Show buttons for navigation to different pages or views
    back = offset - limit # This value is used by Previous button
    next = offset + limit # This value is used by Next button
    b1 = tk.Button(my_w, text='< Prev', command=lambda: my_display(back))
    b1.grid(row=2,column=2,sticky='E')
    b2 = tk.Button(my_w, text='Next >', command=lambda: my_display(next))
    b2.grid(row=2,column=3)

    if(no_rec <= next):
        b2["state"]="disabled" # disable next button
    else:
        b2["state"]="active"  # enable next button

    if(back >= 0):
        b1["state"]="active"  # enable Prev button
    else:
        b1["state"]="disabled"# disable Prev button
    # for your understanding of how the offset value changes
    # query is displayed here, it is not part of the script
    my_str.set(q + '\n' + "next: " + str(next) + "\n back:"+str(back))
    l1 = tk.Label(my_w, textvariable=my_str)
    l1.grid(row=3,column=1,columnspan=3)
my_display(0)  # for the first or default view offset is set to 0
my_w.mainloop()
Pagination in Tkinter Treeview with MySQL Data | Python GUI Tutorial | #Python #Tkinter #PythonGUI
Display MySQL records in Treeview MySQL Treeview Select & Delete record
Displaying MySQL records using Entry or Label Treeview insert Records of MySQL Select -Edit-update MySQL Product table using Treeview

Subhendu Mohapatra
Author
🎥 Join me live on YouTubePassionate about coding and teaching, I publish practical tutorials on PHP, Python, JavaScript, SQL, and web development. My goal is to make learning simple, engaging, and project‑oriented with real examples and source code.
Subscribe to our YouTube Channel here
This article is written by plus2net.com team.
https://www.plus2net.com

 Python Video Tutorials