Display Images in Tkinter Treeview

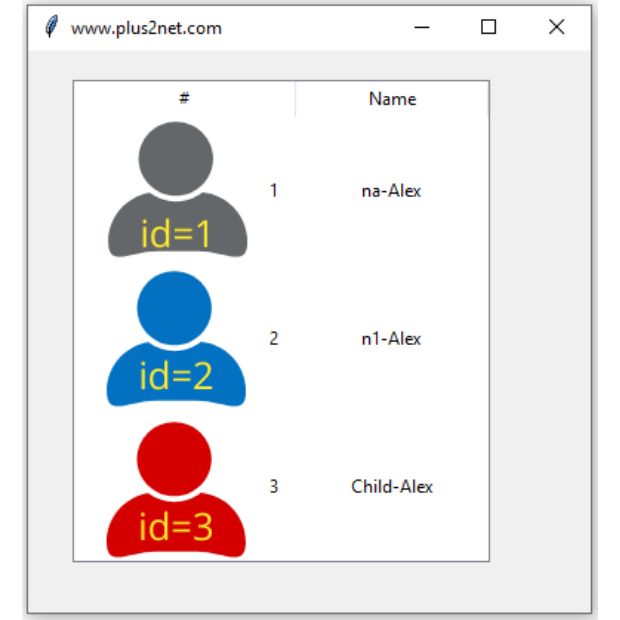
Tkinter Treeview displaying images in the tree column

A Tkinter Treeview item can display an image by using the image option of insert(). The image appears in Treeview's special #0 tree column, together with the item's optional text.


Images Are Displayed in Treeview Column #0 🔝

The Treeview item image is displayed in the special tree column #0.

Use:

tree['show']='tree headings'

to display both the tree column and the headings.

You can also use:

tree['show']='tree'

when headings are not required.

Image with Text

The same item can display both an image and text in column #0.

tree.insert('', tk.END, text='Alex', image=img1, values=(1,))

Set Treeview Row Height for Images 🔝

Treeview does not automatically enlarge each row to match the image height. Use ttk.Style to set an appropriate rowheight.

style=ttk.Style()
style.configure('Image.Treeview', rowheight=80)

Apply the custom style to the Treeview:

tree=ttk.Treeview(root, style='Image.Treeview')

Using a custom style avoids changing the row height of every other Treeview widget in the application.

Display PNG Images with PhotoImage 🔝

PNG images can be loaded with Tkinter PhotoImage.

img1=tk.PhotoImage(file='images/1.png')
img2=tk.PhotoImage(file='images/2.png')
img3=tk.PhotoImage(file='images/3.png')

Use the returned image object with insert():

tree.insert('', tk.END, iid='1', text='1', image=img1, values=('Alex',))

Complete Treeview Image Example 🔝

import tkinter as tk
from tkinter import ttk

root=tk.Tk()
root.geometry('420x380')
root.title('Treeview Images - plus2net')

style=ttk.Style(root)
style.configure('Image.Treeview', rowheight=90)

tree=ttk.Treeview(root, columns=('name',), show='tree headings', selectmode='browse', height=3, style='Image.Treeview')
tree.grid(row=0, column=0, padx=30, pady=20)

tree.column('#0', width=160, anchor='center')
tree.column('name', width=150, anchor='center')

tree.heading('#0', text='Image')
tree.heading('name', text='Name')

img1=tk.PhotoImage(file='images/1.png')
img2=tk.PhotoImage(file='images/2.png')
img3=tk.PhotoImage(file='images/3.png')

tree.insert('', tk.END, iid='1', text='Photo 1', image=img1, values=('Alex',))
tree.insert('', tk.END, iid='2', text='Photo 2', image=img2, values=('Ravi',))
tree.insert('', tk.END, iid='3', text='Photo 3', image=img3, values=('Ron',))

root.mainloop()

Display JPG Images using Pillow 🔝

Pillow can open JPEG and many other image formats.

Install Pillow if required:

pip install pillow

Import:

from PIL import Image, ImageTk

Load a JPEG and convert it to a Tkinter-compatible image:

pil_image=Image.open('images/1.jpg')
img1=ImageTk.PhotoImage(pil_image)

Insert it in exactly the same way:

tree.insert('', tk.END, text='Photo', image=img1, values=('Alex',))

Resize an Image before Adding It to Treeview 🔝

Large images should usually be resized before being displayed in Treeview. Making every row very tall is often unnecessary.

from PIL import Image, ImageTk

image=Image.open('images/1.jpg')
image.thumbnail((70, 70))
img1=ImageTk.PhotoImage(image)

Then use a matching row height:

style.configure('Image.Treeview', rowheight=75)

Resize to an Exact Size

image=Image.open('images/1.jpg')
image=image.resize((70, 70))
img1=ImageTk.PhotoImage(image)

thumbnail() preserves the image aspect ratio while fitting it inside the requested size. resize() forces an exact width and height and can therefore distort the image if the aspect ratio changes.

Keep PhotoImage References 🔝

Tkinter images must remain referenced by Python while they are displayed.

In the earlier example these variables remain available:

img1
img2
img3

so the images remain visible during mainloop().

If images are created inside a function, keep their references somewhere that remains alive. One simple approach is to attach a list to the Treeview widget:

tree.images=[]

for filename in filenames:
    image=tk.PhotoImage(file=filename)
    tree.images.append(image)
    tree.insert('', tk.END, image=image)

Common Treeview Image Mistakes 🔝

1. Using show='headings'

This hides column #0, so item images disappear.

Use:

show='tree headings'

2. Trying to Put Native Treeview Images in Data Columns

The Treeview item's image option belongs to column #0. Additional columns defined through columns= display values rather than native item images.

3. Forgetting to Increase rowheight

A large image can be clipped if the Treeview row is too short.

style.configure('Image.Treeview', rowheight=80)

4. Changing Every Treeview's Row Height

Instead of changing:

style.configure('Treeview', rowheight=80)

create a dedicated style:

style.configure('Image.Treeview', rowheight=80)

5. Losing the PhotoImage Reference

Keep references for every image while the Treeview is using them.

6. Using Machine-Specific File Paths

Avoid examples such as:

E:\testing\blob\photos\1.png

Prefer project-relative paths:

images/1.png

7. Using Very Large Source Images

Resize images first. A Treeview containing thumbnails is usually easier to read and faster to display than one containing full-size photographs.

Tkinter Treeview Image Summary 🔝

  • The Treeview image option displays an image in column #0.
  • Use tree headings or tree when the image must be visible.
  • show='headings' hides column #0.
  • The image can appear with item text in the same tree column.
  • Use rowheight to provide enough vertical space.
  • A custom Treeview style prevents unrelated Treeviews from being changed.
  • tk.PhotoImage can load supported formats such as PNG.
  • Pillow and ImageTk.PhotoImage can load JPEG and resize images.
  • thumbnail() preserves aspect ratio.
  • Keep Python references to all displayed PhotoImage objects.
  • Use relative image paths when possible.
  • Treeview does not natively place item images in arbitrary data columns.
Continue learning: See Treeview styling for row height and colors, or return to the main Treeview tutorial for columns, selection and item management.
Invoice using Treeview Insert MySQL Record and Update Treeview


Subscribe to our YouTube Channel here


plus2net.com


Python Video Tutorials
Python SQLite Video Tutorials
Python MySQL Video Tutorials
Python Tkinter Video Tutorials
We use cookies to improve your browsing experience. . Learn more
HTML MySQL PHP JavaScript ASP Photoshop Articles Contact us
©2000-2026   plus2net.com   All rights reserved worldwide Privacy Policy Disclaimer