Adding rows using insert() in Tkinter Treeview
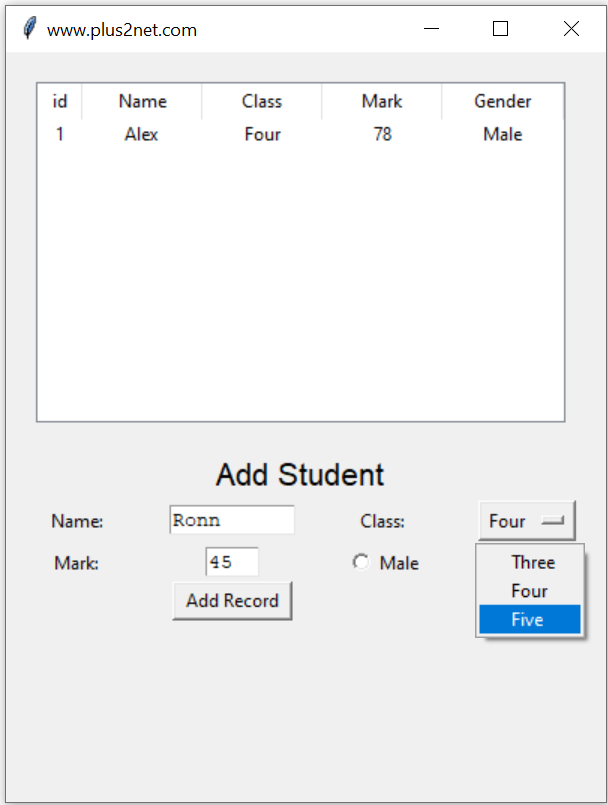
We can use insert() to add one parent of main node ( row ) to the Treeview. Here we have one student record table ( no database here ) and one record is already available. Below the Treeview, input boxes and options are available to add nodes to this Treeview using insert() method.
Declaring a Treeview
Here we have declared one Treeview and use the object trv for further management of the Treeview.trv = ttk.Treeview(my_w, selectmode='browse')
trv.grid(row=1, column=1, columnspan=4, padx=20, pady=20)adding one record
insert(parent, index, iid=None, **kw)parent : For Parent row it should be '', for child row parent iid to be used. index : Index position of row. To added at the bottom 'end' and 0 if at top. iid : Optional, Identifier of the item ( row ), Treeview will create unique iid if not given. text : Text to appear at right of icon column.
Using this after adding header and columns ( check the code below ) one record is added with iid=1 ( unique id of the row )
i = 1
trv.insert("", 'end', iid=i,
values=(i, 'Alex', 'Four', 78, 'Male'))b1 = tk.Button(my_w, text='Add Record',
width=10, command=lambda: add_data())
b1.grid(row=6, column=2)def add_data():
my_name = t1.get("1.0", END) # Read name
my_class = options.get() # Read class
my_mark = t3.get("1.0", END) # Read mark
my_gender = radio_v.get() # Read gender
global i
i = i + 1
trv.insert("", 'end',
values=(i, my_name, my_class,
my_mark, my_gender))
t1.delete('1.0', END) # Reset text entry
t3.delete('1.0', END) # Reset text entry
my_str.set("Data added")
t1.focus()
l5.after(3000,
lambda: my_str.set('')) # Remove message
trv.insert("",0,values=(i,my_name,my_class,my_mark,my_gender))The full code with layout of the window is here.
from tkinter import ttk
import tkinter as tk
from tkinter import *
my_w=tk.Tk()
my_w.geometry('400x500')
my_w.title("www.plus2net.com")
trv=ttk.Treeview(my_w,selectmode='browse')
trv.grid(row=1,column=1,columnspan=4,padx=20,pady=20)
trv["columns"]=("1","2","3","4","5")
trv['show']='headings'
trv.column("1",width=30,anchor='c')
trv.column("2",width=80,anchor='c')
trv.column("3",width=80,anchor='c')
trv.column("4",width=80,anchor='c')
trv.column("5",width=80,anchor='c')
trv.heading("1",text="id")
trv.heading("2",text="Name")
trv.heading("3",text="Class")
trv.heading("4",text="Mark")
trv.heading("5",text="Gender")
i=1
trv.insert("",'end',iid=i,
values=(i,'Alex','Four',78,'Male'))
l0 = tk.Label(my_w, text='Add Student',
font=('Helvetica', 16), width=30,anchor="c" )
l0.grid(row=2,column=1,columnspan=4)
l1 = tk.Label(my_w, text='Name: ', width=10,anchor="c" )
l1.grid(row=3,column=1)
# add one text box
t1 = tk.Text(my_w, height=1, width=10,bg='white')
t1.grid(row=3,column=2)
l2 = tk.Label(my_w, text='Class: ', width=10 )
l2.grid(row=3,column=3)
# add list box for selection of class
options = StringVar(my_w)
options.set("") # default value
opt1 = OptionMenu(my_w, options, "Three", "Four", "Five")
opt1.grid(row=3,column=4)
l3 = tk.Label(my_w, text='Mark: ', width=10 )
l3.grid(row=5,column=1)
# add one text box
t3 = tk.Text(my_w, height=1, width=4,bg='white')
t3.grid(row=5,column=2)
radio_v = tk.StringVar()
radio_v.set('Female')
r1 = tk.Radiobutton(my_w, text='Male', variable=radio_v, value='Male')
r1.grid(row=5,column=3)
r2 = tk.Radiobutton(my_w, text='Female', variable=radio_v, value='Female')
r2.grid(row=5,column=4)
b1 = tk.Button(my_w, text='Add Record', width=10,
command=lambda: add_data())
b1.grid(row=6,column=2)
my_str = tk.StringVar()
l5 = tk.Label(my_w, textvariable=my_str, width=10 )
l5.grid(row=8,column=1)
def add_data():
my_name=t1.get("1.0",END) # read name
my_class=options.get() # read class
my_mark=t3.get("1.0",END) # read mark
my_gender=radio_v.get() # read gender
global i
i=i+1
trv.insert("",'end',
values=(i,my_name,my_class,my_mark,my_gender))
t1.delete('1.0',END) # reset the text entry box
t3.delete('1.0',END) # reset the text entry box
my_str.set("Data added ")
t1.focus()
l5.after(3000, lambda: my_str.set('') ) # remove the message
my_w.mainloop()Python Tkinter Treeview: Add Parent and Child Rows

This script demonstrates the use of Treeview in Python Tkinter to add data as parent and child rows. The interface includes two buttons:
- Add Parent: Adds a new record as a parent row, irrespective of whether any row is selected.
- Add Child: Adds a new record as a child under the selected parent row. This button is disabled until a row is selected.
Key Features:
- The Add Child button is dynamically enabled/disabled based on whether a row is selected.
- Separate functions handle parent and child row insertions for better modularity.
- Input fields are cleared after each operation, and a message is displayed to confirm success.
How to Use:
- Enter the details in the input fields (Name, Class, Mark, Gender).
- Click Add Parent to add the record as a parent row.
- Select a parent row and click Add Child to add the record as a child under the selected row.
Note: Don't forget to double-click the parent row to expand and view the child rows within it.
from tkinter import ttk
import tkinter as tk
from tkinter import *
my_w = tk.Tk()
my_w.geometry('400x500')
my_w.title("www.plus2net.com")
# Create Treeview
trv = ttk.Treeview(my_w, selectmode='browse')
trv.grid(row=1, column=1, columnspan=4, padx=20, pady=20)
trv["columns"] = ("1", "2", "3", "4", "5")
trv['show'] = 'headings'
# Define columns
trv.column("1", width=30, anchor='c')
trv.column("2", width=80, anchor='c')
trv.column("3", width=80, anchor='c')
trv.column("4", width=80, anchor='c')
trv.column("5", width=80, anchor='c')
# Set headings
trv.heading("1", text="id")
trv.heading("2", text="Name")
trv.heading("3", text="Class")
trv.heading("4", text="Mark")
trv.heading("5", text="Gender")
i = 1
# Add initial row
trv.insert("", 'end', iid=i, values=(i, 'Alex', 'Four', 78, 'Male'))
# Labels and Input Fields
l0 = tk.Label(my_w, text='Add Student', font=('Helvetica', 16), width=30, anchor="c")
l0.grid(row=2, column=1, columnspan=4)
l1 = tk.Label(my_w, text='Name: ', width=10, anchor="c")
l1.grid(row=3, column=1)
t1 = tk.Text(my_w, height=1, width=10, bg='white')
t1.grid(row=3, column=2)
l2 = tk.Label(my_w, text='Class: ', width=10)
l2.grid(row=3, column=3)
options = StringVar(my_w)
options.set("") # default value
opt1 = OptionMenu(my_w, options, "Three", "Four", "Five")
opt1.grid(row=3, column=4)
l3 = tk.Label(my_w, text='Mark: ', width=10)
l3.grid(row=5, column=1)
t3 = tk.Text(my_w, height=1, width=4, bg='white')
t3.grid(row=5, column=2)
radio_v = tk.StringVar()
radio_v.set('Female')
r1 = tk.Radiobutton(my_w, text='Male', variable=radio_v, value='Male')
r1.grid(row=5, column=3)
r2 = tk.Radiobutton(my_w, text='Female', variable=radio_v, value='Female')
r2.grid(row=5, column=4)
# Buttons
b1 = tk.Button(my_w, text='Add Parent', width=12, command=lambda: add_parent_data())
b1.grid(row=6, column=1)
b2 = tk.Button(my_w, text='Add Child', width=12, command=lambda: add_child_data(), state=tk.DISABLED)
b2.grid(row=6, column=3)
my_str = tk.StringVar()
l5 = tk.Label(my_w, textvariable=my_str, width=30)
l5.grid(row=8, column=1, columnspan=4)
def add_parent_data():
global i
i += 1
my_name = t1.get("1.0", END).strip()
my_class = options.get()
my_mark = t3.get("1.0", END).strip()
my_gender = radio_v.get()
# Insert new record as a parent node
trv.insert("", 'end', iid=i, values=(i, my_name, my_class, my_mark, my_gender))
# Reset input fields
t1.delete('1.0', END)
t3.delete('1.0', END)
my_str.set("Parent added")
t1.focus()
l5.after(3000, lambda: my_str.set(''))
def add_child_data():
selected_item = trv.focus() # Get the selected parent row
if not selected_item:
my_str.set("No parent selected")
l5.after(3000, lambda: my_str.set(''))
return
global i
i += 1
my_name = t1.get("1.0", END).strip()
my_class = options.get()
my_mark = t3.get("1.0", END).strip()
my_gender = radio_v.get()
# Insert new record as a child node under the selected parent
trv.insert(selected_item, 'end', iid=i, values=(i, my_name, my_class, my_mark, my_gender))
# Reset input fields
t1.delete('1.0', END)
t3.delete('1.0', END)
my_str.set("Child added")
t1.focus()
l5.after(3000, lambda: my_str.set(''))
def enable_child_button(event):
"""Enable or disable the 'Add Child' button based on selection."""
selected_item = trv.focus()
if selected_item:
b2.config(state=tk.NORMAL)
else:
b2.config(state=tk.DISABLED)
# Bind selection event to enable/disable Add Child button
trv.bind("<<TreeviewSelect>>", enable_child_button)
my_w.mainloop()Using Database
In this part, we explored how to insert parent and child rows into a Treeview widget without using a database. In Part 2, we take it a step further by integrating a database to dynamically add rows to the Treeview. Check it out to learn how to manage and display data efficiently!
Part II : Adding row to Treeview after inserting to MySQL table
Generating Invoice by adding products using Treeview
Treeview Records of MySQL Pagination of Records of MySQL Delete Records
Tkinter

Subhendu Mohapatra
Author
🎥 Join me live on YouTubePassionate about coding and teaching, I publish practical tutorials on PHP, Python, JavaScript, SQL, and web development. My goal is to make learning simple, engaging, and project‑oriented with real examples and source code.
Subscribe to our YouTube Channel here

 Python Video Tutorials