Floodgauge widget of ttkbootstrap, displaying real-time data or progress
- Attributes
- configure()
- Displaying value
- Using bootstyle parameter
- Floodgauge Lacks Interactive Mode – Workaround Using Scale
- Floodgauge widget dynamically formats the percentage to two decimal places!
- Synchronizing Multiple Widgets Using a Common Variable
- Real-Time System Performance Monitoring with psutil
A progress indicator of any process which can display the value.
Attributes 🔝
cursor | Shape of the mouse over the widget, List of Cursor shapes are here . |
font | font style of the Label over it ['Family',size, 'style'] , |
length | Length of the long axis, it is width if orientation is horizontal, otherwise height. |
maximum | Maximum value (default 100) |
mode | determinate (default ) | indeterminate. If the value is not known during the process then indeterminate mode is to be used. The rectanble will bounce back and forth indicating the progress is on. |
bootstyle | Style keyword, options are primary, secondary, success,info,warning,danger, light, dark |
takefocus | False ( default ), If it is set to True then widget is included in focus traversal. |
text | Text to be displayed , associated with floodgauge.textvariable. |
value | Float, the current value of Floodgauge. |
mask | A string format to show the value ( See examples below ) |
variable | Associates a Tkinter IntVar to dynamically update the gauge. |
**kwargs | Other keyword arguments. |
import ttkbootstrap as ttk
from ttkbootstrap.constants import *
# Create main application window
my_w = ttk.Window()
my_w.geometry("400x100") # Set window size
# Column value (not used in this example but can be useful later)
c = 0
# Create a Floodgauge widget
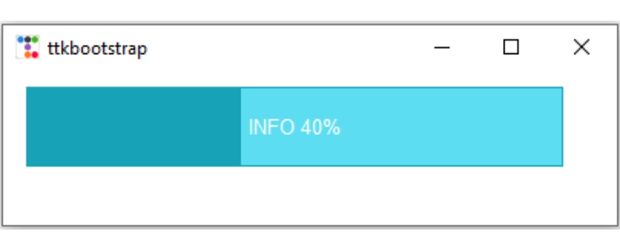
fg1 = ttk.Floodgauge(
bootstyle=INFO, # Set Bootstrap style
mask='INFO ' + '{}%', # Display text format
value=40, # Initial value
maximum=100, # Maximum value
length=350 # Width of the Floodgauge
)
# Place Floodgauge in grid layout
fg1.grid(row=1, column=1, padx=15, pady=10)
# Run the main event loop
my_w.mainloop()configure() : updating attributes 🔝
We can manage parameters by using configure().fg1.configure(
value=65, # Set new value
orient='vertical' # Change orientation to vertical
)Displaying value 🔝
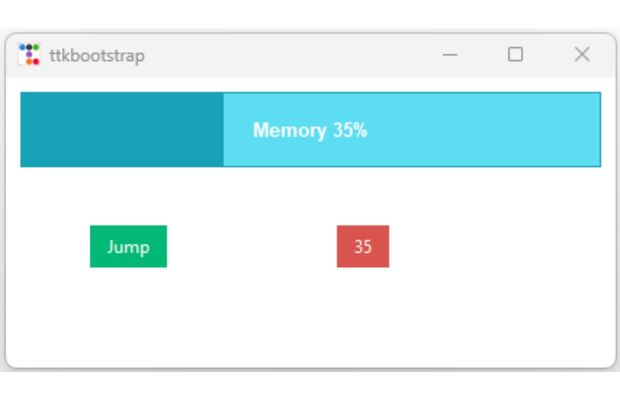
We will update the Floodgauge by using a button, each click of the button will increase the value by 10 and display the same value on a Label.
import ttkbootstrap as ttk
from ttkbootstrap.constants import *
# Create the main application window
my_w = ttk.Window()
my_w.geometry("620x320") # Set window size
# Create a Floodgauge widget
fg = ttk.Floodgauge(
bootstyle=INFO, # Apply info style
font=(None, 10, 'bold'),
mask='Memory {}%', # Display text format
value=15, # Initial value
maximum=100, # Maximum value
length=500 # Width of the Floodgauge
)
fg.grid(row=1, column=1, padx=10, pady=10, columnspan=3)
# Function to update the Floodgauge value
def my_upd():
fg.variable.set(fg.variable.get() + 10) # Increase value by 10
l2.configure(text=str(fg.variable.get())) # Update Label
# Button to trigger the update
b1 = ttk.Button(
my_w, text='Jump',
command=my_upd, bootstyle=SUCCESS
)
b1.grid(row=2, column=1, padx=10, pady=20)
# Label to display the current Floodgauge value
l2 = ttk.Button(
my_w, text=str(fg.variable.get()),
bootstyle=DANGER
)
l2.grid(row=2, column=2, padx=10, pady=20)
# Run the main event loop
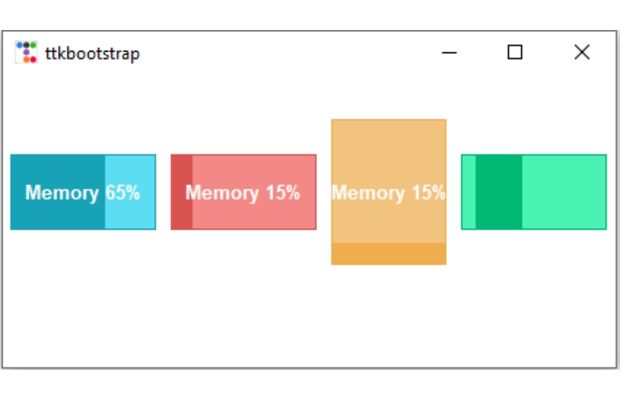
my_w.mainloop()Using bootstyle parameter 🔝

Inside a for loop we can add different available bootstrap style colours by using bootstyle parameter.
import ttkbootstrap as ttk
from ttkbootstrap.constants import *

# Create the main application window
my_w = ttk.Window()
my_w.geometry("870x100")  # Set window size

# Column value for Floodgauge placement
c = 0

# Loop through all available Bootstrap styles
for my_style in my_w.style.colors:
    fg = ttk.Floodgauge(
        bootstyle=my_style,  # Apply different styles
        font=(None, 8, 'bold'),
        mask=my_style + ' {}%',  # Display text format
        value=40,  # Initial value
        maximum=100  # Maximum value
    )
    fg.grid(row=1, column=c, padx=4, pady=10)

    c = c + 1  # Move to the next column

# Run the main event loop
my_w.mainloop()
🔹 Floodgauge Lacks Interactive Mode – Workaround Using Scale 🔝

Unlike ttkbootstrap.Meter, the Floodgauge widget does not have an interactive mode for user input. However, we can use a Scale (Slider) widget to allow users to dynamically adjust the Floodgauge value. By linking the Scale’s output to the Floodgauge, we create an intuitive way to visualize progress while letting users set values interactively. Below is an implementation using a Scale widget to update the Floodgauge in real-time.
import ttkbootstrap as ttk
from ttkbootstrap.constants import *

# Initial value for both Floodgauge and Scale
initial_value = 30

# Function to update the Floodgauge with Scale value
def update_gauge(value):
    fg.configure(value=round(float(value)))
    # Value is rounded before updating

# Create main window
my_w = ttk.Window(themename="superhero")
my_w.geometry("400x200")

# Floodgauge Widget (Starts at initial_value)
fg = ttk.Floodgauge(
    bootstyle=INFO,
    mask="Progress {}%",
    value=initial_value,
    maximum=100,
    length=350
)
fg.grid(row=0, column=0, padx=20, pady=10)

# Scale Widget (Slider) starts at the same initial value
scale = ttk.Scale(
    my_w,
    from_=0,
    to=100,
    orient="horizontal",
    command=update_gauge,
    length=300
)
scale.set(initial_value)  # Set Scale to same initial value
scale.grid(row=1, column=0, padx=20, pady=10)

# Run the application
my_w.mainloop()
🔹 Difference Between value and variable in ttkbootstrap.Floodgauge
The value attribute sets the Floodgauge’s progress manually and must be updated using .configure(value=X). It does not change automatically.
In contrast, variable links the Floodgauge to a Tkinter variable (IntVar or DoubleVar), ensuring it updates dynamically whenever the variable changes.
Using variable is ideal for real-time synchronization, especially when binding the Floodgauge to widgets like a Scale. 🚀
Here is the code to integrate Scale slider output ( progress_var ) to Floodgauge by using variable attribute.
import ttkbootstrap as ttk
from ttkbootstrap.constants import *

# Create main window first
my_w = ttk.Window(themename="superhero")
my_w.geometry("400x200")

# Declare common Tkinter variable for both widgets
progress_var = ttk.IntVar(value=30)  # This must come after my_w

# Floodgauge Widget (Automatically updates)
fg = ttk.Floodgauge(
    my_w,
    bootstyle=INFO,
    mask="Progress {}%",
    variable=progress_var,
    maximum=100,
    length=350
)
fg.grid(row=0, column=0, padx=20, pady=10)

# Scale Widget (Also linked to progress_var)
scale = ttk.Scale(
    my_w,
    from_=0,
    to=100,
    orient="horizontal",
    variable=progress_var,
    length=300
)
scale.grid(row=1, column=0, padx=20, pady=10)

# Run the application
my_w.mainloop()Floodgauge widget dynamically formats the percentage to two decimal places! 🔝
Here we will declare progress_var as one DoubleVar()progress_var = ttk.DoubleVar(value=30.5) # Must come after my_wdef update_mask(*args):
fg.configure(mask=f"Progress {progress_var.get():.2f}%")progress_var.trace_add("write", update_mask)Synchronizing Multiple Widgets Using a Common Variable 🔝

In this example, we integrate four different widgets—Floodgauge, Scale, and two Spinbox widgets—by linking them to a single shared variable, progress_var. This common variable ensures that all widgets update simultaneously whenever its value changes.
How It Works:
- progress_var: A ttk.IntVar is declared as the shared variable.
- Floodgauge Widget: Displays the progress as a percentage.
- Scale Widget: Allows users to adjust the value by sliding.
- Spinbox Widget 1 & 2: Provide numeric input fields to modify the value.
Whenever the user interacts with any of these widgets, the shared progress_var updates automatically, keeping all widgets synchronized in real-time.
import ttkbootstrap as ttk
from ttkbootstrap.constants import *

# Create main window first
my_w = ttk.Window(themename="superhero")
my_w.geometry("400x250")

# Declare common Tkinter variable for all widgets
progress_var = ttk.IntVar(value=30)  # Shared variable

# Floodgauge Widget (Automatically updates)
fg = ttk.Floodgauge(
    my_w,
    bootstyle=INFO,
    mask="Progress {}%",
    variable=progress_var,
    maximum=100,
    length=350
)
fg.grid(row=0, column=0, columnspan=2, padx=20, pady=10)

# Scale Widget (Linked to progress_var)
scale = ttk.Scale(
    my_w,
    from_=0,
    to=100,
    orient="horizontal",
    variable=progress_var,
    length=300
)
scale.grid(row=1, column=0, columnspan=2, padx=20, pady=10)

# Spinbox Widget 1 (Also linked to progress_var)
spinbox1 = ttk.Spinbox(
    my_w,
    from_=0,
    to=100,
    textvariable=progress_var,
    width=5
)
spinbox1.grid(row=2, column=0, padx=10, pady=10)

# Spinbox Widget 2 (Another spinbox linked to progress_var)
spinbox2 = ttk.Spinbox(
    my_w,
    from_=0,
    to=100,
    textvariable=progress_var,
    width=5
)
spinbox2.grid(row=2, column=1, padx=10, pady=10)

# Run the application
my_w.mainloop()
Real-Time System Performance Monitoring with psutil 🔝
This script demonstrates how to use a Floodgauge widget to monitor real-time CPU usage. Similarly, you can modify this code to track other system parameters such as RAM usage, disk space, network bandwidth, and battery status. For a more comprehensive solution, these individual monitors can be integrated into a single application for complete system performance tracking.

Below is the script to create a real-time CPU monitoring system. You can extend this to monitor additional processes and combine them into a fully integrated performance dashboard.
import psutil
import ttkbootstrap as tb
import time
import threading
from ttkbootstrap.constants import *

# Function to determine the bootstyle based on CPU usage
def get_bootstyle(value):
    if value <= 30:
        return SUCCESS
    elif value <= 70:
        return WARNING
    else:
        return DANGER

# Function to update the Floodgauge dynamically
def update_floodgauge():
    while True:
        cpu_usage = psutil.cpu_percent(interval=1)
        floodgauge.configure(value=cpu_usage, bootstyle=get_bootstyle(cpu_usage))
        root.update_idletasks()
        time.sleep(1)

# Create main application window
root = tb.Window(themename="superhero")
root.title("CPU Usage Monitor")

# Floodgauge widget to display CPU usage
floodgauge = tb.Floodgauge(
    root,
    bootstyle=SUCCESS,
    text="CPU Usage",
    mask="{}%",
    maximum=100,
    length=300
)
floodgauge.pack(pady=20)

# Start background thread to update Floodgauge
threading.Thread(target=update_floodgauge, daemon=True).start()

# Run the application
root.mainloop()
👉 Want to use a Meter widget instead? Check out our tutorial: System Monitoring with Meter Widget
Advanced: Modern Threading with Floodgauge
Just like the standard Progressbar, the Floodgauge can freeze your UI if you run heavy tasks on the main thread. Here is the modern way to integrate a Background Thread with the Floodgauge for a smooth user experience.
import ttkbootstrap as ttk
from ttkbootstrap.constants import *
import threading
import time

def heavy_work(gauge, button):
    for i in range(101):
        time.sleep(0.05)
        # Update the Floodgauge value directly
        gauge.configure(value=i)
        gauge.configure(mask=f"Syncing: {i}%")

    # Task finished: Reset UI to completion state
    button.config(state=NORMAL)
    gauge.configure(bootstyle=SUCCESS, mask="Complete!")

def start_process():
    # RESET: Clear previous state for a fresh run
    fg.configure(value=0, bootstyle=INFO, mask="Starting...")
    btn.config(state=DISABLED)

    # USE DAEMON: Setting daemon=True prevents the app from hanging on exit
    t1 = threading.Thread(target=heavy_work, args=(fg, btn), daemon=True)
    t1.start()

root = ttk.Window(themename="cosmo")
root.geometry("400x200")

fg = ttk.Floodgauge(length=300, font=(None, 14, 'bold'))
fg.pack(pady=30)

btn = ttk.Button(text="Start Modern Sync", command=start_process)
btn.pack()

root.mainloop()daemon=True when spawning background threads in Tkinter. It ensures that when the user clicks the "X" to close the window, all background tasks are killed immediately, preventing the program from hanging in the background.
bootstyle changes to SUCCESS (green) automatically when the thread finishes. This visual feedback is what makes your apps look professional!
Start() stop() autoincrement of Floodgauge Displaying number of chars entered in Text widget using Floodgauge
ttkbootstrap

Subhendu Mohapatra
Author
🎥 Join me live on YouTubePassionate about coding and teaching, I publish practical tutorials on PHP, Python, JavaScript, SQL, and web development. My goal is to make learning simple, engaging, and project‑oriented with real examples and source code.
Subscribe to our YouTube Channel here

 Python Video Tutorials