Tableview of ttkbootstrap
- Example with list of columns and data rows
- Summary row : Adding extra record by insert_row()
- Paging of records
- Pagesize & height
- Updating default font
- Summary row and paging of records
- Export Rows
- Export selected Rows
- Getting row value
- Delete Row
- Delete all Rows
- Hide and show column by Checkbutton
- Getting ID of user selected row

bootstyle | Style keyword, options are primary, secondary, success,info,warning,danger, light, dark |
coldata | Names or Dictionary of column names with settings. |
rowdata | Iterable rows with data. Must match with number of columns |
paginated | Adding Pagination of records - required or not. ( True / False ) |
pagesize | Number of rows to show per page, works with paginated check the difference between pagesize and height below. |
searchable | Show search entry or not |
autofit | If True, columns will be automatically sized. |
autoalign | If True, Numbers are right aligned and others are left aligned. |
stripecolor | Tuple to provide alternate row colours. ('lightblue',None) |
height | Number of rows to display in Viewport. Check below for details. |
delimiter | Char to use as delimiter ( default is comma ) while exporting data. |
Example with List of Columns and data Rows 🔝
Here we are creating two different Lists. The list l1 is the column header text with dictionay of style properties.One more list r_set contains the rows of data.
We can change the parameters of the table and observe the effects.
1️⃣ Importing Required Modules
import ttkbootstrap as ttk
from ttkbootstrap.tableview import Tableview
from ttkbootstrap.constants import *
- We import ttkbootstrap to create a modern, styled GUI.
- Tableview is used to create a paginated table.
- constants allows usage of Bootstrap themes and styles.
2️⃣ Creating the Main Window
my_w = ttk.Window()
my_w.geometry("400x300")  # Set width and height

colors = my_w.style.colors
- Creates the main window using ttk.Window().
- Sets the window size to 400x300 pixels.
- Retrieves Bootstrap theme colors for styling the table.
3️⃣ Defining Table Columns
l1 = [
    {"text": "id", "stretch": False},
    {"text": "Name", "stretch": True},
    "Class",
    {"text": "Mark"},
    {"text": "Gender"}
]
- Defines the columns for the table.
- Some columns use dictionaries to allow additional properties like stretch.
Available Column Properties
Each column can be defined as a dictionary with the following properties:
| Property | Type | Description |
|---|---|---|
| text | str |
The column header name (Required). |
| stretch | bool |
Whether the column should expand to fill extra space (True = expandable, False = fixed). |
| width | int |
Sets the column width in pixels. |
| anchor | str |
Alignment of the text inside the column ("w", "e", or "center"). |
| minwidth | int |
The minimum width for a column when resizing. |
Example with Additional Properties
Modified l1 list to include these properties:
l1 = [
    {"text": "id", "stretch": False, "width": 50, "anchor": "center"},
    {"text": "Name", "stretch": True, "minwidth": 100},
    {"text": "Class", "anchor": "w"},  # Left-aligned text
    {"text": "Mark", "width": 80, "anchor": "e"},  # Right-aligned, fixed width
    {"text": "Gender"}
]
Explanation of Changes
- "id" column is center-aligned, fixed width (50px), and sortable.
- "Name" column stretches, with a minimum width of 100px and max width of 200px.
- "Class" is left-aligned.
- "Mark" column is right-aligned, and fixed width (80px).
4️⃣ Defining Table Data (Rows)
r_set = [
    (1, "Alex", "Four", 90, "Female"),
    (2, "Ron", "Five", 80, "Male"),
    (3, "Geek", "Four", 70, "Male"),
    (4, "King", "Five", 78, "Female")
]
- Stores row data as a list of tuples.
5️⃣ Creating & Displaying the Table
dv = ttk.tableview.Tableview(
    master=my_w,
    paginated=True, # Enable pagination
    coldata=l1, # Column headers
    rowdata=r_set, # Table data
    searchable=True, # Enable search feature
    bootstyle=SUCCESS, # Bootstrap style
    pagesize=10, # Number of rows per page
    height=10, # Number of visible rows
    stripecolor=(colors.light, None) # Row stripe colors
)

dv.grid(row=0, column=0, padx=10, pady=5)

# Autofit columns to match content
dv.autofit_columns()
6️⃣ Running the Application
my_w.mainloop()
Full Code is here
import ttkbootstrap as ttk
from ttkbootstrap.tableview import Tableview
from ttkbootstrap.constants import *

# Create main window
my_w = ttk.Window()
my_w.geometry("400x300")  # Set window size

# Fetch default color theme
colors = my_w.style.colors

# Define table column headers
l1 = [
    {"text": "id", "stretch": False},
    {"text":"Name","stretch":True},
    "Class",
    {"text":"Mark"},
    {"text":"Gender"}
]

# Sample data rows as a list of tuples
r_set = [
    (1, "Alex", 'Four', 90, 'Female'),    (2, "Ron", "Five", 80, 'Male'),
    (3, "Geek", 'Four', 70, 'Male'),    (4, 'King', 'Five', 78, 'Female'),
    (5, 'Queen', 'Four', 60, 'Female'),    (6, 'Jack', 'Five', 70, 'Female')
]

# Create Tableview Widget
dv = ttk.tableview.Tableview(
    master=my_w,
    paginated=True, # Enable pagination
    coldata=l1, # Column headers
    rowdata=r_set, # Table data
    searchable=True, # Enable search feature
    bootstyle=SUCCESS, # Bootstrap style
    pagesize=10, # Number of rows per page
    height=10, # Number of visible rows
    stripecolor=(colors.light, None) # Row stripe colors
)

dv.grid(row=0, column=0, padx=10, pady=5)

# Autofit columns to match content
dv.autofit_columns()

# Run the Tkinter application
my_w.mainloop()
Summary row: Adding extra record by insert_row() 🔝
After the table is displayed we can add one new row at the end of the table showing the summary of data. Here we are showing the total of the mark column values. To get the total value we have used this code.
marks=[r[3] for r in r_set] # List of all marks column
print(sum(marks)) # sum of the marks column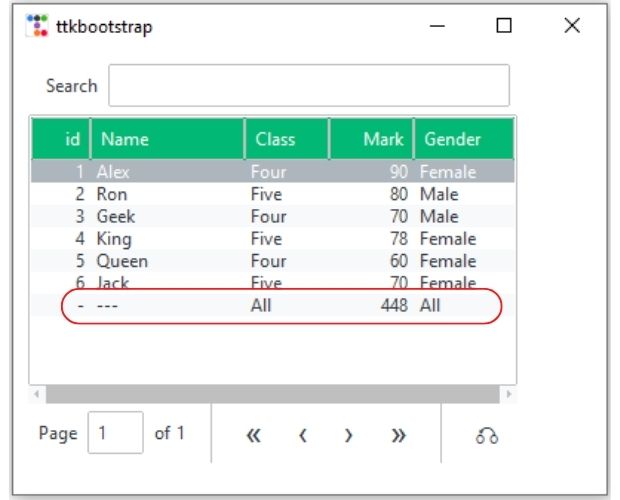
Full code is here
import ttkbootstrap as ttk
from ttkbootstrap.tableview import Tableview
from ttkbootstrap.constants import *

my_w = ttk.Window()
my_w.geometry("400x300")  # width and height
colors = my_w.style.colors
l1 = [
    {"text": "id", "stretch": False},
    {"text":"Name","stretch":True},
    "Class",
    {"text":"Mark"},
    {"text":"Gender"}
]  # Columns with Names and style
# Data rows as list
r_set = [(1, "Alex", 'Four',90,'Female'), (2, "Ron", "Five",80,'Male'),
            (3, "Geek", 'Four',70,'Male'),(4,'King','Five',78,'Female'),
            (5,'Queen','Four',60,'Female'),(6,'Jack','Five',70,'Female')]
marks=[r[3] for r in r_set] # List of all marks column
print(sum(marks)) # sum of the marks column
dv = ttk.tableview.Tableview(
    master=my_w,
    paginated=True,
    coldata=l1,
    rowdata=r_set,
    searchable=True,
    bootstyle=SUCCESS,
    pagesize=10,
    height=10,
    stripecolor=(colors.light, None),
)
dv.grid(row=0, column=0, padx=10, pady=5)
dv.autofit_columns() # Fit in current view
dv.insert_row("end", values=['-', "---", "All", sum(marks), "All"])
dv.load_table_data() # Load all data rows
my_w.mainloop()
dv.build_table_data(l1,r_set)
dv.autofit_columns() # Fit in current view
dv.load_table_data() # Load all data rows
Paging of records 🔝
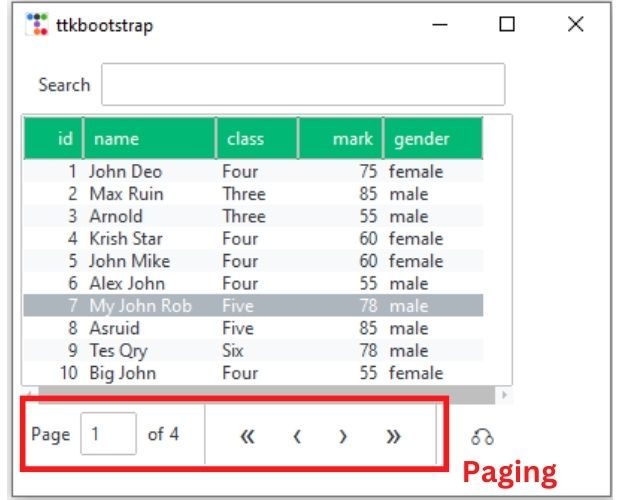
If we have large number of rows and the view port ( height parameter ) is less, then we can display some records within the view port and provide user with navigation to move to different part of the available records.
Read more about PHP Paging here .
By making the parameter
paginated=True , we can show navigation buttons to move to different pages of the records. Here the parameter pagesize=10 will accommodate 10 records per page.
# Creating a Tableview widget with pagination and search functionality
dv = ttk.tableview.Tableview(
    master=my_w,  # Parent window
    paginated=True,  # Enable pagination
    coldata=l1,  # Column headers
    rowdata=r_set,  # Data rows to display
    searchable=True,  # Enable search bar
    bootstyle=SUCCESS,  # Bootstrap styling
    pagesize=8,  # Number of rows per page
    height=6,  # Visible row count
    stripecolor=(colors.light, None) # Alternating row stripe color
)
pagesize & height 🔝
Pagesize: number of records visible per page.height : number of rows within Table's viewport.
If Pagesize is more than height then user has to scroll using mousewheel to navigate.
Updating default font 🔝
Use these lines after declaring the root window to change the font details.from tkinter.font import nametofont
default_font = nametofont("TkDefaultFont")
default_font.configure(family="Times",size=14,weight='bold')Summary row and paging of records 🔝
If we are adding any row by using insert_row() as explained above and usingpaginated=True then the row will be added at the last page only.
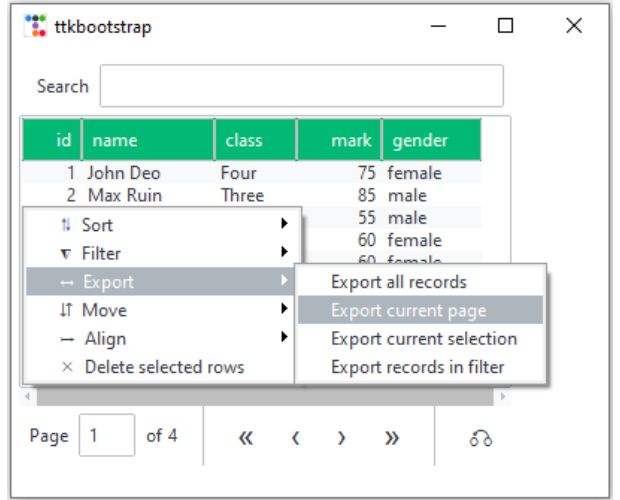
Export Rows 🔝
Right click on the table rows and we can export data using the set delimiter.By default we can download data as CSV file.
Export selectd Rows 🔝
We can use export_current_selection() to export the selected rows to CSV file. Hold the Ctrl key to select multiple rows.b1=ttk.Button(my_w,text='Export',bootstyle=SUCCESS,
command=lambda:dv.export_current_selection())
b1.grid(row=1,column=0)Getting row value 🔝
row = dv.tablerows
print(row[1].values) # [2, 'Max Ruin', 'Three', 85, 'male']
Delete row 🔝
# Delete row at index 5
b1 = ttk.Button(my_w, text='Delete Row 5', bootstyle=DANGER,
    command=lambda: dv.delete_row(5))
Delete selected row from the table. Call the function my_delete() by using command attribute of a button.
def my_delete():
    # Get selected row(s)
    selected_item = dv.view.selection()
    print(selected_item)  # Debugging: Check selected row ID

    if selected_item:
        # Get the internal ID of the selected row
        iid = selected_item[0]  # This is a string like 'I004'

        # Find the row index corresponding to this selection
        index = None
        for i, row in enumerate(dv.tablerows_visible):
            if row.iid == iid:
                index = i
                break

        if index is not None:
            dv.delete_row(index)  # Delete the row using its index
def my_delete_multiple():
    # Get all selected row(s)
    selected_items = dv.view.selection()
    print(selected_items)  # Debugging: Print selected row IDs

    if not selected_items:
        return  # Exit if no row is selected

    # Store indices of rows to delete
    indices_to_delete = []

    # Loop through selected rows to find corresponding indices
    for iid in selected_items:
        for i, row in enumerate(dv.tablerows_visible):
            if row.iid == iid:
                indices_to_delete.append(i)
                break

    # Sort indices in reverse order to avoid reindexing issues
    indices_to_delete.sort(reverse=True)

    # Delete rows one by one using sorted indices
    for index in indices_to_delete:
        dv.delete_row(index)  # Delete row by index
Clearing the Table: unload_table_data() 🔝
While delete_row() is perfect for removing specific entries, you often need to clear the entire dataset—for example, when a user clicks a "Reset" button or before loading a new search result. The unload_table_data() method instantly flushes all internal data and empties the visual display.
# To clear all rows from the Tableview
dv.unload_table_data()

# Pro-Tip: If you want to replace the data with a new list
new_data = [['A1', 'B1'], ['A2', 'B2']]
dv.build_table_data(coldata, new_data)
unload_table_data() followed by build_table_data() is the recommended pattern for "Refreshing" a table from a database. It ensures that the pagination and scrollbars are recalculated correctly for the new dataset.
Refreshing the Entire Table
When your source data changes significantly, the best practice is to "flush" the old data and rebuild the table structure. Using unload_table_data() ensures no ghost records remain in memory, while build_table_data() maps your new lists to the view.
def refresh_data():
    # 1. New data set (could be fetched from a database)
    new_r_set = [
        (10, "New User A", "Six", 95, "Male"),
        (11, "New User B", "Seven", 88, "Female")
    ]

    # 2. Completely unload the existing records
    dv.unload_table_data()

    # 3. Build with new data and existing columns (l1)
    dv.build_table_data(l1, new_r_set)

    # 4. Finalize the view
    dv.autofit_columns()
    dv.load_table_data()

# Button to trigger the refresh
btn_refresh = ttk.Button(my_w, text="Refresh Table", command=refresh_data)
btn_refresh.grid(row=1, column=0, pady=10)dv.load_table_data() at the end. Without this call, the Tableview might appear empty even though the data has been built internally.
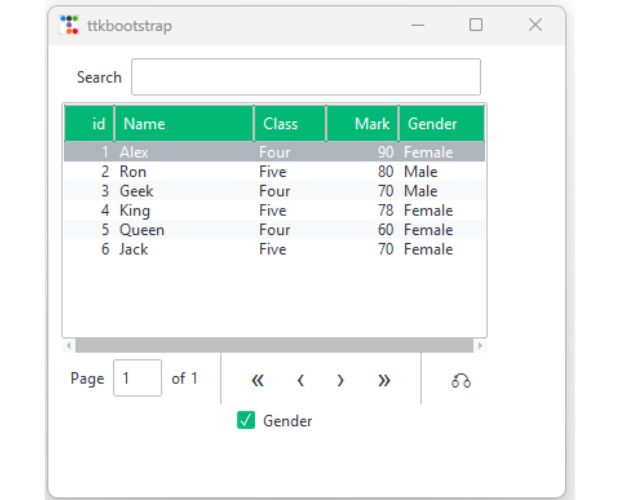
Hide and show a column of table view by using checkbutton 🔝
import ttkbootstrap as ttk
from ttkbootstrap.tableview import Tableview
from ttkbootstrap.constants import *

my_w = ttk.Window()
my_w.geometry("400x350")  # width and height
colors = my_w.style.colors
l1 = [
    {"text": "id", "stretch": False},
    {"text":"Name","stretch":True},
    "Class",
    {"text":"Mark"},
    {"text":"Gender"}
]  # Columns with Names and style
# Data rows as list
r_set1 = [(1, "Alex", 'Four',90,'Female'), (2, "Ron", "Five",80,'Male'),
            (3, "Geek", 'Four',70,'Male'),(4,'King','Five',78,'Female'),
            (5,'Queen','Four',60,'Female'),(6,'Jack','Five',70,'Female')]
l2 = [
    {"text": "id", "stretch": False},
    {"text":"Name","stretch":True},
    "Class",
    {"text":"Mark"}

]  # Columns with Names and style
# Data rows as list
r_set2 = [(1, "Alex", 'Four',90), (2, "Ron", "Five",80),
            (3, "Geek", 'Four',70),(4,'King','Five',78),
            (5,'Queen','Four',60),(6,'Jack','Five',70)]
dv = ttk.tableview.Tableview(
    master=my_w,
    paginated=True,
    coldata=l1,
    rowdata=r_set1,
    searchable=True,
    bootstyle=SUCCESS,
    pagesize=10,
    height=10,
    stripecolor=(colors.light, None),
)
dv.grid(row=0, column=0, padx=10, pady=5)
#dv.build_table_data(l2,r_set2)
dv.autofit_columns() # Fit in current view
def my_upd():

    dv.grid_forget()
    if cb1_v.get():
        dv.build_table_data(l1,r_set1)
    else:
        dv.build_table_data(l2,r_set2)
    dv.autofit_columns() # Fit in current view
    dv.load_table_data() # Load all data rows
    dv.grid(row=0, column=0, padx=10, pady=5)
cb1_v = ttk.BooleanVar(value=True)
cb1 = ttk.Checkbutton(variable=cb1_v,text="Gender",
	onvalue=True, offvalue=False, bootstyle=SUCCESS ,command=my_upd)
cb1.grid(row=1,column=0)

my_w.mainloop()
Getting ID of user selected row 🔝

import ttkbootstrap as ttk
from ttkbootstrap.tableview import Tableview
from ttkbootstrap.constants import *

my_w = ttk.Window()
my_w.geometry("400x320")

colors = my_w.style.colors

l1 = [
    {"text": "id", "stretch": False},
    {"text": "Name", "stretch": True},
    "Class",
    {"text": "Mark"},
    {"text": "Gender"}
]

r_set = [
    (1, "Alex", "Four", 90, "Female"),
    (2, "Ron", "Five", 80, "Male"),
    (3, "Geek", "Four", 70, "Male"),
    (4, "King", "Five", 78, "Female"),
    (5, "Queen", "Four", 60, "Female"),
    (6, "Jack", "Five", 70, "Female")
]

dv = Tableview(
    master=my_w,
    paginated=True,
    coldata=l1,
    rowdata=r_set,
    searchable=True,
    bootstyle=SUCCESS,
    pagesize=10,
    height=10,
    stripecolor=(colors.light, None)
)
dv.grid(row=0, column=0, padx=10, pady=5)
dv.autofit_columns()

label = ttk.Label(my_w, text="Selected Row ID: None", bootstyle="info")
label.grid(row=1, column=0, padx=10, pady=5)

def on_row_select(event):
    selected_item = dv.view.selection()
    if selected_item:
        row_id = dv.view.item(selected_item[0])["values"][0]
        label.configure(text=f"Selected Row ID: {row_id}")

dv.view.bind("<<TreeviewSelect>>", on_row_select)

my_w.mainloop()def on_row_select(event):
selected_item = dv.view.selection()
if selected_item:
# row_id = dv.view.item(selected_item[0])["values"][0]
# label.configure(text=f"Selected Row ID: {row_id}")
row_ids = [dv.view.item(item)["values"][0] for item in selected_item]
label.configure(text=f"Selected Row IDs: {', '.join(map(str, row_ids))}")dv.load_table_data() to refresh the visual display and update pagination.
Conclusion: The Power of Tableview
The Tableview widget is arguably the most powerful component in the ttkbootstrap library. By combining modern styling with complex logic like pagination, multi-column sorting, and real-time searching, it saves developers hours of manual coding.
Summary Checklist
- ✅ Use coldata (dictionaries) for advanced column control (stretch, anchor).
- ✅ Enable paginated=True for large datasets to maintain speed.
- ✅ Access .view for event binding and advanced Treeview selections.
Ready to build a full CRUD application? Pair this Tableview with our SQLite Database Guide to manage your data permanently!
Different data sources for Tableview
ttkbootstrap

Subhendu Mohapatra
Author
🎥 Join me live on YouTubePassionate about coding and teaching, I publish practical tutorials on PHP, Python, JavaScript, SQL, and web development. My goal is to make learning simple, engaging, and project‑oriented with real examples and source code.
Subscribe to our YouTube Channel here

05-04-2025 | |
| Is there any possibility to add a column of checkboxes ? | |
 Python Video Tutorials