Adding Image to MySQL Blob column in Tkinter
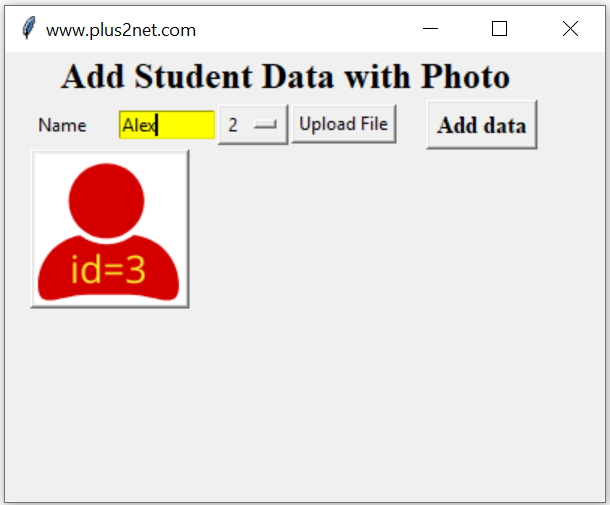
We will ask user to enter Name using Entry , select one Id from OptionMenu and then upload any JPG or PNG image. These data we will store in MySQL table on click of a Button.
We have already discussed about the structure of the student_profile table and how to display the records with uploaded photo here.
Download the zip file at the end of this tutorial with all source codes and sample images.
Tkinter GUI application to add, display update and delete Blob column data with image of MySQL table
We will first display the Tkinter GUI with all input elements.
import tkinter as tkfrom tkinter import filedialogfrom tkinter.filedialog import askopenfilefrom PIL import Image, ImageTkfrom sqlalchemy import create_engine
my_w = tk.Tk()my_w.geometry("400x300")  # Size of the window my_w.title('www.plus2net.com')my_font1=('times', 18, 'bold')l1 = tk.Label(my_w,text='Add Student Data with Photo',font=my_font1)  l1.grid(row=1,column=1,columnspan=5)
l2 = tk.Label(my_w,  text='Name', width=10 )  # added one Label l2.grid(row=2,column=1)
e1 = tk.Entry(my_w,width=10,bg='yellow') # added one Entry boxe1.grid(row=2,column=2)
my_list = [1,2,3,4] # options to appear for selectionoptions = tk.StringVar(my_w)
options.set(my_list[1]) # default value selectedom1 =tk.OptionMenu(my_w, options, *my_list)
om1.grid(row=2,column=3) # displaying option Menub1 = tk.Button(my_w, text='Upload File',    command = lambda:upload_file())b1.grid(row=2,column=4)
my_font=('times', 12, 'bold')b2 = tk.Button(my_w, text='Add data', font=my_font, command = lambda:add_data())b2.grid(row=2,column=5,padx=20) global filename # Access this from both functions##### function to upload_file() ######## function to add_data() ####my_w.mainloop() # Keep the window openOne is upload_file() to show the file browser and allow uploading of file. After uploading the same image is displayed on the window showing a sample to the user about the image going to be stored in the database table.
Upload and display image in Tkinter GUI
Here is the code to upload and display the image within the function.
def upload_file(): # Image upload and display global filename,img f_types =[('Png files','*.png'),('Jpg Files', '*.jpg')] filename = filedialog.askopenfilename(filetypes=f_types) img = ImageTk.PhotoImage(file=filename) b2 =tk.Button(my_w,image=img) # using Button b2.grid(row=4,column=1,columnspan=2)#display uploaded photodef add_data(): # Add data to MySQL table global img , filename fob=open(filename,'rb') # filename from upload_file() fob=fob.read() data=(options.get(),e1.get(),fob) # tuple with data my_conn = create_engine("mysql+mysqldb://root:test@localhost/my_tutorial") id=my_conn.execute("INSERT INTO student_profile(id,student,profile_photo) \ VALUES (%s,%s,%s)",data) print("Row Added = ",id.rowcount) # displayed in console my_w.destroy() # close window after adding data- The button to add data can be kept as disabled unless some minimum length of text is entered as name and the image file is uploaded. Read how to disable / enable a button here
- While displaying the image the size can be reduced to match the window size. Here all sample images shown are of small sizes so they fit to the window. Check how to reduce the size of the image using PIL
- Check if the ID selected by the user is already available in the table.
import tkinter as tkfrom tkinter import filedialogfrom tkinter.filedialog import askopenfilefrom PIL import Image, ImageTkfrom sqlalchemy import create_enginemy_w = tk.Tk()my_w.geometry("400x300")  # Size of the window my_w.title('www.plus2net.com')my_font1=('times', 18, 'bold')
l1 = tk.Label(my_w,text='Add Student Data with Photo',font=my_font1)  l1.grid(row=1,column=1,columnspan=5)
l2 = tk.Label(my_w,  text='Name', width=10 )  # added one Label l2.grid(row=2,column=1)
e1 = tk.Entry(my_w,width=10,bg='yellow') # added one Entry boxe1.grid(row=2,column=2)
my_list = [1,2,3,4] # options to appear for selectionoptions = tk.StringVar(my_w)
options.set(my_list[1]) # default value selectedom1 =tk.OptionMenu(my_w, options, *my_list)
om1.grid(row=2,column=3) # displaying option Menub2 = tk.Button(my_w, text='Upload File',    command = lambda:upload_file())b2.grid(row=2,column=4) my_font=('times', 12, 'bold')b3 = tk.Button(my_w, text='Add data', font=my_font,   command = lambda:add_data())b3.grid(row=2,column=5,padx=20)
global filename # Access this from both functionsdef upload_file(): # Image upload and display    global filename,img    f_types =[('Png files','*.png'),('Jpg Files', '*.jpg')]    filename = filedialog.askopenfilename(filetypes=f_types)    img = ImageTk.PhotoImage(file=filename)    b2 =tk.Button(my_w,image=img) # using Button     b2.grid(row=4,column=1,columnspan=2)#display uploaded photo
def add_data(): # Add data to MySQL table     global img , filename     fob=open(filename,'rb') # filename from upload_file()    fob=fob.read()    data=(options.get(),e1.get(),fob) # tuple with data     my_conn = create_engine("mysql+mysqldb://root:test@localhost/my_tutorial")    id=my_conn.execute("INSERT INTO  student_profile(id,student,profile_photo) \                 VALUES (%s,%s,%s)",data)    print("Row Added  = ",id.rowcount) # displayed in console     my_w.destroy() # close window after adding data
my_w.mainloop() # Keep the window openAdding data with Photo to student table using Tkinter GUI
Tkinter window to display MySQL Blob Data type image( Single record)
Tkinter window to display MySQL Blob Data type image( All records)
Tkinter update Blob Data type with user uploaded image
Tkinter delete record with Blob Data type
Tkinter MySQL Record display MySQL Update MySQL Delete
Changes required for using SQLite database in place of MySQL

Subhendu Mohapatra
Author
🎥 Join me live on YouTubePassionate about coding and teaching, I publish practical tutorials on PHP, Python, JavaScript, SQL, and web development. My goal is to make learning simple, engaging, and project‑oriented with real examples and source code.
Subscribe to our YouTube Channel here
This article is written by plus2net.com team.
https://www.plus2net.com

25-02-2023 | |
| I am not able to save record in database Error insert into ??? | |
 Python Video Tutorials