Using Bitmaps in Tkinter Widgets: A Detailed Guide
Understanding Bitmaps in Tkinter
Bitmaps are a basic form of graphics consisting of a grid of pixels, each of which can be either on or off (in black and white bitmaps) or colored if a color palette is used. Tkinter, Python's standard GUI toolkit, allows the use of bitmaps in its various widgets. These bitmaps can either be pre-defined or custom-made, providing a simple yet effective way to add graphics to your application.Using Predefined Bitmaps
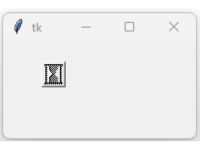
Tkinter comes with several built-in bitmaps like 'error', 'hourglass', 'questhead', and more. These can be easily implemented in widgets. For example, to add an 'hourglass' bitmap to a button:import tkinter as tk
my_w = tk.Tk()
my_w.geometry('200x100')
bt1 = tk.Button(my_w, bitmap='hourglass')
bt1.grid(row=0,column=0,padx=40,pady=20)
my_w.mainloop()
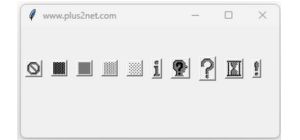
Other bitmaps are 'error', 'gray75', 'gray50', 'gray25', 'gray12', 'info', 'questhead', 'question', and 'warning'.
Using this list of bitmaps multiple buttons are placed with each bitmap.

import tkinter  as tk
from tkinter import *
my_w = tk.Tk()
my_w.geometry("350x150")  # Size of the window
my_w.title("www.plus2net.com")  # Adding a title

bitmaps=['error', 'gray75', 'gray50', 'gray25', 'gray12',
         'info', 'questhead', 'question', 'hourglass','warning']
j=1 #column value
for img in bitmaps:
    e = Button(my_w, bitmap=img)
    e.grid(row=1, column=j,padx=6,pady=40)
    j=j+1

my_w.mainloop() # Keep the window openCreating and Using Custom Bitmaps
For more personalized applications, you can create custom bitmaps in the X BitMap (XBM) format. XBM is a plain text binary image format. Here's an example of a simple XBM image:
#define my_bitmap_width 16
#define my_bitmap_height 16
static unsigned char my_bitmap_bits[] = {
   0x00, 0x00, 0x00, 0x00, /* ... more hexadecimal values ... */ };
bitmap_image = tk.BitmapImage(file="path_to_xbm_file.xbm")
label = tk.Label(root, image=bitmap_image)
label.pack()
Applying Bitmaps to Various Widgets
Bitmaps can be used in a variety of Tkinter widgets. For instance:- Buttons: As seen in the earlier example, you can add a bitmap to a button to give it a graphical element.
- Labels: Use bitmaps in labels to display icons or small images.
- Canvas: Draw bitmaps on a canvas widget to create complex graphics.
- Radiobuttons: Show options by adding bitmaps to the radiobuttons .
- Menubutton: In place of showing text , show the bitmap image.
Styling and Configuring Bitmaps
You can modify the appearance of bitmaps in Tkinter widgets. However, remember that Tkinter's bitmap functionality is quite basic. If you need to resize or recolor a bitmap, it’s usually best to do this with an image editing tool before importing it into Tkinter. Here are some basic styling options:- Foreground and Background Colors: You can set the foreground (color of the bitmap) and background colors using the foreground and background options in widgets.
- Positioning: Align the bitmap with text using the compound option in widgets like buttons and labels.
Checking bitmap attribute
By using if-else we can check the availability of the attribute with the widget object.import tkinter as tk
my_w = tk.Tk()
my_w.geometry("250x200")
l1 = tk.Label(my_w, width=15 )
l1.grid(row=1,column=1,pady=20)
l2 = tk.Label(my_w, bitmap='question' )
l2.grid(row=1,column=2)
sb1 = tk.Spinbox(my_w, from_= 0, to = 10,width=5)
sb1.grid(row=2,column=1,padx=20,pady=20)
if "bitmap" in l2.config():
#if "bitmap" in sb1.config():
print("Attribute is available")
else:
print("Attribute is Not available")
my_w.mainloop()Common Pitfalls and Best Practices
When using bitmaps in Tkinter, be aware of their limitations. Bitmaps are not scalable like vector graphics, so resizing can lead to quality loss. Also, complex images may not render well as bitmaps due to their binary nature. Best practices include:Use bitmaps for simple icons or graphics.
Pre-process your images for the correct size and color before using them in Tkinter.
Use higher resolution images for better clarity, keeping in mind the binary nature of bitmaps.
In conclusion, while bitmaps offer a straightforward method to include graphics in a Tkinter application, they are best used for simple icons or indicators. For more complex or scalable graphics, you might consider other image formats supported by Tkinter, such as PNG or JPEG, using the PhotoImage class. The use of bitmaps can greatly enhance the user interface of your application.
Custome Bitmap Image displaying

Using Python Image Library
from PIL import Image
import tkinter as tk
from PIL import Image,ImageTk

# Create a new bitmap image.
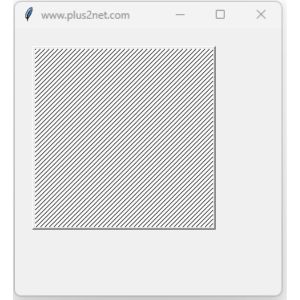
img= Image.new("1", (200, 200))

# Get the image data.
pixels = img.load() # Create the pixel map

# Set the pixel values.
for i in range(img.size[0]):    # For every pixel:
    for j in range(img.size[1]):
        pixels[i,j] = 0 if (i + j) % 5 == 0 else 255 # Set the colour accordingly
#image.save("E:\\bitmap_image.bmp")

my_w=tk.Tk()
my_w.geometry('300x300')
my_w.title('www.plus2net.com')
my_img = ImageTk.PhotoImage(img)

b1=tk.Button(my_w,image=my_img)
b1.grid(row=1,column=1,padx=20,pady=20)
my_w.mainloop()
Questions
- What is a bitmap in Tkinter and how can it be used to create custom images?
- How can a bitmap be created from a PIL Image object?
- How can a bitmap be used to create a custom Button widget?
- How can a bitmap be used to create a custom Label widget?
- What are the different options that can be used to configure a bitmap?
Image Resizing image using PIL Upload and display image file
Colour selection dialog box using Ttkbootstrap

Subhendu Mohapatra
Author
🎥 Join me live on YouTubePassionate about coding and teaching, I publish practical tutorials on PHP, Python, JavaScript, SQL, and web development. My goal is to make learning simple, engaging, and project‑oriented with real examples and source code.
Subscribe to our YouTube Channel here
This article is written by plus2net.com team.
https://www.plus2net.com

 Python Video Tutorials