Python tkinter image icons
";require "templates/body_start.php";?>Changing the default icon
There is a default icon comes with the window.import tkinter as tkmy_w=tk.Tk()my_w.geometry('300x100')my_w.title('www.plus2net.com')my_w.mainloop()Tkinter displaying icon or JPG PNG image in windows by using Label or button using PILLOW library
Escape the path by using two backslashes if you have any char with can be used with backslash. Here
\f can be understood as form feed, so we used two backslashes. import tkinter as tkmy_w=tk.Tk()my_w.geometry('300x100')my_w.title('www.plus2net.com')my_w.iconbitmap('D:\\images\\favicon.ico')my_w.mainloop()Dynamic Path with os Module
If you want your application to locate the icon file dynamically, use the os module to build the path relative to the script’s directory.import osBASE_DIR = os.path.dirname(os.path.abspath(__file__))icon_path = os.path.join(BASE_DIR, 'favicon.ico')my_w.iconbitmap(icon_path)Adding image using Label

import tkinter as tk my_w = tk.Tk() my_w.geometry("400x200") l1 = tk.Label(my_w, width=15) l1.grid(row=1, column=1) my_img = tk.PhotoImage(file="D:\\top2.png") l2 = tk.Label(my_w, image=my_img) l2.grid(row=1, column=2) my_w.mainloop()Using a Button to add image.
We can place image over one Button
import tkinter as tk my_w=tk.Tk() my_w.geometry('300x100') my_w.title('www.plus2net.com') my_w.iconbitmap('D:\\images\\favicon.ico') my_img = tk.PhotoImage(file = "D:/images/top2.png") b1 = tk.Button(my_w, image = my_img) b1.grid(row = 1, column = 1) my_w.mainloop()PIL ( Python Imaging Library )
To install use this command at command promptpip install pillowFor .jpg images we have to use PIL library.
from PIL import ImageTk, Image%pip freezeimport tkinter as tk my_w = tk.Tk() from PIL import Image, ImageTk my_w.geometry('300x100') my_w.title('www.plus2net.com') my_img = ImageTk.PhotoImage(Image.open("D:/images/top2.jpg")) b1 = tk.Button(my_w, image=my_img) b1.grid(row=1, column=1) my_w.mainloop()Background Image of the window
Change the path of the image used at my_img2.
To use JPG image we have to include PIL library.
import tkinter as tk from tkinter import ttk from PIL import Image, ImageTk my_w = tk.Tk() my_w.geometry("840x570") my_img2 = ImageTk.PhotoImage(Image.open("D:\\my_data\\background1.jpg")) bg = tk.Label(my_w, image=my_img2) bg.place(x=0, y=0, relwidth=1, relheight=1) my_w.mainloop()my_img = tk.PhotoImage(file = "D:\\top2.png")Width and height of the image
import tkinter as tk my_w = tk.Tk()my_w.geometry("840x570") my_img = tk.PhotoImage(file = "H:\\top2.png") print(my_img.width(),my_img.height()) # Width and height of the image b1=tk.Button(my_w,image=my_img)b1.grid(row=1,column=1)my_w.mainloop()import tkinter as tkmy_w=tk.Tk()from PIL import Image,ImageTkmy_w.geometry('400x300')my_w.title('www.plus2net.com')my_img = ImageTk.PhotoImage(Image.open("H:/top2.jpg"))print(my_img.width(),my_img.height()) # Print width and height of the imageb1=tk.Button(my_w,image=my_img)b1.grid(row=1,column=1,padx=20,pady=20)my_w.mainloop()import tkinter as tkmy_w=tk.Tk()from PIL import Image,ImageTkmy_w.geometry('400x300')my_w.title('www.plus2net.com')my_img = Image.open("H:/top2.jpg") # change the path of your imageprint(my_img.size) # Print the tuple with width and height of the imageprint('Width: ',my_img.size[0],' , Height: ',my_img.size[1])my_img = ImageTk.PhotoImage(Image.open("H:/top2.jpg"))b1=tk.Button(my_w,image=my_img)b1.grid(row=1,column=1,padx=20,pady=20)my_w.mainloop()Colourful Buttons by using images
Create and display image in Tkinter window
import tkinter as tk from PIL import Image, ImageTk # Create the image img = Image.new('RGB', (255,255), "black") # Create a new black image pixels = img.load() # Create the pixel map for i in img.size[0]: for j in img.size[1]: pixels[i,j] = (i, j, 100) # Set the colour accordingly my_w = tk.Tk() my_w.geometry('300x300') my_w.title('www.plus2net.com') my_img = ImageTk.PhotoImage(img) b1 = tk.Button(my_w, image=my_img) b1.grid(row=1, column=1, padx=20, pady=20) my_w.mainloop()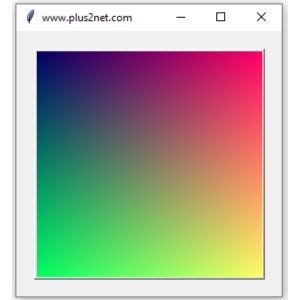
Bitmap Image displaying
from PIL import Image import tkinter as tk from PIL import Image, ImageTk # Create a new bitmap image. img = Image.new("1", (200, 200)) # Get the image data. pixels = img.load() # Set the pixel values. for i in img.size[0]: for j in img.size[1]: pixels[i, j] = 0 if (i + j) % 5 == 0 else 255 # Initialize Tkinter window my_w = tk.Tk() my_w.geometry('300x300') my_w.title('www.plus2net.com') # Convert the image for Tkinter my_img = ImageTk.PhotoImage(img) # Create a button with the image b1 = tk.Button(my_w, image=my_img) b1.grid(row=1, column=1, padx=20, pady=20) # Run the Tkinter main loop my_w.mainloop()PIL : Python Image Library Resizing image using PIL Upload and display image fileColorchooser Draw graphs on Tkinter window using Pandas DataFrame Tkinter Bitmap
Images used over button to create ON / Off switchCreate QR Code in Tkinter window