Inserting records to Student table with Blob and other data
id: Auto-increment id column of MySQL table. Inputs
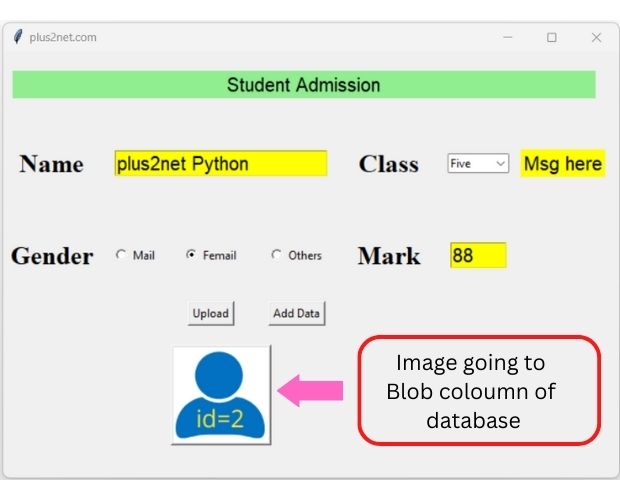
Name : Name of the student, Entry box is used to take user inputClass : Combobox is used to take user input or selection of student classGender : Radio buttons for selection of Gender of the student. mark : Entry to accept mark of the student.photo : Blob column to store uploaded any JPG or PNG image
Tkinter GUI to collect user inputs with Photo to store in student Database table with Blob column
We have already discussed about the structure of the student_profile table and how to display the records with uploaded photo here.
There are two parts of this script. In first part we will create the layout and upload - display the student photo. In second part we will insert the details to Database.
We will first display the Tkinter GUI with all input elements.
The function my_upload() to show the file browser and allow uploading of file. After uploading the same image is displayed on the window over a button, showing a sample to the user about the image going to be stored in the database table.
Upload and display image in Tkinter GUI
Here is the code to upload and display the image within the function.
def my_upload(): # show file browser and preview of photo
    global filename,img
    f_types = [('All Files', '*.*'),
             ('JPG', '*.jpg'),
             ('PNG', '*.png')              ]
    filename = filedialog.askopenfilename(filetypes=f_types)
    img=ImageTk.PhotoImage(file=filename)
    b3=tk.Button(my_w,image=img) # display image on this
b3.grid(row=4,column=1,columnspan=3,pady=20)The other function my_add() will insert the user input data along with the Photo in database table. Details of this function my_add() is covered in Part II of this tutorial.
Full code of part I is here
import tkinter as tk
from tkinter import ttk
my_w = tk.Tk()
from tkinter import filedialog
from tkinter.filedialog import askopenfile
from PIL import Image,ImageTk

my_w.geometry("650x450")
my_w.title("plus2net.com")  # Adding a title
font1=['Times',20,'bold'] # font style to use in Labels

l1 = tk.Label(my_w,  text='Student Admission', font=24,bg='lightgreen' )
l1.grid(row=0,column=0,columnspan=7,padx=10,pady=20,sticky='ew')
l2=tk.Label(my_w,text='Name',font=font1)
l2.grid(row=1,column=0,padx=5,pady=30)
e2 = tk.Entry(my_w,   width=20,bg='yellow',font=18) # added one Entry box
e2.grid(row=1,column=1,columnspan=3,padx=15)

l3=tk.Label(my_w,text='Class',font=font1)
l3.grid(row=1,column=4,padx=15,pady=10)
my_class=['Three','Four','Five','Six']
cb1 = ttk.Combobox(my_w, values=my_class,width=7)
cb1.grid(row=1,column=5,padx=10,pady=10)
l_msg=tk.Label(my_w,text='Msg here',bg='yellow',font=16) # show messages
l_msg.grid(row=1,column=6)
l4=tk.Label(my_w,text='Gender',font=font1)
l4.grid(row=2,column=0,padx=5,pady=30)
r1_v=tk.StringVar(value='Female')
r1 = tk.Radiobutton(my_w, text='Male', variable=r1_v, value='Male')
r1.grid(row=2,column=1)
r2 = tk.Radiobutton(my_w, text='Female', variable=r1_v, value='Female')
r2.grid(row=2,column=2)
r3 = tk.Radiobutton(my_w, text='Others', variable=r1_v, value='Other')
r3.grid(row=2,column=3)

l5=tk.Label(my_w,text='Mark',font=font1)
l5.grid(row=2,column=4,padx=5,pady=10)
e5 = tk.Entry(my_w,   width=5,bg='yellow',font=18) # Entry box
e5.grid(row=2,column=5,padx=15)
b1=tk.Button(my_w,text='Upload',command=lambda:my_upload())
b1.grid(row=3,column=2)
b2=tk.Button(my_w,text='Add Data',command=lambda:my_add())
b2.grid(row=3,column=3,padx=5)
global filename,img
def my_upload(): # show file browser and preview of photo
    global filename,img
    f_types = [('All Files', '*.*'),
             ('JPG', '*.jpg'),
             ('PNG', '*.png')              ]
    filename = filedialog.askopenfilename(filetypes=f_types)
    img=ImageTk.PhotoImage(file=filename)
    b3=tk.Button(my_w,image=img) # display image on this
    b3.grid(row=4,column=1,columnspan=3,pady=20)
def my_add():
    pass # code to store data in database
my_w.mainloop()Part II : Storing data in Database
Inserting data with Picture to Blob column of MySQL student table using Tkinter GUI inputs Part II
To create table here is the SQL dump of the student_blob table.
CREATE TABLE IF NOT EXISTS `student_blob` (
  `id` int(2) NOT NULL AUTO_INCREMENT,
  `name` varchar(50) CHARACTER SET utf8 NOT NULL DEFAULT '',
  `class` varchar(10) CHARACTER SET utf8 NOT NULL DEFAULT '',
  `mark` int(3) NOT NULL DEFAULT '0',
  `gender` varchar(6) CHARACTER SET utf8 NOT NULL DEFAULT 'male',
  `photo` blob,
  UNIQUE KEY `id` (`id`)
) ENGINE=InnoDB DEFAULT CHARSET=latin1 AUTO_INCREMENT=1 ;from sqlalchemy import create_engine
my_conn = create_engine("mysql+mysqldb://userid:pass@localhost/db_name")In above code we have used the button b2 to trigger a function my_add().
b2=tk.Button(my_w,text='Add Data',command=lambda:my_add())
b2.grid(row=3,column=3,padx=5)As a confirmation of data insertion to MySQL table , we use the function lastrowid to get auto-increment id of the record added to the table. This number is displayed in the Message area in our Label l_msg.
def my_add():
    global filename
    flag_validation=True # set the flag
    my_name=e2.get() # read name
    my_class=cb1.get()    # read class
    my_mark=e5.get() # read mark
    my_gender=r1_v.get()   # read gender
    fob=open(filename,'rb') # filename from upload_file()
    fob=fob.read() # binary format the image is ready
    my_data=(None,my_name,my_class,my_mark,my_gender,fob)
    my_query="INSERT INTO student_blob values(%s,%s,%s,%s,%s,%s)"
    id=my_conn.execute(my_query,my_data)
    l_msg.config(text="id :" + str(id.lastrowid))
print("ID of Row Added = ",id.lastrowid)- The button to add data can be kept as disabled unless some minimum length of text is entered as name and the image file is uploaded. Read how to disable / enable a button here
- While displaying the image the size can be reduced to match the window size. Here all sample images shown are of small sizes so they fit to the window. Check how to reduce the size of the image using PIL
- Check if the ID selected by the user is already available in the table.
import tkinter as tk
from tkinter import ttk
my_w = tk.Tk()
from tkinter import filedialog
from tkinter.filedialog import askopenfile
from PIL import Image,ImageTk

from sqlalchemy import create_engine
my_conn = create_engine("mysql+mysqldb://userid:pass_w@localhost/db_name")

my_w.geometry("650x450")
my_w.title("plus2net.com")  # Adding a title
font1=['Times',20,'bold'] # font style to use in Labels

l1 = tk.Label(my_w,  text='Student Admission', font=24,bg='lightgreen' )
l1.grid(row=0,column=0,columnspan=7,padx=10,pady=20,sticky='ew')
l2=tk.Label(my_w,text='Name',font=font1)
l2.grid(row=1,column=0,padx=5,pady=30)
e2 = tk.Entry(my_w,   width=20,bg='yellow',font=18) # added one Entry box
e2.grid(row=1,column=1,columnspan=3,padx=15)

l3=tk.Label(my_w,text='Class',font=font1)
l3.grid(row=1,column=4,padx=15,pady=10)
my_class=['Three','Four','Five','Six']
cb1 = ttk.Combobox(my_w, values=my_class,width=7)
cb1.grid(row=1,column=5,padx=10,pady=10)
l_msg=tk.Label(my_w,text='Msg here',bg='yellow',font=16) # to show messages
l_msg.grid(row=1,column=6)
l4=tk.Label(my_w,text='Gender',font=font1)
l4.grid(row=2,column=0,padx=5,pady=30)
r1_v=tk.StringVar(value='Female')
r1 = tk.Radiobutton(my_w, text='Male', variable=r1_v, value='Male')
r1.grid(row=2,column=1)
r2 = tk.Radiobutton(my_w, text='Female', variable=r1_v, value='Female')
r2.grid(row=2,column=2)
r3 = tk.Radiobutton(my_w, text='Others', variable=r1_v, value='Other')
r3.grid(row=2,column=3)

l5=tk.Label(my_w,text='Mark',font=font1)
l5.grid(row=2,column=4,padx=5,pady=10)
e5 = tk.Entry(my_w,   width=5,bg='yellow',font=18) # added one Entry box
e5.grid(row=2,column=5,padx=15)
b1=tk.Button(my_w,text='Upload',command=lambda:my_upload())
b1.grid(row=3,column=2)
b2=tk.Button(my_w,text='Add Data',command=lambda:my_add())
b2.grid(row=3,column=3,padx=5)
global filename,img
def my_upload():
    global filename,img
    f_types = [('All Files', '*.*'),
             ('JPG', '*.jpg'),
             ('PNG', '*.png')              ]
    filename = filedialog.askopenfilename(filetypes=f_types)
    img=ImageTk.PhotoImage(file=filename)
    b3=tk.Button(my_w,image=img) # display image on this button
    b3.grid(row=4,column=1,columnspan=3,pady=20)
def my_add():
    global filename
    flag_validation=True # set the flag
    my_name=e2.get() # read name
    my_class=cb1.get()    # read class
    my_mark=e5.get() # read mark
    my_gender=r1_v.get()   # read gender
    fob=open(filename,'rb') # filename from upload_file()
    fob=fob.read() # binary format the image is ready
    my_data=(None,my_name,my_class,my_mark,my_gender,fob)
    my_query="INSERT INTO student_blob values(%s,%s,%s,%s,%s,%s)"
    id=my_conn.execute(my_query,my_data)
    l_msg.config(text="id :" + str(id.lastrowid))
    print("ID of Row Added  = ",id.lastrowid)
my_w.mainloop()Tkinter window to display MySQL Blob Data type image( Single record)
Tkinter window to display MySQL Blob Data type image( All records)
Tkinter update Blob Data type with user uploaded image
Tkinter delete record with Blob Data type
Tkinter MySQL Record display MySQL Update MySQL Delete
Changes required for using SQLite database in place of MySQL

Subhendu Mohapatra
Author
🎥 Join me live on YouTubePassionate about coding and teaching, I publish practical tutorials on PHP, Python, JavaScript, SQL, and web development. My goal is to make learning simple, engaging, and project‑oriented with real examples and source code.
Subscribe to our YouTube Channel here
This article is written by plus2net.com team.
https://www.plus2net.com

 Python Video Tutorials