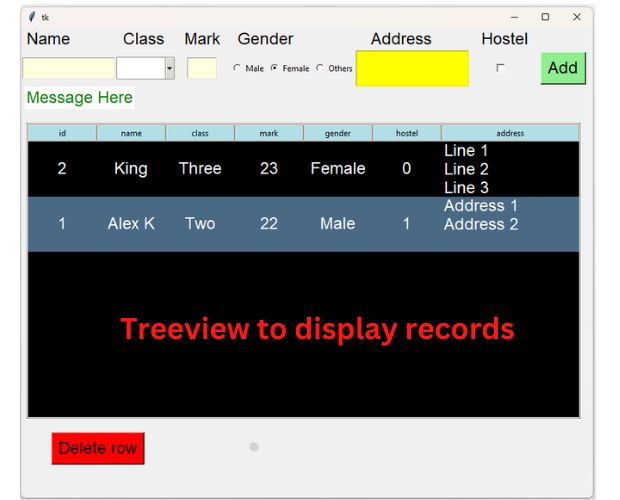
Data Entry form and displaying inserted rows using Treeview in Tkinter

Configuring SQLite Database in config.py
For managing an SQLite database, begin by opening the config.py file. Here, you need to update the database file path to my_db.db. This SQLite database includes a pre-existing table named student_address which contains one sample record for reference.Creating the Table
Within the provided zip file, you'll find a script named sqlite_create_table.py. Execute this script to create the student_address table. It's important to note that the zip file already includes a sample table with one record, serving as an example.Deleting Data from the Table
To remove all data from the student_address sample table, run the sqlite_delete_data.py script. This action will clear all existing data from the table, leaving the structure intact.Deleting and Recreating the Table
If you need to delete the entire table, use the sqlite_delete_table.py page. This will remove the student_address table completely. To recreate the table afterwards, simply run the sqlite_create_table.py script again. This flexibility allows you to manage the table structure and data efficiently in your SQLite database.
Tkinter & SQLite Data Entry Tutorial: Build a Python GUI Application to store in different databases
Using MySQL database
The connection string can be changed inside config.py file to use MySQL database.To create the student_address table here is the SQL dump. ( One copy is avilable inside the Zip file ).
CREATE TABLE `student_address` (
  `id` int NOT NULL,
  `name` varchar(50) CHARACTER SET utf8 COLLATE utf8_general_ci NOT NULL DEFAULT '',
  `class` varchar(10) CHARACTER SET utf8 COLLATE utf8_general_ci NOT NULL DEFAULT '',
  `mark` int NOT NULL DEFAULT '0',
  `gender` varchar(6) CHARACTER SET utf8 COLLATE utf8_general_ci NOT NULL DEFAULT 'male',
  `hostel` tinyint(1) NOT NULL,
  `address` varchar(50) NOT NULL
) ENGINE=InnoDB DEFAULT CHARSET=latin1;

--
-- Dumping data for table `student_address`
--
ALTER TABLE `student_address`
  ADD UNIQUE KEY `id` (`id`);

  ALTER TABLE `student_address`
  MODIFY `id` int NOT NULL AUTO_INCREMENT, AUTO_INCREMENT=3;
COMMIT;
Update the config.py file
Inside the config.py file, comment the line using SQLite database and un-comment the line for MySQL and use your login id , password and database name here.from sqlalchemy import create_engine
## Use one of the line below based on SQLite or MySQL database ##
#my_conn = create_engine("sqlite:///C:\\data\\my_db.db") # For SQLite Database
my_conn = create_engine("mysql+mysqldb://id:pw@localhost/my_db") # MySQL
my_conn=my_conn.connect()Populating options for combobox tkinter
We can take data from the student_address table ( or any other list or table ) to pre populate the options for the combobox used for selection of Class.Different Data Sources for Combobox
query="SELECT DISTINCT(class) as class FROM student_address"
my_data=my_conn.execute(text(query)) # SQLAlchem engine result set
class_list = [r for r, in my_data] # create a  list
#class_list=['One','Two','Three'] # OR use a fixed list
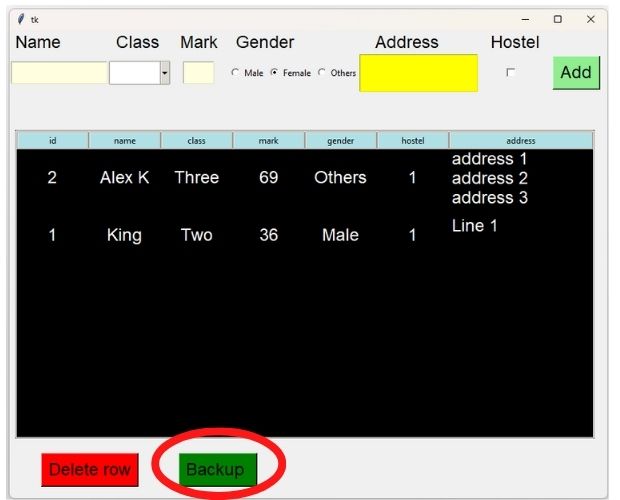
Data Backup

Here we are creating one Pandas DataFrame by using the data from SQLite table. From the DataFrame df we are creating Excel, CSV and one MySQL table by using to_excel(), to_csv() and to_sql() functions.
Backup as Excel, CSV or MySQL table from Tkinter GUI data entry application #backup #sqlite
def my_backup():
    sql="SELECT * FROM student_address" # query to get data
    df=pd.read_sql(sql,my_conn,index_col='id') # create DataFrame
    #print(df.head())
    df.to_excel('E:\\testing\\student_address.xlsx',index=False)
    df.to_csv('E:\\testing\\student_address.csv',index=False)

    my_conn2 = create_engine("mysql+mysqldb://id:pw@localhost/my_db")
    my_conn2=my_conn2.connect()
    df.to_sql(con=my_conn2,name='student_adress2',if_exists='replace')
    my_msg='Backup taken'
return my_msgfrom sqlite_backup import my_backupdef my_backup2():
my_str.set(my_backup())
msg.after(3000,lambda: my_str.set(''))
bt3_backup = tk.Button(my_w, bg='green',font=font1,
text='Backup ',command=my_backup2)
bt3_backup.grid(row=5,column=3,columnspan=2)Displaying the Values of the Selected Row

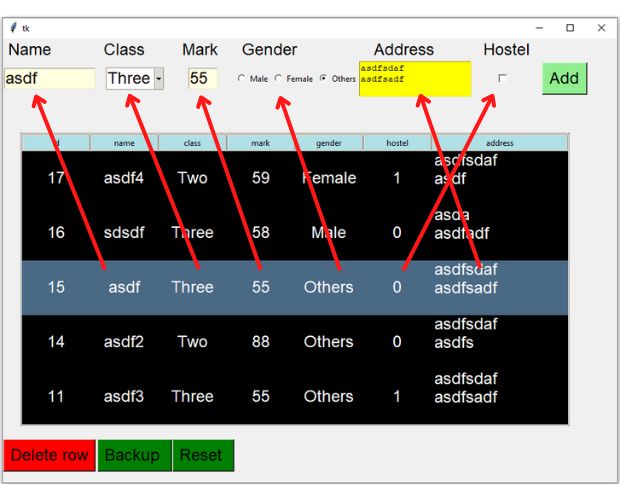
We can populate the TreeView with the selected row's values immediately after a row is selected. Data is retrieved from the database using the ID of the selected row of the TreeView. The elements of the tuple received from the database are then utilized to fill our input boxes. Considering the diversity of input widgets used, specific methods are implemented to assign values to these boxes.
StringVar() is used for Entry widgets for names and gender.
IntVar() is utilized for the marks Entry widget.
BooleanVar() is applied for selecting hostel (checkbox) options, True or False.
The event that initiates the function data_collect() to populate the widgets is contained within the function show_data().
trv.bind("<<TreeviewSelect>>", data_collect)def data_collect(*args):
global trv,p_id
#print("hi")
p_id = trv.selection()[0] # collect selected row id
#print(p_id)
query=text("SELECT * FROM student_address WHERE id=:id")
my_data={'id':p_id} # dictionary to pass value as parameter
my_cursor=my_conn.execute(query,my_data)
data_row=my_cursor.fetchone() # tuple with all column data
my_name.set(data_row[1]) # show name value
class1.set(data_row[2]) # selection for the combobox for class
my_mark.set(data_row[3]) # mark value to set
gender.set(data_row[4]) # set the gender
address.delete('1.0',END) # empty the address text widget
address.insert(tk.END,data_row[6]) # add the address
hostel.set(data_row[5]) # set the true or false
The updated page tk-sqlite-v2.py is available for download at github. Link is available below.
Populate inputs widgets of Tkinter with values on selection of row of Treeview #sqlite #tkinter
FAQ
How can I use my own table with different structure?
To use your own table structure, follow these steps:- Create Your Table: Design and create your table in the database with the required structure. Make sure to define the columns that you need.
- Adjust Widgets: Based on your table's columns, decide what widgets (like text boxes, dropdowns, etc.) you need for user input. Implement these widgets in your UI.
- Update Script: Modify the script to handle the input from your widgets and to perform operations (like insert, update, delete) on your new table. Map each widget to the corresponding column in your table.
- Test with Few Columns: Start with a few essential columns and corresponding widgets to ensure everything works as expected.
- Expand Gradually: Once the basic functionality is working, gradually add more columns and widgets to cover all your requirements.
Using Different Data Sources (MySQL, Excel)
To use different data sources such as MySQL or Excel, you need to:- Update Connection Object: In the config.py file, change the database connection object to connect to your MySQL database. You will need to provide the MySQL server details, such as host, user, password, and database name.
- Create MySQL Table: Use the MySQL dump or manual SQL queries to create a table in your MySQL database that matches the structure required by your application.
- For Excel: If you're using an Excel file as a data source, you will need a library like openpyxl or pandas to read and write to Excel files. Update your script to use these libraries to interact with the Excel file.
- Adapt Code for Data Source: Ensure that your code is adapted to interact with the new data source. This includes writing SQL queries for MySQL or using appropriate functions for Excel file operations.
- Test Thoroughly: After making these changes, test your application thoroughly to ensure that it interacts correctly with the new data source.
While using MySQL getting error No module named 'MySQLdb'
Read here how to install modules to connect to MySQL.Download the source code sqlite-data-entry.zip
Download the source codes from Github.
https://github.com/plus2net/tk-sqlite-data-entry
https://github.com/plus2net/tk-sqlite-data-entry

Subhendu Mohapatra
Author
🎥 Join me live on YouTubePassionate about coding and teaching, I publish practical tutorials on PHP, Python, JavaScript, SQL, and web development. My goal is to make learning simple, engaging, and project‑oriented with real examples and source code.
Subscribe to our YouTube Channel here
This article is written by plus2net.com team.
https://www.plus2net.com

 Python Video Tutorials