Child to Parent data transfer
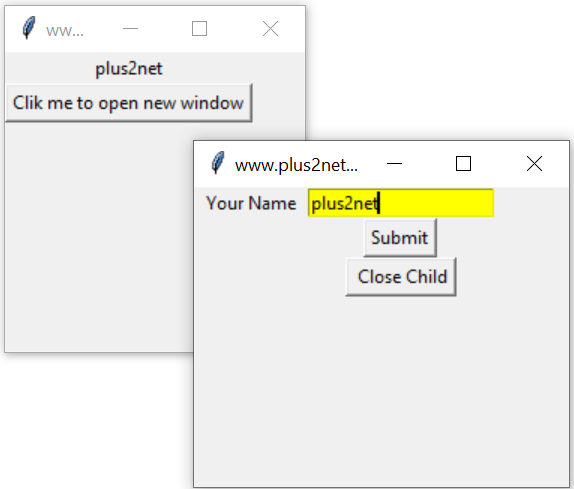
Passing data between child and parent window in Tkinter Toplevel
You can read basics of Parent and Child window here
We are using one string variable in parent window and assigned a string to it. In child window on click of a button the text entered at Entry box will transfer to parent window.
import tkinter as tk
from tkinter import *
my_w = tk.Tk()
my_w.geometry("200x200")  # Size of the window
my_w.title("www.plus2net.com")  # Adding a title

# create one label
my_str = tk.StringVar()
l1 = tk.Label(my_w,  textvariable=my_str )
l1.grid(row=1,column=2)
my_str.set("Hi I am main window")
# add one button
b1 = tk.Button(my_w, text='Click me to open new window',
               command=lambda:my_open())
b1.grid(row=2,column=2)

def my_open():
    my_w_child=Toplevel(my_w) # Child window
    my_w_child.geometry("250x200")  # Size of the window
    my_w_child.title("www.plus2net.com")

    l1 = tk.Label(my_w_child,  text='Your Name', width=10 )
    l1.grid(row=1,column=1)

    e1 = tk.Entry(my_w_child, width=20,bg='yellow')
    e1.grid(row=1,column=2)
    b2 = tk.Button(my_w_child, text='Submit',
               command=lambda:my_str.set(e1.get()))
    b2.grid(row=2,column=2)
    b3 = tk.Button(my_w_child, text=' Close Child',
                   command=my_w_child.destroy)
    b3.grid(row=3,column=2)

my_w.mainloop()Passing data from Parent to Child
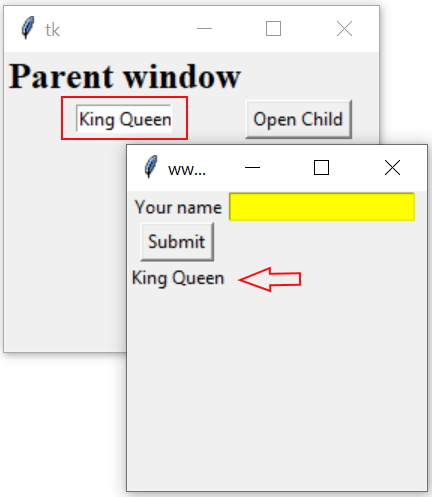
We will place one Entry widget ( e2 ) at Parent window and while opening the child window the data entered inside the Entry widget will be displayed in the child window ( l3 ).
We will keep the Label at child window and it will read the data entered at Entry box of parent window
l3=tk.Label(my_w_child,text=e2.get())
l3.grid(row=3,column=1)e2=tk.Entry(my_w,width=10)
e2.grid(row=2,column=1)import tkinter as tk
my_w = tk.Tk()
my_w.geometry("250x200+200+50")
l1_str=tk.StringVar()
font1=('Times',18,'bold')
l1=tk.Label(my_w,textvariable=l1_str,font=font1)
l1.grid(row=1,column=1)
l1_str.set('Parent window')
e2=tk.Entry(my_w,width=10)
e2.grid(row=2,column=1)
b1=tk.Button(my_w,text='Open Child',command=lambda:my_open())
b1.grid(row=2,column=2)
def my_open():
my_w_child=tk.Toplevel(my_w)
my_w_child.geometry("200x200")
my_w_child.title('www.plus2net.com')
my_str1=tk.StringVar()
l1=tk.Label(my_w_child,text='Your name')
l1.grid(row=1,column=1)
e1=tk.Entry(my_w_child, bg='yellow')
e1.grid(row=1,column=2)
b2=tk.Button(my_w_child,text='Submit',
command=lambda:l1_str.set(e1.get()))
b2.grid(row=2,column=1)
my_str1.set('Your Name')
l3=tk.Label(my_w_child,text=e2.get())
l3.grid(row=3,column=1)
my_w.mainloop() # Keep the window openPassing data from child window to Combobox in Parent

We can keep one Combobox in Parent window and pass user entered data from Child window entry widget as option to Combobox.
Here we are assigning value to StringVar() my_str which is connected to Combobox cb1 in Parent window
import tkinter as tk
from tkinter import *
from tkinter import ttk
my_w = tk.Tk()
my_w.geometry("400x300")  # Size of the window
my_w.title("www.plus2net.com")  # Adding a title

# Add one Combobox
my_str = tk.StringVar()
months=['google','MSN','Microsoft','Yahoo'] # options of Combobox
cb1 = ttk.Combobox(my_w, values=months,width=10,textvariable=my_str,font=22)
cb1.grid(row=1,column=1,padx=10,pady=20)

# add one button
b1 = tk.Button(my_w, text='Clik me to open new window',
               command=lambda:my_open())
b1.grid(row=2,column=2)

def my_open():
    my_w_child=Toplevel(my_w) # Child window
    my_w_child.geometry("250x200")  # Size of the window
    my_w_child.title("www.plus2net.com")

    l1 = tk.Label(my_w_child,  text='Your Name', width=10 )
    l1.grid(row=0,column=0,padx=5,pady=10)

    e1 = tk.Entry(my_w_child, width=20,bg='yellow',font=20)
    e1.grid(row=1,column=0,padx=5,pady=2)

    b2 = tk.Button(my_w_child, text='Submit',
            command=lambda:my_str.set(e1.get())
    b2.grid(row=2,column=0,padx=5)
    b3 = tk.Button(my_w_child, text=' Close Child',
                   command=my_w_child.destroy)
    b3.grid(row=3,column=0,padx=5)

my_w.mainloop()
Displaying Scale value in Parent window

The main window includes a label displaying a variable, and a button to open a child window. When clicked, the child window opens with a horizontal scale. Adjusting the scale updates the label in the parent window to reflect the scale's value. The child window also has a button to close it. This demonstrates how to create a child window and share data between parent and child windows using StringVar.
import tkinter as tk
from tkinter import *
my_w = tk.Tk()
my_w.geometry("200x200")  # Size of the window
my_w.title("www.plus2net.com")  # Adding a title
font1=['Arial',28,'normal'] # higher size font

# create one label
my_str = tk.StringVar(value=0) # Connected to Scale & Label in parent
l1 = tk.Label(my_w,  textvariable=my_str ,font=font1,bg='lightgreen')
l1.grid(row=1,column=2,padx=10,pady=20)

# add one button to open child window
b1 = tk.Button(my_w, text='Clik me to open new window',
               command=lambda:my_open())
b1.grid(row=2,column=2,padx=10,pady=20)

def my_open():
    my_w_child=Toplevel(my_w) # Child window
    my_w_child.geometry("200x150")  # Size of the window
    my_w_child.title("www.plus2net.com") # title of the window

    sc = tk.Scale(my_w_child, from_=0, to=100,
        orient='horizontal',variable=my_str,font=font1)
    sc.grid(row=2,column=1,padx=20)

    b3 = tk.Button(my_w_child, text=' Close Child',
                   command=my_w_child.destroy)
    b3.grid(row=3,column=1)

my_w.mainloop()
Schronizing Spinbox and Scale

This Tkinter Python script creates a parent window with a Spinbox and a Button. The Spinbox lets users input a value between 0 and 100, and a button opens a new child window. The child window contains a horizontal Scale widget, also ranging from 0 to 100, synchronized with the Spinbox using a shared StringVar. Adjusting either widget updates the other, and the child window also includes a button to close it.
import tkinter as tk
from tkinter import *
my_w = tk.Tk() # Parent window
my_w.geometry("300x150")  # Size of the window
my_w.title("www.plus2net.com")  # Adding a title

font1=['Arial',28,'normal'] # higher size font
sv = tk.StringVar() #string variable connecting both
sb = tk.Spinbox(my_w,textvariable=sv,
    width=4,from_=0,to=100, font=font1,bg='lightgreen')
sb.grid(row=1,column=1,padx=50,pady=10)

b1 = tk.Button(my_w, text='Clik me to open new window',
               command=lambda:my_open())
b1.grid(row=2,column=1,padx=10,pady=20)

def my_open():
    my_w_child=Toplevel(my_w) # Child window
    my_w_child.geometry("200x150")  # Size of the window
    my_w_child.title("www.plus2net.com") # title of the window

    sc = tk.Scale(my_w_child, from_=0, to=100,
        orient='horizontal',variable=sv,font=font1,bg='khaki')
    sc.grid(row=2,column=1,padx=20)

    b3 = tk.Button(my_w_child, text=' Close Child',
                   command=my_w_child.destroy)
    b3.grid(row=3,column=1)

my_w.mainloop()  # Keep the window open
Real-Time Messaging Between Parent and Child Windows
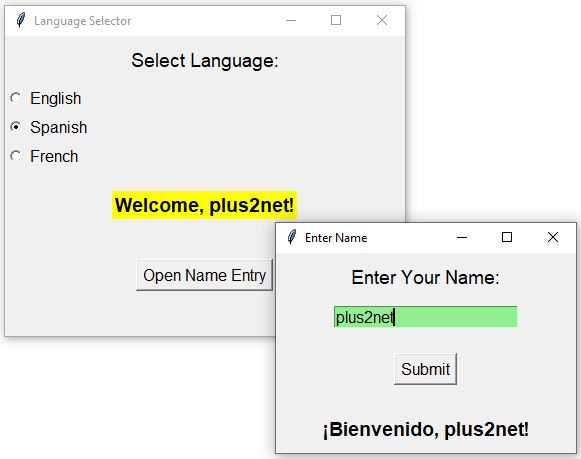
The parent window lets users select a language, and the greeting in the child window updates automatically based on this selection. The child window also captures a user’s name, which is then reflected in a welcome message in the parent window upon submission. StringVar enables this seamless communication, providing an intuitive approach for inter-window interactions in GUI applications.
import tkinter as tk

def update_child_message():
    if child_window and child_window.winfo_exists():
        language = language_var.get()
        name = name_var.get() or "User"
        message = {
            "English": f"Welcome, {name}!",
            "Spanish": f"¡Bienvenido, {name}!",
            "French": f"Bienvenue, {name}!"
        }
        welcome_message.set(message.get(language, "Welcome!"))

def open_child():
    global child_window
    parent_x = my_w.winfo_x()
    parent_y = my_w.winfo_y()
    parent_width = my_w.winfo_width()
    x_offset = parent_x + parent_width + 10
    y_offset = parent_y

    child_window = tk.Toplevel(my_w)
    child_window.title("Enter Name")
    child_window.geometry(f"300x200+{x_offset}+{y_offset}")

    tk.Label(child_window, text="Enter Your Name:",
             font=("Arial", 14)).pack(pady=10)
    tk.Entry(child_window, textvariable=name_var,
             bg='lightgreen',font=("Arial", 12)).pack(pady=5)
    tk.Button(child_window, text="Submit", font=("Arial", 12),
               command=display_in_parent).pack(pady=20)
    tk.Label(child_window, textvariable=welcome_message,
              font=("Arial", 14, "bold")).pack(pady=10)

def display_in_parent():
    name = name_var.get()
    if name:
        parent_message.set(f"Welcome, {name}!")

# Main (Parent) window setup
my_w = tk.Tk()
my_w.geometry("400x300")
my_w.title("Language Selector")

language_var = tk.StringVar(value="English")
name_var = tk.StringVar()
welcome_message = tk.StringVar()
parent_message = tk.StringVar()

tk.Label(my_w, text="Select Language:",
         font=("Arial", 14)).pack(pady=10)
languages = [("English", "English"),
             ("Spanish", "Spanish"), ("French", "French")]
for lang, val in languages:
    tk.Radiobutton(my_w, text=lang, variable=language_var,
                   value=val, command=update_child_message,
                   font=("Arial", 12)).pack(anchor="w")

tk.Label(my_w, textvariable=parent_message,bg='yellow',
         font=("Arial", 14, "bold")).pack(pady=20)
tk.Button(my_w, text="Open Name Entry",
          command=open_child, font=("Arial", 12)).pack(pady=20)

my_w.mainloop()
Two different widgets sharing data across the windows

This Tkinter application features a parent window with a button to open a child window containing a Combobox. Users can select a color from the Combobox, which dynamically changes the background color of the parent window. The child window also includes a Close button to exit. This setup demonstrates effective data sharing between parent and child windows using Combobox selections in Tkinter.
import tkinter as tk
from tkinter import ttk

def open_child():
    # Create the child window
    child_window = tk.Toplevel(my_w)
    child_window.title("Choose Background Color")
    child_window.geometry("300x150")

    tk.Label(child_window, text="Select a Color:",
             font=("Arial", 12)).pack(pady=10)

    # Combobox with color options
    colors = ["Red", "Green", "Blue", "Yellow", "Purple", "Orange"]
    color_combobox = ttk.Combobox(child_window,
                                  values=colors, font=("Arial", 12))
    color_combobox.pack(pady=5)

    # Update background color on selection
    color_combobox.bind("<<ComboboxSelected>>",
                         lambda event: change_bg_color(color_combobox.get()))

    # Close button
    tk.Button(child_window, text="Close",
              command=child_window.destroy, font=("Arial", 12)).pack(pady=10)

def change_bg_color(color):
    # Convert color names to lowercase to match Tkinter color names
    my_w.configure(bg=color.lower())

# Main (Parent) window setup
my_w = tk.Tk()
my_w.geometry("400x300")
my_w.title("Parent Window")

# Button to open the child window
tk.Button(my_w, text="Open Color Selector", command=open_child, font=("Arial", 12)).pack(pady=20)

my_w.mainloop()
Sharing Data Between Parent and Child Windows in #Python #Tkinter - #PythonGUI Tutorial
Managing a Single Instance of a Tkinter Toplevel Window
To ensure that clicking a button opens only one instance of a Toplevel window—even after it's closed—you should avoid using the destroy() method, as it permanently removes the window. Instead, use withdraw() to hide the window and deiconify() to show it again. This approach preserves the window's state and allows it to be reopened without creating a new instance.
import tkinter as tk

# Initialize the main application window
root = tk.Tk()
root.geometry("300x200")
root.title("Main Window")

# Initialize the Toplevel window as None
child_window = None

# Function to open or show the Toplevel window
def open_child():
    global child_window
    if child_window is None or not tk.Toplevel.winfo_exists(child_window):
        child_window = tk.Toplevel(root)
        child_window.geometry("200x100")
        child_window.title("Child Window")
        tk.Label(child_window, text="This is the child window.").pack(pady=10)
        tk.Button(child_window, text="Close", command=child_window.withdraw).pack()
    else:
        child_window.deiconify()

# Button to open the Toplevel window
tk.Button(root, text="Open Child Window", command=open_child).pack(pady=20)

root.mainloop()
- Global Variable: child_window is used to keep track of the Toplevel window instance.
- Check Existence: winfo_exists() ensures the window hasn't been destroyed before attempting to show it.
- Hide Instead of Destroy: withdraw() hides the window, allowing it to be shown again with deiconify().
- Single Instance: This setup prevents multiple instances of the Toplevel window from being created.
Toplevel Showing Message before Closing of Child window

Subhendu Mohapatra
Author
🎥 Join me live on YouTubePassionate about coding and teaching, I publish practical tutorials on PHP, Python, JavaScript, SQL, and web development. My goal is to make learning simple, engaging, and project‑oriented with real examples and source code.
Subscribe to our YouTube Channel here
This article is written by plus2net.com team.
https://www.plus2net.com

 Python Video Tutorials