Inserting Data to Excel workbook
There are three parts in this script.
- Part 1: Create the GUI window using tkinter.
- Part 2: Validate the user entered data.
- Part 3: Add data to Excel file.
The same script can be used with SQLite or MySQL database. The GUI and data validation part are same.
tutorial on inserting data to SQLite using Tkinter
Tutorial on inserting data to MySQL using Tkinter
Tutorial on inserting data to webpage & MySQL using Tkinter
tutorial on inserting data to SQLite using Tkinter
Tutorial on inserting data to MySQL using Tkinter
Tutorial on inserting data to webpage & MySQL using Tkinter
Data input to Excel workbook from Tkinter window by using openpyxl
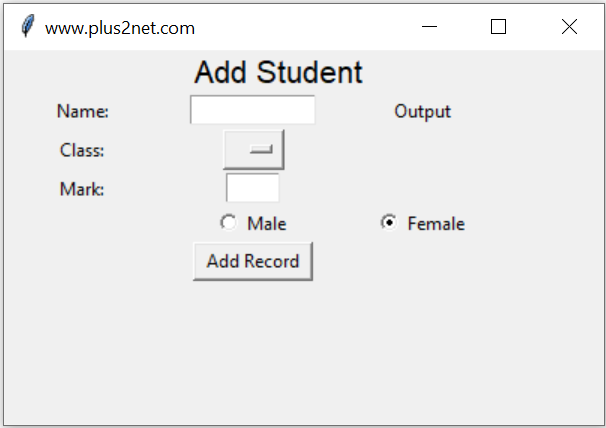
Part 1 : Tkinter window to accept user inputs
User will enter four input data using our Tkinter window. Main components are hereName : String of name through a text box t1
Class : Select one option from the dropdown OptionMenu
Mark : Integer value ( number ) through text box t3
gender : Selection through a pair of radio buttons ( Male , Female or other )
Submit : Button to trigger a click event to handle all the inputs.
Managing Excel file by openpyxl
We will use openpyxl to manage Excel file.Some line of code are commented and description is added to explain the reasons. If you want to use one new excel file then include the proper lines.
#from openpyxl import load_workbook
path = "E:\data\student7.xlsx"  # existing file to work ( Not a new file. )
#wb = load_workbook(filename=path, read_only=False)from openpyxl import Workbook
wb = Workbook() # create workbook
ws = wb.active # work on default worksheet
#ws = wb.create_sheet("my_student") # create a worksheet l1 = [my_name, my_class, my_mark, my_gender] # List to add
ws.append(l1) # data added at the end
wb.save(path)Layout and adding Widgets
There are Labels to show message about the input data ( l1,l2,l3 ) and one final Label ( l5 ) to display the output or return id of the record after inserting the data in table. One OptionMenu ( opt1) is used for selection of class.l0 = tk.Label(my_w, text="Add Student", font=16, width=30, anchor="c")
l0.grid(row=1, column=1, columnspan=4)
l1 = tk.Label(my_w, text="Name: ", width=10, anchor="c")
l1.grid(row=3, column=1)
# add one text box
t1 = tk.Text(my_w, height=1, width=10, bg="white")
t1.grid(row=3, column=2)
l2 = tk.Label(my_w, text="Class: ", width=10)
l2.grid(row=4, column=1)
# add list box for selection of class
options = StringVar(my_w)
options.set("") # default value
opt1 = OptionMenu(my_w, options, "Three", "Four", "Five")
opt1.grid(row=4, column=2, pady=10)
l3 = tk.Label(my_w, text="Mark: ", width=10)
l3.grid(row=5, column=1)
# add one text box
t3 = tk.Text(my_w, height=1, width=4, bg="white")
t3.grid(row=5, column=2)
radio_v = tk.StringVar()
radio_v.set("Female")
r1 = tk.Radiobutton(my_w, text="Male", variable=radio_v, value="Male")
r1.grid(row=6, column=1, pady=10)
r2 = tk.Radiobutton(my_w, text="Female", variable=radio_v, value="Female")
r2.grid(row=6, column=2)
r3 = tk.Radiobutton(my_w, text="Others", variable=radio_v, value="Others")
r3.grid(row=6, column=3)
b1 = tk.Button(my_w, text="Add Record", width=10,
command=lambda: add_data())
b1.grid(row=7, column=2)
my_str = tk.StringVar()
l5 = tk.Label(my_w, textvariable=my_str, width=10)
l5.grid(row=3, column=3)
my_str.set("Output")b1 = tk.Button(my_w, text='Add Record', width=10,
command=lambda: add_data())
b1.grid(row=7,column=2)def add_data():
flag_validation=True # set the flag
my_name=t1.get("1.0",END) # read name
my_class=options.get() # read class
my_mark=t3.get("1.0",END) # read mark
my_gender=radio_v.get() # read gender
# length of my_name , my_class and my_gender more than 2
if(len(my_name) < 2 or len(my_class)<2 or len(my_gender) < 2 ):
flag_validation=False
try:
val = int(my_mark) # checking mark as integer
except:
flag_validation=False
if(flag_validation):
# Part 3 Insert to Excel file
else:
l5.config(fg='red') # foreground color
l5.config(bg='yellow') # background color
my_str.set("check inputs.")
In this code we first set one flag validation ( flag_validation ) to True, if any where the validation of the inputs fails then we will change this status of validation to False. ( this is part of the above code )
if(len(my_name) < 2 or len(my_class)<2 or len(my_gender) < 2 ):
flag_validation=False
try:
val = int(my_mark) # checking mark as integer
except:
flag_validation=False if flag_validation:
#my_str.set("Adding data...")
l1 = [my_name, my_class, my_mark, my_gender]
ws.append(l1)
wb.save(path)
try:
print(" Data to excel ")
except Exception as e:
print(e)Adding incremental row number
Here there is no auto incremented id column like we used in our MySQL database. We can create one incremental number and use that to store in our excel file.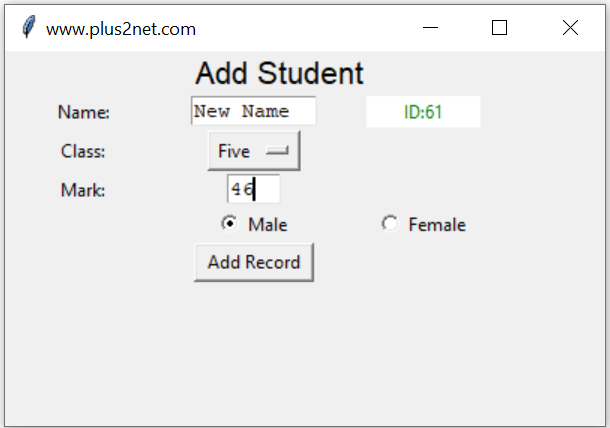
We have used the Label l5 to display the id of the record added. This display of Id ensures that the record is inserted successfully. By using ws.max_row we can get the last row number.
if flag_validation:
i = ws.max_row +1 # Next row number
#print(str(ws.max_row) + ", i value :" + str(i))
l1 = [i, my_name, my_class, my_mark, my_gender]
ws.append(l1)
wb.save(path)Adding time delay
We want to show the ID ( after adding the record ) or the error message for some time ( say 3 seconds ) and it should vanish after the time delay.l5.after(3000,lambda:l5.config(fg='white',bg='white',text=''))One if condition is used to prevent the first row number as 2
Remove the user entered text after adding of records. Code to add data row including the reset , time dealy, and the getting the last row number is here.
if flag_validation:
try:
#i=int(ws.cell(ws.max_row, 1).value or 0)+1
i=ws.max_row # read the last row number
if i!=1:
i=i+1
#print(str(ws.max_row) + ", i value :" + str(i))
l1 = [i, my_name, my_class, my_mark, my_gender] # row of data to add
ws.append(l1)
wb.save(path)
t1.delete("1.0", END) # reset the text entry box
t3.delete("1.0", END) # reset the text entry box
l5.grid()
l5.config(fg="green") # foreground color
l5.config(bg="white") # background color
# my_str.set("ID:" + str(id.lastrowid)) # this is for MySQL only
my_str.set("ID: " + str(ws.max_row))
l5.after(3000, lambda: l5.config(fg="white", bg="white", text=""))import tkinter as tk
from tkinter import *
#from openpyxl import load_workbook
path = "E:\data\student7.xlsx" # existing file to work ( Not a new file. )
#wb = load_workbook(filename=path, read_only=False)
from openpyxl import Workbook
wb = Workbook()  # create workbook

ws = wb.active  # work on default worksheet
#ws = wb.create_sheet("my_student")  # create a worksheet
my_w = tk.Tk()
my_w.geometry("400x250")
my_w.title("www.plus2net.com")
# add one Label
l0 = tk.Label(my_w, text="Add Student", font=16, width=30, anchor="c")
l0.grid(row=1, column=1, columnspan=4)

l1 = tk.Label(my_w, text="Name: ", width=10, anchor="c")
l1.grid(row=3, column=1)

# add one text box
t1 = tk.Text(my_w, height=1, width=10, bg="white")
t1.grid(row=3, column=2)

l2 = tk.Label(my_w, text="Class: ", width=10)
l2.grid(row=4, column=1)

# add list box for selection of class
options = StringVar(my_w)
options.set("")  # default value

opt1 = OptionMenu(my_w, options, "Three", "Four", "Five")
opt1.grid(row=4, column=2, pady=10)

l3 = tk.Label(my_w, text="Mark: ", width=10)
l3.grid(row=5, column=1)

# add one text box
t3 = tk.Text(my_w, height=1, width=4, bg="white")
t3.grid(row=5, column=2)

radio_v = tk.StringVar()
radio_v.set("Female")
r1 = tk.Radiobutton(my_w, text="Male", variable=radio_v, value="Male")
r1.grid(row=6, column=1, pady=10)

r2 = tk.Radiobutton(my_w, text="Female", variable=radio_v, value="Female")
r2.grid(row=6, column=2)

r3 = tk.Radiobutton(my_w, text="Others", variable=radio_v, value="Others")
r3.grid(row=6, column=3)

b1 = tk.Button(my_w, text="Add Record", width=10,
	command=lambda: add_data())
b1.grid(row=7, column=2)
my_str = tk.StringVar()
l5 = tk.Label(my_w, textvariable=my_str, width=10)
l5.grid(row=3, column=3)
my_str.set("Output")
def add_data():
flag_validation = True # set the flag
my_name = t1.get("1.0", END) # read name
my_class = options.get() # read class
my_mark = t3.get("1.0", END) # read mark
my_gender = radio_v.get() # read gender
# length of my_name , my_class and my_gender more than 2
if len(my_name) < 2 or len(my_class) < 2 or len(my_gender) < 2:
flag_validation = False
try:
val = int(my_mark) # checking mark as integer
except:
flag_validation = False
if flag_validation:
        try:
            #i=int(ws.cell(ws.max_row, 1).value or 0)+1
            i=ws.max_row # read the last row number
            if i!=1:
                i=i+1
            #print(str(ws.max_row) + ", i value :"  + str(i))
            l1 = [i, my_name, my_class, my_mark, my_gender] # row of data to add
            ws.append(l1)

            wb.save(path)
            t1.delete("1.0", END)  # reset the text entry box
            t3.delete("1.0", END)  # reset the text entry box
            l5.grid()
            l5.config(fg="green")  # foreground color
            l5.config(bg="white")  # background color
            # my_str.set("ID:" + str(id.lastrowid)) # this is for MySQL only
            my_str.set("ID: " + str(ws.max_row))
            l5.after(3000, lambda: l5.config(fg="white", bg="white", text=""))
except Exception as e:
print(e)
else:
l5.grid()
l5.config(fg="red") # foreground color
l5.config(bg="yellow") # background color
my_str.set("check inputs.")
l5.after(3000, lambda: l5.config(fg="white", bg="white", text=""))
my_w.mainloop()We can display 10 records from student table without any user input.
Displaying records from student table
Search and display record based on input ID
Detail sqlalchemy Database Error message from MySQL

Subhendu Mohapatra
Author
🎥 Join me live on YouTubePassionate about coding and teaching, I publish practical tutorials on PHP, Python, JavaScript, SQL, and web development. My goal is to make learning simple, engaging, and project‑oriented with real examples and source code.
Subscribe to our YouTube Channel here
This article is written by plus2net.com team.
https://www.plus2net.com

 Python Video Tutorials