rowconfigure() & columnconfigure()
We can manage these sizes by using relative weighting using rowconfigure() and columnconfigure().
root.columnconfigure(N,Weight)
root.rowconfigure(N,Weight)N: row or column numberWeight : Relative scale for distributing extra space. Default value is 0 ( Not grow if there's extra space )
Tkinter rowconfigure & columnconfigure to assign relative weight to rows and columns width & height
Here is an example without using rowconfigure() and columnconfigure()
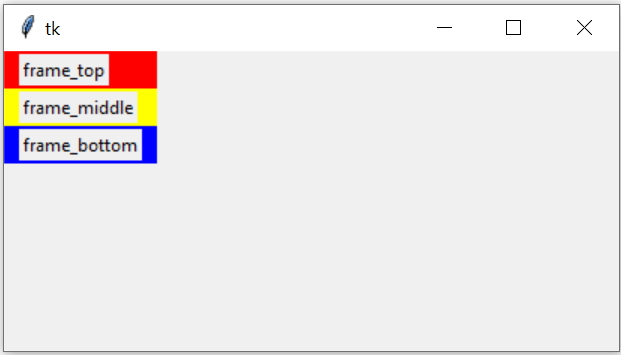
Here we used Frame as containers to hold group of widgets.
import tkinter as tk
from tkinter import *
my_w = tk.Tk()
my_w.geometry("410x200")  # Size of the window

#my_w.columnconfigure(0,weight=1)
#my_w.rowconfigure(0, weight=1)
#my_w.rowconfigure(1, weight=1) # change weight to 4
#my_w.rowconfigure(2, weight=1)

frame_top=tk.Frame(my_w,bg='red')
frame_middle=tk.Frame(my_w,bg='yellow')
frame_bottom=tk.Frame(my_w,bg='blue')
#placing in grid
frame_top.grid(row=0,column=0,sticky='WENS')
frame_middle.grid(row=1,column=0,sticky='WENS')
frame_bottom.grid(row=2,column=0,sticky='WENS')
#adding labels to frame
l1=tk.Label(frame_top,text='frame_top')
l1.grid(row=0,column=0,padx=10,pady=2)

l2=tk.Label(frame_middle,text='frame_middle')
l2.grid(row=0,column=0,padx=10,pady=2)

l3=tk.Label(frame_bottom,text='frame_bottom')
l3.grid(row=0,column=0,padx=10,pady=2)
my_w.mainloop() # Keep the window openmy_w.columnconfigure(0,weight=1) # column weight 100%
my_w.rowconfigure(0, weight=1)
my_w.rowconfigure(1, weight=1) # change weight to 4
my_w.rowconfigure(2, weight=1)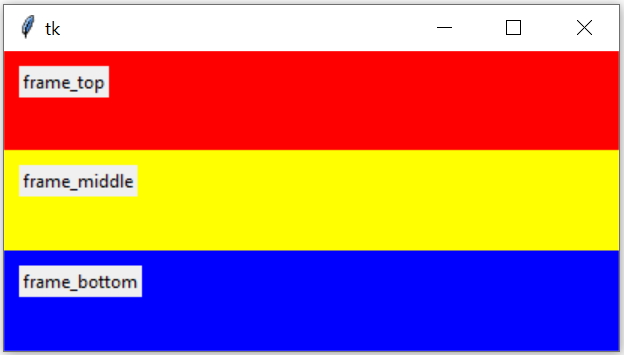
Here all three rows are equally distributed as their weight=1, so each one takes 33% of total space available. Now let us change the weight.
my_w.rowconfigure(0, weight=1) # 10% of total height
my_w.rowconfigure(1, weight=8) # 80% of total height
my_w.rowconfigure(2, weight=1) # 10% of total height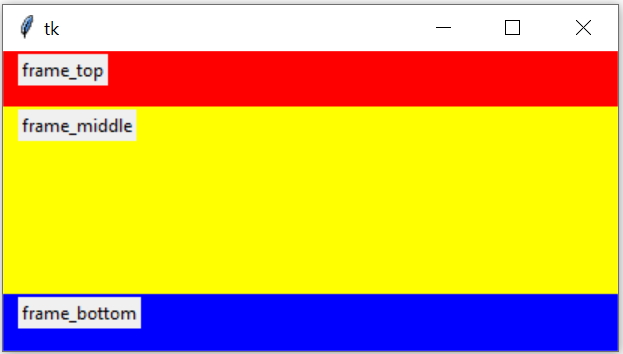
columnconfigure()
We can assign weight to different columns by using columnconfigure(). Here let us add one left column ( frame_left )import tkinter as tk
from tkinter import *
my_w = tk.Tk()
my_w.geometry("410x200") # Size of the window
my_w.columnconfigure(0,weight=1)
my_w.columnconfigure(1,weight=1)
my_w.rowconfigure(0, weight=1)
my_w.rowconfigure(1, weight=8) # change weight to 4
my_w.rowconfigure(2, weight=1)
frame_top=tk.Frame(my_w,bg='red')
frame_middle=tk.Frame(my_w,bg='yellow')
frame_bottom=tk.Frame(my_w,bg='blue')
frame_left=tk.Frame(my_w,bg='lightgreen')
#placing in grid
frame_top.grid(row=0,column=1,sticky='WENS')
frame_middle.grid(row=1,column=1,sticky='WENS')
frame_bottom.grid(row=2,column=1,sticky='WENS')
frame_left.grid(row=0,column=0, rowspan=3,sticky='WENS')
my_w.mainloop() # Keep the window open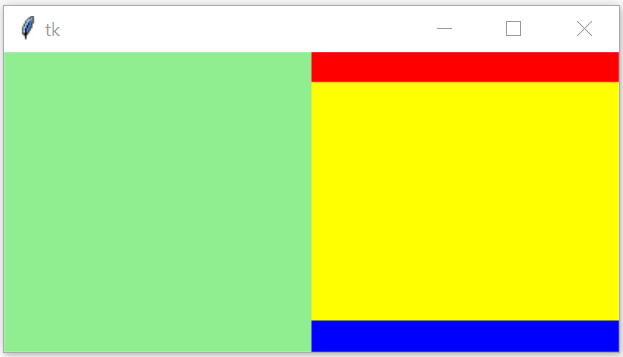
Let us add one right side column ( frame_right ) with different weight.
import tkinter as tk
from tkinter import *
my_w = tk.Tk()
my_w.geometry("410x200")  # Size of the window

my_w.columnconfigure(0,weight=1)
my_w.columnconfigure(1,weight=3)
my_w.columnconfigure(2,weight=1)

my_w.rowconfigure(0, weight=1)
my_w.rowconfigure(1, weight=8) # change weight to 4
my_w.rowconfigure(2, weight=1)

frame_top=tk.Frame(my_w,bg='red')
frame_middle=tk.Frame(my_w,bg='yellow')
frame_bottom=tk.Frame(my_w,bg='blue')
frame_left=tk.Frame(my_w,bg='lightgreen')
frame_right=tk.Frame(my_w,bg='lightblue')
#placing in grid
frame_top.grid(row=0,column=1,sticky='WENS')
frame_middle.grid(row=1,column=1,sticky='WENS')
frame_bottom.grid(row=2,column=1,sticky='WENS')
frame_left.grid(row=0,column=0,rowspan=3,sticky='WENS')
frame_right.grid(row=0,column=2,rowspan=3,sticky='WENS')

my_w.mainloop()  # Keep the window open
using rowconfigure columnfigure inside frame
We can use rowconfigure() columnfigure() outside the main window. Here we will use inside our frame. We kept three Labels inside top frame.import tkinter as tk
from tkinter import *
my_w = tk.Tk()
my_w.geometry("410x200") # Size of the window
my_w.columnconfigure(0,weight=1)
my_w.columnconfigure(1,weight=3)
my_w.columnconfigure(2,weight=1)
my_w.rowconfigure(0, weight=1)
my_w.rowconfigure(1, weight=8) # change weight to 4
my_w.rowconfigure(2, weight=1)
frame_top=tk.Frame(my_w,bg='red')
frame_middle=tk.Frame(my_w,bg='yellow')
frame_bottom=tk.Frame(my_w,bg='blue')
frame_left=tk.Frame(my_w,bg='lightgreen')
frame_right=tk.Frame(my_w,bg='lightblue')
#placing in grid
frame_top.grid(row=0,column=1,sticky='WENS')
frame_middle.grid(row=1,column=1,sticky='WENS')
frame_bottom.grid(row=2,column=1,sticky='WENS')
frame_left.grid(row=0,column=0,rowspan=3,sticky='WENS')
frame_right.grid(row=0,column=2,rowspan=3,sticky='WENS')
frame_top.columnconfigure(0,weight=1)
frame_top.columnconfigure(1,weight=3)
frame_top.columnconfigure(2,weight=1)
l1=tk.Label(frame_top,text='left')
l1.grid(row=0,column=0,padx=5,pady=5)
l2=tk.Label(frame_top,text='center')
l2.grid(row=0,column=1,padx=5)
l3=tk.Label(frame_top,text='Right')
l3.grid(row=0,column=2,padx=5)
my_w.mainloop() # Keep the window open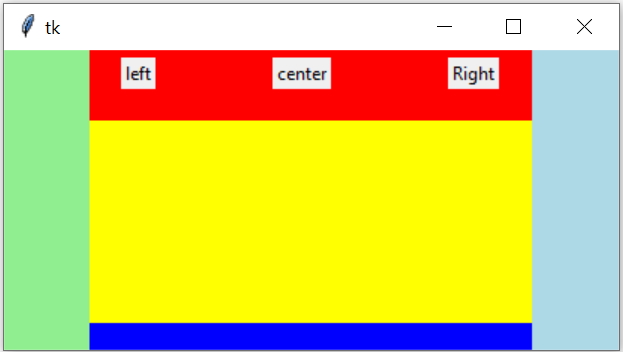
Expanding & contracting widgets along with the main window
expand & contract of widgets on change in geometry of the parent Tkinter window using rowconfigure
Zoom In and Zoom out widgets along with the window can be achieved by using the rowconfigure() and columnconfigure(). Here we are assigning weight to each row and columns to match the expansion and contraction of the main or parent window.
While placing the widgets in the grid we have to use the sticky option to expand the widget in all four directions
sticky='nsew' to occupy the available space.
import tkinter as tk

my_w = tk.Tk() # parent window
my_w.geometry('200x150')  # Size of the window, width & height
my_w.title("www.plus2net.com")  # Adding a title

b1=tk.Button(my_w,text='Button 1',bg='lightpink',font=14)
b1.grid(row=0,column=0,padx=10,pady=10,sticky='nsew')

b2=tk.Button(my_w,text='Button 2',bg='yellow',font=14)
b2.grid(row=1,column=0,padx=10,pady=10,sticky='nsew')

my_w.rowconfigure(0,weight=1) # first row with weight
my_w.rowconfigure(1,weight=1) # second row with weight
my_w.columnconfigure(0,weight=1) # first column with weight

my_w.mainloop()  # Keep the window open
Using minsize in Tkinter Grid Layout

The minsize option in Tkinter allow us to control the minimum sizes of rows and columns in a grid layout. These options help ensure that the layout remains usable and organized when the window is resized. Here’s how to use them:
import tkinter as tk

# Create the main window
root = tk.Tk()
root.geometry("400x300")

# Configure rows with minsize and maxsize
root.rowconfigure(0, weight=1, minsize=50)  # Row 0 with minimum height 50
root.rowconfigure(1, weight=1, minsize=50)  # Row 1 with min height 50

# Configure columns with minsize
root.columnconfigure(0, weight=1, minsize=100)  # Column 0 with minimum width 100
root.columnconfigure(1, weight=1, minsize=150)  # Column 1 with minimum width 150

# Add widgets to the grid
label1 = tk.Label(root, text="Row 0, Column 0", bg="lightblue")
label1.grid(row=0, column=0, sticky="nsew", padx=5, pady=5)

label2 = tk.Label(root, text="Row 1, Column 0", bg="lightgreen")
label2.grid(row=1, column=0, sticky="nsew", padx=5, pady=5)

label3 = tk.Label(root, text="Row 0, Column 1", bg="lightyellow")
label3.grid(row=0, column=1, sticky="nsew", padx=5, pady=5)

label4 = tk.Label(root, text="Row 1, Column 1", bg="lightpink")
label4.grid(row=1, column=1, sticky="nsew", padx=5, pady=5)

# Run the main loop
root.mainloop()
Explanation
- minsize ensures that rows or columns do not shrink below a specified size, even when the window is resized.
- In this example, Row 0 and Row 1 have a minimum height of 50 pixels.
- Columns 0 and 1 have minimum widths of 100 and 150 pixels, respectively.
Use Cases
- Ensuring Layout Consistency: Use `minsize` to prevent important UI components from becoming too small and unusable.
Zoom In & Zoom out Text
Grid Layout Pack Layout place layout Frame

Subhendu Mohapatra
Author
🎥 Join me live on YouTubePassionate about coding and teaching, I publish practical tutorials on PHP, Python, JavaScript, SQL, and web development. My goal is to make learning simple, engaging, and project‑oriented with real examples and source code.
Subscribe to our YouTube Channel here
This article is written by plus2net.com team.
https://www.plus2net.com

20-01-2025 | |
| You should become the global tkinter teacher. Thanks for everything. | |
 Python Video Tutorials