Tkinter Scrollable Frame: Adding Dynamic Widgets with Grid Layout
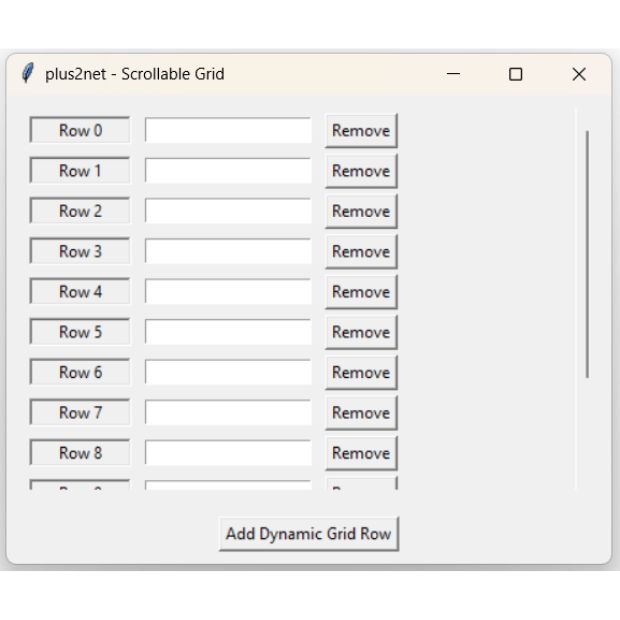
Key Components of the Dynamic Grid
- The Canvas Viewport: Since a
tk.Framecannot scroll on its own, we use atk.Canvasas a "window" or viewport. The frame is placed inside this canvas. - The <Configure> Event: This is the most critical part. We bind the
scrollable_frameto a configuration event. Every time a new row is added or removed, this event triggers and updates thescrollregionof the canvas so the scrollbar knows exactly how long the content is. - create_window(): Unlike standard layouts, we use
canvas.create_window()to embed the frame. This allows the canvas to treat the entire frame as a single scrollable object. - Dynamic Row Management:
- Adding Rows: We use a global
row_countto place new widgets into the next availablegrid()index. - Removing Rows: By passing the specific widget references into a
lambdafunction, we can destroy only the widgets belonging to that specific row.
- Adding Rows: We use a global
import tkinter as tk
from tkinter import ttk

def add_row():
    global row_count

    # Add widgets using grid layout
    lbl = tk.Label(scrollable_frame, text=f"Row {row_count}", width=10, relief="sunken")
    lbl.grid(row=row_count, column=0, padx=5, pady=2)

    ent = tk.Entry(scrollable_frame)
    ent.grid(row=row_count, column=1, padx=5, pady=2)

    # Delete button to remove specific row
    btn_del = tk.Button(scrollable_frame, text="Remove",
                         command=lambda r=row_count: remove_row(lbl, ent, btn_del))
    btn_del.grid(row=row_count, column=2, padx=5, pady=2)

    row_count += 1

def remove_row(*widgets):
    for w in widgets:
        w.destroy()

root = tk.Tk()
root.title("plus2net - Scrollable Grid")
root.geometry("450x350")
row_count = 0

# Main container for Canvas and Scrollbar
main_frame = tk.Frame(root)
main_frame.pack(fill=tk.BOTH, expand=True, padx=10, pady=10)

canvas = tk.Canvas(main_frame)
canvas.pack(side=tk.LEFT, fill=tk.BOTH, expand=True)

sb = ttk.Scrollbar(main_frame, orient=tk.VERTICAL, command=canvas.yview)
sb.pack(side=tk.RIGHT, fill=tk.Y)

canvas.configure(yscrollcommand=sb.set)

# Internal frame that holds the actual grid
scrollable_frame = tk.Frame(canvas)

# Bind the configuration event to update the scroll region
scrollable_frame.bind(
    "<Configure>",
    lambda e: canvas.configure(scrollregion=canvas.bbox("all"))
)

canvas.create_window((0, 0), window=scrollable_frame, anchor="nw")

# Bottom button to add rows
btn_add = tk.Button(root, text="Add Dynamic Grid Row", command=add_row)
btn_add.pack(pady=10)

root.mainloop()
Key Components of the Dynamic Grid
- The Canvas Viewport: Since a
tk.Framecannot scroll on its own, we use atk.Canvasas a "window" or viewport. The frame is placed inside this canvas. - The <Configure> Event: This is the most critical part. We bind the
scrollable_frameto a configuration event. Every time a new row is added or removed, this event triggers and updates thescrollregionof the canvas so the scrollbar knows exactly how long the content is. - create_window(): Unlike standard layouts, we use
canvas.create_window()to embed the frame. This allows the canvas to treat the entire frame as a single scrollable object. - Dynamic Row Management:
- Adding Rows: We use a global
row_countto place new widgets into the next availablegrid()index. - Removing Rows: By passing the specific widget references into a
lambdafunction, we can destroy only the widgets belonging to that specific row.
- Adding Rows: We use a global
# 1. Define the handler function
def _on_mousewheel(event):
    # Scroll the canvas based on wheel movement
    canvas.yview_scroll(int(-1*(event.delta/120)), "units")

# 2. Bind to all widgets within the application
# (Ensures scrolling works even when hovering over Buttons/Entries)
canvas.bind_all("<MouseWheel>", _on_mousewheel)

# 3. Linux Support (Optional)
canvas.bind_all("<Button-4>", lambda e: canvas.yview_scroll(-1, "units"))
canvas.bind_all("<Button-5>", lambda e: canvas.yview_scroll(1, "units"))
Summary: Best Practices for Scrollable Layouts
- Structure: Always use the Scrollbar → Canvas → Internal Frame hierarchy. The Scrollbar controls the Canvas, and the Canvas hosts the Frame.
- Grid for Alignment: Use the
grid()manager inside the internal frame. It is superior topack()for creating forms with aligned columns (like ID, Name, and Action buttons). - Clean Removal: When destroying widgets dynamically, ensure you use
lambdato capture the current references. This prevents the "last-row-only" bug common in Tkinter loops. - User Experience: Never forget to implement
bind_allfor the Mouse Wheel. Users expect to scroll without manually clicking the scrollbar.
5. Conclusion
Building Professional Tkinter Interfaces
Creating a scrollable frame is a milestone in Tkinter development. It transforms a simple, static GUI into a functional application capable of handling real-world data, such as database records, shopping carts, or settings panels. By combining Canvas scrolling with dynamic widget management, you overcome one of Tkinter's biggest native limitations.
The key to a smooth interface lies in the <Configure> event binding, which ensures your scrollbar stays perfectly in sync with your content size. Whether you are building a tool for data entry or a complex dashboard, the patterns covered in this tutorial provide a solid, SEO-friendly foundation for your Python projects.
Take it to the next level!
Now that you've mastered the scrollable frame, learn how to add Dynamic Search & Real-time Filtering to your data rows. View the Search & Filter Tutorial →
ProgressBar showing number of chars entered in a Text widget
From large CSV file to SQLite data transfer with Progress bar showing the status

Subhendu Mohapatra
Author
🎥 Join me live on YouTubePassionate about coding and teaching, I publish practical tutorials on PHP, Python, JavaScript, SQL, and web development. My goal is to make learning simple, engaging, and project‑oriented with real examples and source code.
Subscribe to our YouTube Channel here

 Python Video Tutorials