Create & Apply Custom Theme in ttkbootstrap for Tkinter
Tutorial Breakdown:
- Part I: Creating a custom Theme.
- Part II: TTK Creator: Customize Your Tkinter Themes
- Part III: Using a Database to Store Theme Settings Instead of JSON.
- Interactive Theme Switching: Toggling Dark and Light Modes
Introduction
ttkbootstrap is a powerful library that enhances Tkinter by providing modern UI themes. This tutorial demonstrates how to create and apply a custom theme in ttkbootstrap, enabling you to modify styles according to your application's requirements.
Creating a Custom Theme 🔝
To define a custom theme, we use a JSON file containing color, font, and layout settings. Here is a sample JSON file, apply it, and use it to style widgets like Labels and Buttons.
{
    "name": "mytheme",
    "type": "dark",
    "colors": {
        "primary": "#1f3d7a",
        "secondary": "#00aaff",
        "success": "#28a745",
        "info": "#FF6103",
        "warning": "#ffc107",
        "danger": "#dc3545",
        "light": "#f8f9fa",
        "dark": "#343a40",
        "bg": "#121212",
        "fg": "#e0e0e0",
        "selectbg": "#444444",
        "selectfg": "#ffffff"
    }
}- name: Specifies the theme name.
- colors: Defines the primary, secondary, border, and other colors.
- fonts: Sets default and heading font styles.
- layout: Defines the UI layout type.
📥 1. Importing Required Libraries
# Import required libraries
import ttkbootstrap as ttk
from ttkbootstrap.constants import *
from ttkbootstrap.style import ThemeDefinition
import json  # Load theme from a JSON file
📂 2. Loading and Validating the Custom Theme
# Load the custom theme JSON file
theme_path = "E:\\testing\\my_custom_theme.json"  # Update with your file path

with open(theme_path, "r") as f:
    custom_theme_data = json.load(f)  # Load JSON as a dictionary

# Required theme properties
required_keys = ["name", "colors", "fonts", "layout"]
filtered_theme_data = {key: custom_theme_data[key] for key in required_keys if key in custom_theme_data}

# Ensure essential color properties exist
required_colors = ["border", "inputfg", "inputbg", "active"]
for color in required_colors:
    if color not in filtered_theme_data["colors"]:
        filtered_theme_data["colors"][color] = "#000000"  # Default black if missing
🎨 3. Registering and Applying the Custom Theme
# Convert dictionary to ThemeDefinition object
custom_theme = ThemeDefinition(**filtered_theme_data)

# Initialize ttkbootstrap style
style = ttk.Style()
style.register_theme(custom_theme)  # Register theme
style.theme_use(custom_theme.name)  # Apply theme
🖥️ 4. Creating the GUI with Custom Theme
# Create main window
my_w = ttk.Window()
my_w.geometry("500x300")  # Width and height
my_w.title("www.plus2net.com : ttkbootstrap custom theme")

# Label with custom theme
label = ttk.Label(my_w, text="Hello, Custom Theme!", bootstyle="info")
label.pack(pady=20)

# Button with theme styling
button = ttk.Button(my_w, text="Click Me", bootstyle="primary",
    command=lambda: label.config(text="Button Clicked!"))
button.pack()

# Run the application
my_w.mainloop()
Simple custom theme: Label with button

The custom theme JSON file is loaded and stored as a dictionary. Only essential theme properties (name, colors, fonts, and layout) are extracted. Missing required color fields (border, inputfg, inputbg, active) are assigned a default black color to ensure a valid theme definition.
The filtered theme data is converted into a ThemeDefinition object. A ttk.Window is then created with a specified size and title. A Style object is initialized to register and apply the custom theme to the application
import ttkbootstrap as ttk
from ttkbootstrap.constants import *
from ttkbootstrap.style import ThemeDefinition
import json

# Load the custom theme JSON file
theme_path = "E:\\testing\\my_custom_theme.json"  # Update the correct file path
with open(theme_path, "r") as f:
    custom_theme_data = json.load(f)  # Load JSON data into a dictionary

# Extract and validate required theme properties
required_keys = ["name", "colors", "fonts", "layout"]
filtered_theme_data = {key: custom_theme_data[key] for key in required_keys if key in custom_theme_data}

# Ensure the 'colors' dictionary has all required fields for a valid theme
required_colors = ["border", "inputfg", "inputbg", "active"]
for color in required_colors:
    if color not in filtered_theme_data["colors"]:
        filtered_theme_data["colors"][color] = "#000000"  # Default to black if missing

# Convert the dictionary into a ThemeDefinition object
custom_theme = ThemeDefinition(**filtered_theme_data)

# Create the main window with the custom theme
my_w = ttk.Window()
my_w.geometry("500x300")  # Set window dimensions (width x height)
my_w.title("www.plus2net.com : ttkbootstrap Custom Theme")  # Set window title

# Initialize the style, register, and apply the custom theme
style = ttk.Style()
style.register_theme(custom_theme)  # Register the theme
style.theme_use(custom_theme.name)  # Apply the custom theme

# Create a Label Widget with custom theme styling
label = ttk.Label(my_w, text="Hello, Custom Theme!", bootstyle="info")
label.pack(pady=20)  # Add vertical spacing

# Create a Button Widget styled with the custom theme
button = ttk.Button(
    my_w, text="Click Me", bootstyle="primary",
    command=lambda: label.config(text="Button Clicked!")  # Change label text on click
)
button.pack()

# Run the main event loop
my_w.mainloop()
Enhancing the Custom Theme with Interactive Widgets
In this section, we extend our custom ttkbootstrap theme by integrating interactive widgets such as a Meter, Floodgauge, and Button. This demonstrates how the theme applies to different UI components while showcasing real-time interaction using linked widgets. The Meter and Floodgauge dynamically update together, and a button starts an animated gauge effect. 🚀
import ttkbootstrap as ttk
from ttkbootstrap.constants import *
from ttkbootstrap.style import ThemeDefinition
import json

# Load the custom theme JSON file
theme_path = "F:\\testing\\my_custom_theme.json" # update the path
with open(theme_path, "r") as f:
    custom_theme_data = json.load(f)  # Load JSON as a dictionary

# Extract and validate required theme properties
required_keys = ["name", "colors", "fonts", "layout"]
filtered_theme_data = {key: custom_theme_data[key] for key in required_keys if key in custom_theme_data}

# Ensure the 'colors' dictionary has all required fields
required_colors = ["border", "inputfg", "inputbg", "active"]
for color in required_colors:
    if color not in filtered_theme_data["colors"]:
        filtered_theme_data["colors"][color] = "#000000"  # Default black if missing

# Convert the dictionary to a ThemeDefinition object
custom_theme = ThemeDefinition(**filtered_theme_data)

# Create the main window
my_w = ttk.Window()
my_w.geometry("500x300")  # Width and height
my_w.title("www.plus2net.com : ttkbootstrap custom theme")  # Adding a title
# Register and apply the custom theme
style = ttk.Style()
style.register_theme(custom_theme)
style.theme_use(custom_theme.name)

# Configure grid layout
my_w.columnconfigure(0, weight=1)
my_w.columnconfigure(1, weight=1)
my_w.rowconfigure(0, weight=1)
my_w.rowconfigure(1, weight=1)

# Add an Interactive Meter Widget
meter = ttk.Meter(
    my_w,
    bootstyle="success",
    interactive=True,
    amountused=40,
    amounttotal=100,
    subtext="Interactive Meter"
)
meter.grid(row=0, column=0, padx=10, pady=10)

# Add a Floodgauge Widget
fg = ttk.Floodgauge(
    my_w,
    bootstyle="info",
    mask="Progress {}%",
    variable=meter.amountusedvar,  # Link Meter and Floodgauge
    maximum=100,
    length=200
)
fg.grid(row=0, column=1, padx=10, pady=10)

# Button to Start Floodgauge Animation
def start_gauge():
    fg.start()  # Start Floodgauge animation

btn = ttk.Button(my_w, text="Start Gauge", bootstyle="primary", command=start_gauge)
btn.grid(row=1, column=0, columnspan=2, pady=10)

# Label
label = ttk.Label(my_w, text="Welcome to My Custom Theme", bootstyle="info")
label.grid(row=2, column=0, columnspan=2, pady=10)

my_w.mainloop()
TTK Creator: Customize Your Tkinter Themes 🔝

TTK Creator is a GUI tool that allows users to design and customize themes for ttkbootstrap. With an intuitive interface, users can adjust colors, styles, and widget appearances to create personalized themes for Tkinter applications.
Installing TTK Creator
To use TTK Creator, install ttkbootstrap if you haven't already:
pip install ttkbootstrapLaunching TTK Creator
Run the following command in your terminal or command prompt:
python -m ttkcreatorThis will open the graphical interface where you can modify and preview themes.
Saving and Using Custom Themes
- Once satisfied with the design, save the theme. It will be stored inside the file
user.py - It will be stored in
C:\Users\YourUsername\.ttkbootstrap\themes\(Windows) or~/.ttkbootstrap/themes/(Linux/macOS). - Use the theme in your Tkinter projects by setting
themenamewhen initializingttk.Window.
Example: Applying a Custom Theme
import ttkbootstrap as ttk

root = ttk.Window(themename="my_theme_v1")
root.mainloop()
With TTK Creator, you can effortlessly enhance the appearance of your Tkinter applications with custom themes!
Going Further: Persistence
Want to learn how to save your custom themes so they load automatically next time? Check out our guide on:
Saving Settings with JSON or SQLiteInteractive Theme Switching: Toggling Dark and Light Modes 🔝
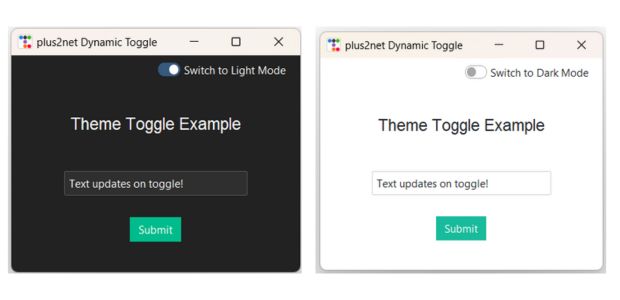
In this section, we will learn how to add a modern Dark Mode toggle to your application.
Instead of hard-coding colors for every widget, we will leverage the built-in themes of ttkbootstrap.
By using a round-toggle style Checkbutton, we can create a sleek, mobile-like switch
that updates the entire application's aesthetic instantly.
We will start with a simple implementation that switches between two popular built-in themes: 'flatly' (Light) and 'darkly' (Dark).
Key Features of this Implementation:
- Grid Layout: Ensures the toggle stays perfectly aligned in the top-right corner.
- Style Persistence: Uses
style.theme_use()to update all widgets (buttons, labels, entries) simultaneously. - User Interface: Utilizes the
round-togglebootstyle for a professional look and feel.
import ttkbootstrap as ttk
from ttkbootstrap.constants import *

def change_theme():
    # Toggle between 'darkly' and 'flatly' themes
    if var.get() == 1:
        style.theme_use("darkly")
        toggle.config(text="Switch to Light Mode")
    else:
        style.theme_use("flatly")
        toggle.config(text="Switch to Dark Mode")

# 1. Initialize the Window
root = ttk.Window(themename="flatly")
root.title("plus2net Dynamic Toggle")
root.geometry("400x300")

# Configure the grid weight so column 1 expands
root.columnconfigure(0, weight=1)
root.columnconfigure(1, weight=1)

style = ttk.Style()
var = ttk.IntVar(value=0)

# 2. Position the Toggle at Top-Right
toggle = ttk.Checkbutton(
    root,
    text="Switch to Dark Mode",
    variable=var,
    onvalue=1,
    offvalue=0,
    command=change_theme,
    bootstyle="round-toggle"
)
toggle.grid(row=0, column=1, padx=20, pady=10, sticky='e')

# 3. Main Content
label = ttk.Label(root, text="Theme Toggle Example", font=("Helvetica", 14))
label.grid(row=1, column=0, columnspan=2, pady=40)

entry = ttk.Entry(root, width=30)
entry.insert(0, "Text updates on toggle!")
entry.grid(row=2, column=0, columnspan=2, pady=10)

btn = ttk.Button(root, text="Submit", bootstyle="success")
btn.grid(row=3, column=0, columnspan=2, pady=20)

root.mainloop()
Handling Multi-Window Applications (Toplevel)
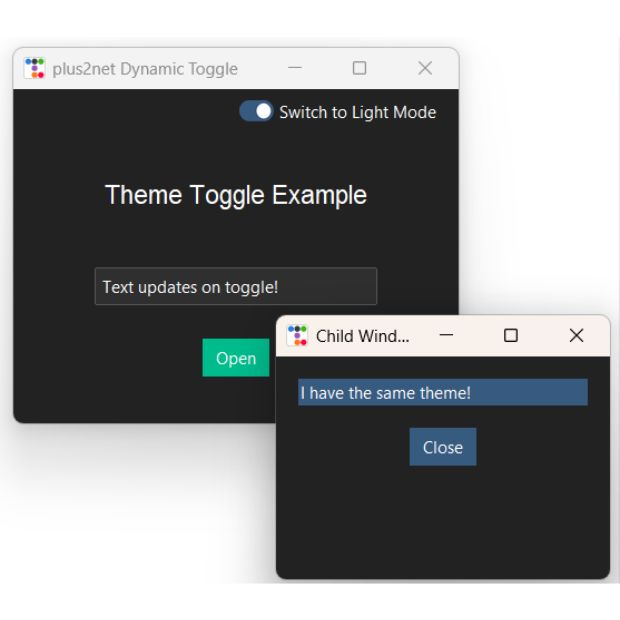
A common challenge when building professional applications is maintaining a consistent theme across multiple windows. When you open a Toplevel window in ttkbootstrap, you might find that the theme is missing or defaults back to standard Tkinter styles.
Style() instance in your second window. Since the Style object is a singleton, re-initializing it can reset your main window's theme or cause unexpected crashes.
The Correct Approach
To ensure your Toplevel windows inherit the same custom theme as your main window, you simply need to set the master relationship correctly and use the standard ttk widgets inside the popup.
def open_popup():
    # Create Toplevel and set the main window as the master
    top = ttk.Toplevel(master=root)
    top.title("Child Window")
    top.geometry("300x200")

    # Use ttkbootstrap widgets - they automatically inherit the parent's theme
    lbl = ttk.Label(top, text="I have the same theme!", bootstyle="inverse-primary")
    lbl.pack(pady=20, padx=20, fill="x")

    btn_close = ttk.Button(top, text="Close", command=top.destroy)
    btn_close.pack()
Why this works:
-
Inheritance: By passing
master=rootto theToplevelconstructor, the child window looks at the root's style configuration for all its drawing logic. -
No Style Conflicts: Because you aren't creating a second
ttk.Style()object, you prevent the library from trying to "re-apply" CSS-like rules, which keeps the memory usage low and the theme stable.
import ttkbootstrap as ttk
from ttkbootstrap.constants import *

def change_theme():
    # Toggle between 'darkly' and 'flatly' themes
    if var.get() == 1:
        style.theme_use("darkly")
        toggle.config(text="Switch to Light Mode")
    else:
        style.theme_use("flatly")
        toggle.config(text="Switch to Dark Mode")

# 1. Initialize the Window
root = ttk.Window(themename="flatly")
root.title("plus2net Dynamic Toggle")
root.geometry("400x300")

# Configure the grid weight so column 1 expands
root.columnconfigure(0, weight=1)
root.columnconfigure(1, weight=1)

style = ttk.Style()
var = ttk.IntVar(value=0)

# 2. Position the Toggle at Top-Right
toggle = ttk.Checkbutton(
    root,
    text="Switch to Dark Mode",
    variable=var,
    onvalue=1,
    offvalue=0,
    command=change_theme,
    bootstyle="round-toggle"
)
toggle.grid(row=0, column=1, padx=20, pady=10, sticky='e')

def open_popup():
    # Create Toplevel and set the main window as the master
    top = ttk.Toplevel(master=root)
    top.title("Child Window")
    top.geometry("300x200")

    # Use ttkbootstrap widgets - they automatically inherit the parent's theme
    lbl = ttk.Label(top, text="I have the same theme!", bootstyle="inverse-primary")
    lbl.pack(pady=20, padx=20, fill="x")

    btn_close = ttk.Button(top, text="Close", command=top.destroy)
    btn_close.pack()

# 3. Main Content
label = ttk.Label(root, text="Theme Toggle Example", font=("Helvetica", 14))
label.grid(row=1, column=0, columnspan=2, pady=40)

entry = ttk.Entry(root, width=30)
entry.insert(0, "Text updates on toggle!")
entry.grid(row=2, column=0, columnspan=2, pady=10)

btn = ttk.Button(root, text="Open", bootstyle="success", command=open_popup)
btn.grid(row=3, column=0, columnspan=2, pady=20)

root.mainloop()
Conclusion: Mastering Professional UI Styling
With ttkbootstrap, styling a Python application is no longer about manual pixel-tweaks; it's about creating a cohesive environment. By mastering theme toggling and understanding how styles inherit across multiple windows, you can build tools that look and feel like modern native software.
Dynamic UI
Switching themes at runtime keeps your application accessible and modern (Dark Mode vs. Light Mode).
Visual Consistency
By correctly using the master=root relationship, your popups and child windows will always match your primary theme.
Scalability
Using the singleton Style() object ensures your application remains memory-efficient, even with complex layouts.
Ready to make these themes permanent?
Learn to Save Theme Settings →
Subhendu Mohapatra
Author
🎥 Join me live on YouTubePassionate about coding and teaching, I publish practical tutorials on PHP, Python, JavaScript, SQL, and web development. My goal is to make learning simple, engaging, and project‑oriented with real examples and source code.
Subscribe to our YouTube Channel here

 Python Video Tutorials